FRONT DOOR SPEAKER INSTALLATION
CAUTION / NOTICE / HINT
Tech Tips
-
Use the same procedure for the RH and LH sides.
-
The procedure listed below is for the LH side.
PROCEDURE
-
INSTALL FRONT NO. 1 SPEAKER ASSEMBLY
Note
Do not touch the cone section of the front No. 1 speaker assembly
-
for LH Side:
-
Attach the guide and temporarily install the front No. 1 speaker assembly to the door panel.
-
Connect the connector.
-
Install the front No. 1 speaker assembly with the 4 screws.
Tech Tips
-
Tighten the screws in the order shown in the illustration.
-
When tightening the screws, make sure to press them.
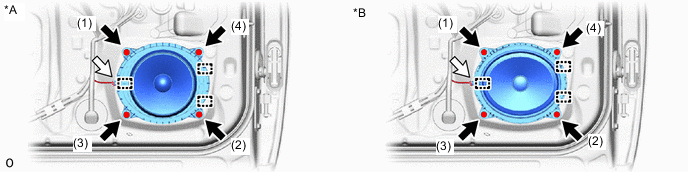
*A for 12 Speakers *B for 24 Speakers 
Screw 
Connector -
-
-
for RH Side:
-
Attach the guide and temporarily install the front No. 1 speaker assembly to the door panel.
-
Connect the connector.
-
Install the front No. 1 speaker assembly with the 4 screws.
Tech Tips
-
Tighten the screws in the order shown in the illustration.
-
When tightening the screws, make sure to press them.

*A for 12 Speakers *B for 24 Speakers Screw Connector -
-
-
-
INSTALL FRONT DOOR TRIM BOARD SUB-ASSEMBLY LH
-
INSTALL FRONT NO. 2 DOOR ARMREST COVER LH
-
INSTALL FRONT DOOR ARMREST COVER LH
-
INSTALL FRONT UPPER DOOR TRIM COVER LH
-
INSPECT FRONT DOOR TRIM BOARD SUB-ASSEMBLY