PROCEDURE
- Click here
INSTALL NO. 2 STEERING RACK BOOT
-
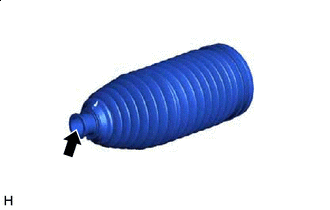

Lithium Soap Base Glycol Grease Apply lithium soap base glycol grease to the inside of the small opening of the No. 2 steering rack boot.
-
Install the No. 2 steering rack boot to the groove of the rack housing.
Note:
-
Be careful not to damage or twist the No. 2 steering rack boot.
-
Make sure that the No. 2 steering rack boot is free of rust and foreign matter.
-
Make sure that the boot is free of water, rust, foreign matter, etc.
-
Do not touch the inside of the rack boot or rack bar when performing installation.
-
-
- Click here
INSTALL NO. 1 STEERING RACK BOOT
Tip:Perform the same procedure as for the No. 2 steering rack boot.
- Click here
INSTALL NO. 2 STEERING RACK BOOT CLAMP (for LH Side)
-
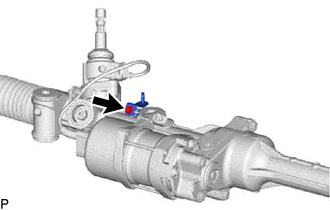
Temporarily install a new No. 2 steering rack boot clamp to the No. 2 steering rack boot.
Note:Do not damage the No. 2 steering rack boot.
Tip: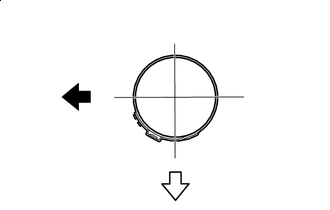
Front of Vehicle 
Under of Vehicle Make sure that the protrusion of the No. 2 steering rack boot clamp is positioned within the area shown in the illustration.
-
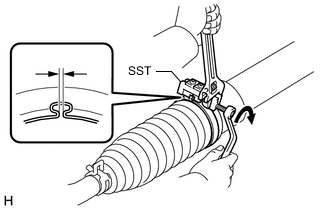
Using SST, install the No. 2 steering rack boot clamp as shown in the illustration.
09521-24010 Note:
-
Do not pinch the No. 2 steering rack boot clamp excessively.
-
Be careful not to damage or twist the No. 2 steering rack boot.
-
-
Remove SST and measure the clearance of the No. 2 steering rack boot clamp.
Clearance 2.5 to 4.0 mm (0.0984 to 0.157 in.)
-
- Click here
INSTALL NO. 2 STEERING RACK BOOT CLAMP (for RH Side)
Tip:Perform the same procedure as for the LH side.
- Click here
INSTALL STEERING RACK BOOT CLIP (for LH Side)
-
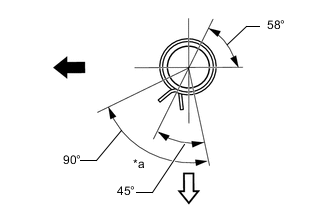
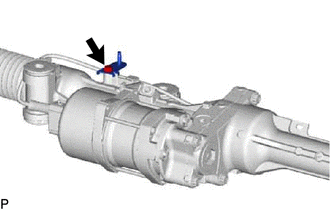
*a Clip Tab Positioning Area Front of Vehicle Under of Vehicle Using pliers, install the steering rack boot clip.
Tip:Make sure that the tabs of the clip are facing the rear of the vehicle.
-
- Click here
INSTALL STEERING RACK BOOT CLIP (for RH Side)
Tip:Perform the same procedure as for the LH side.
- Click here
INSPECT RACK AND PINION POWER STEERING GEAR ASSEMBLY
-
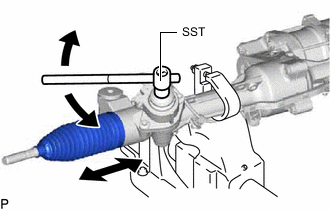
Using SST, turn the pinion shaft and check that the left and the right steering rack boots expand and contract smoothly.
09616-00011 If the operation cannot be performed as specified, use new steering rack boot clamps and reinstall the steering rack boots.
-
- Click here
INSTALL TIE ROD ASSEMBLY LH
-
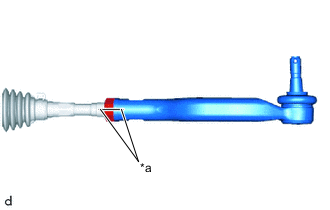
*a Matchmark Install the lock nut and tie rod assembly LH to the steering rack end sub-assembly until the matchmarks are aligned.
Tip:After adjusting toe-in, tighten the lock nut.
-
- Click here
INSTALL TIE ROD ASSEMBLY RH
Tip:Perform the same procedure as for the LH side.
- Click here
INSTALL WIRE HARNESS CLAMP BRACKET (for LHD)
-
Install the wire harness clamp bracket with the bolt.
9.0 N*m 92 kgf*cm 80 in.*lbf
-
- Click here
INSTALL WIRE HARNESS CLAMP BRACKET (for RHD)
-
Install the wire harness clamp bracket with the bolt.
9.0 N*m 92 kgf*cm 80 in.*lbf
-