CAUTION / NOTICE / HINT
The necessary procedures (adjustment, calibration, initialization or registration) that must be performed after parts are removed, installed or replaced during the rear side window curtain assembly removal/installation are shown below.
| Replacement Part or Procedure | Necessary Procedures | Effects / Inoperative when not Performed | Link |
|---|---|---|---|
| Disconnect cable from negative (-) auxiliary battery terminal | Memorize steering angle neutral point | LKA/LDA system (for Mono camera type) | for Mono Camera type: for Stereo Camera type: |
| Lane control system (for Stereo camera type) | |||
| Parking support brake system* | |||
| Pre-collision system (for Mono camera type) | |||
| Pre-collision system (for Stereo camera type) | |||
| Adaptive high beam system | |||
|
|||
| Variable gear ratio steering system | |||
| Parking assist monitor system | |||
| Panoramic View Monitor System | |||
| Initialize rear door sunshade system | Rear door sunshade system | ||
| Initialize power trunk lid system | Power trunk lid system | ||
|
Zero point calibration (Occupant classification system) |
|
-
Use the same procedure for RHD and LHD vehicles.
-
The procedure listed below is for LHD vehicles.
-
Use the same procedure for the RH and LH sides.
-
The procedure listed below is for the LH side.
PROCEDURE
- Click here
REMOVE CURTAIN SHIELD AIRBAG ASSEMBLY LH
- Click here
REMOVE REAR SIDE WINDOW CURTAIN ASSEMBLY LH
-


Bolt 
Connector Remove the 3 bolts.
-
Detach the clamp and disconnect the connector.
-
Detach the clip.
-
Pull in the removal direction (1) shown in the illustration to tilt the rear side window curtain assembly LH toward the center of the vehicle.
-
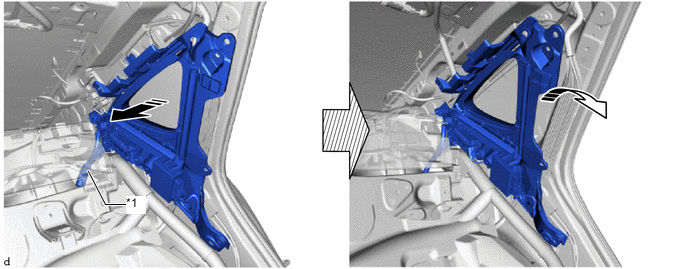
*1 Storage Tube - - 
Remove in this Direction (1) 
Remove in this Direction (2) Pull in the removal direction (2) shown in the illustration to pull out the storage tube and remove the rear side window curtain assembly LH.
-