HV BATTERY DISCHARGING

CAUTION / NOTICE / HINT
CAUTION:
It is possible that the voltage of the HV battery will be recovered. Therefore, dispose of the HV battery within 1 week of performing the HV battery stack discharge operation.
PROCEDURE
-
DISCHARGING (WHEN USING THE LI-ION BATTERY DISCHARGER)
CAUTION:
Be sure to wear insulated gloves and protective goggles.
Note
-
Set it in a secure, flat place.
-
Set it in a dry place protected from dust and water.
-
Set it in a position where illumination of the LED indicators can be observed.
-
Do not block the ventilation holes or cooling fans.
Make sure to observe the following points when using the Li-ion battery discharger.
-
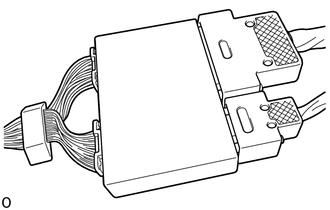
Select Li-ion battery connection cables
-
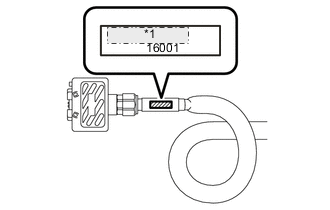
*1 TTDC TM4216-61 Confirm the type of the Li-ion battery connection cable as indicated by the tag shown in the illustration. (Type: TM4216-61)
-
-
Install Li-ion battery connection cable
-
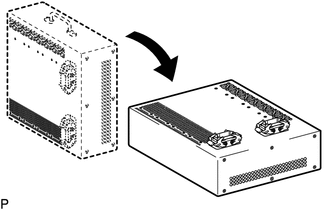
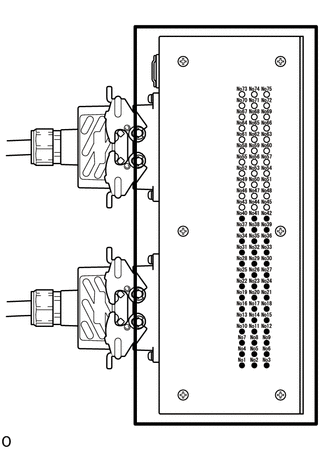
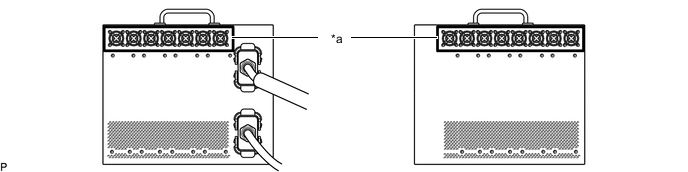
Set the Li-ion battery discharger as shown in the illustration.
-

*a Connector A Connect the Li-ion battery connection cable connector (A) to the Li-ion battery discharger connector (A).
Note
Make sure that the connector is connected securely.
-
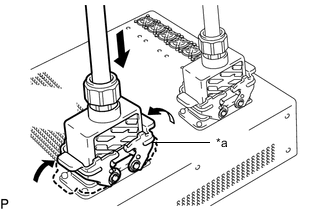
*a Connector B Connect the Li-ion battery connection cable connector (B) to the Li-ion battery discharger connector (B).
Note
Make sure that the connector is connected securely.
-
Set the Li-ion battery discharger as shown in the illustration.
Tech Tips
The Li-ion battery discharger is set on its side so that the ventilation holes will not be blocked.
-
-
Discharge the No. 1 HV supply stack sub-assembly.
-
Remove the upper HV battery cover panel.
-
Remove the No. 2 hybrid battery shield sub-assembly.
-
Remove the No. 1 hybrid battery shield sub-assembly.
-
Remove the upper No. 1 hybrid battery cover sub-assembly.
-
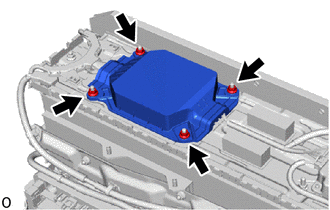
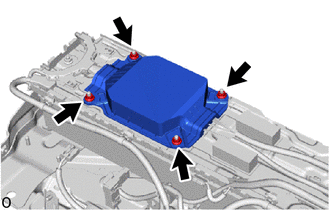
Remove the 4 nuts and No. 1 HV battery protector (for upper side).
-
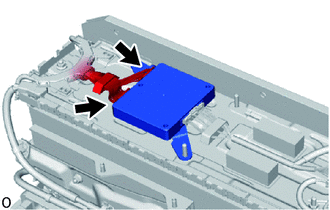
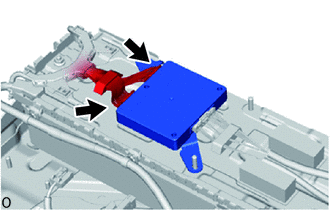
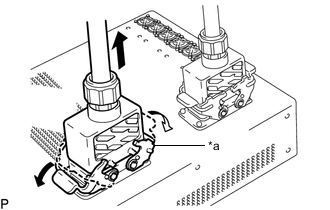
Disconnect the 2 high-voltage connectors (orange) from the battery voltage sensor (for upper side).
-
Connect the Li-ion battery connection cable connectors (orange) to the 2 high-voltage connectors (orange) of the No. 1 HV supply stack sub-assembly.
-
Confirm that all of the LED indicators are illuminated as shown in the following table.
CAUTION:
If all of the LED indicators of the Li-ion battery discharger listed in the following table are not illuminated, the HV battery cannot be discharged using the Li-ion battery discharger. Make sure to soak the HV battery in a salt water solution to complete discharging.
LED Indicator Illumination Status (When discharge has started normally) LED Indicator No. LED Indicator Illumination Status LED Indicator No. LED Indicator Illumination Status LED Indicator No. LED Indicator Illumination Status 1 Illuminated 2 Illuminated 3 Illuminated 4 Illuminated 5 Illuminated 6 Illuminated 7 Illuminated 8 Illuminated 9 Illuminated 10 Illuminated 11 Illuminated 12 Illuminated 13 Illuminated 14 Illuminated 15 Illuminated 16 Illuminated 17 Illuminated 18 Illuminated 19 Illuminated 20 Illuminated 21 Illuminated 22 Illuminated 23 Illuminated 24 Illuminated 25 Illuminated 26 Illuminated 27 Illuminated 28 Illuminated 29 Illuminated 30 Illuminated 31 Illuminated 32 Illuminated 33 Illuminated 34 Illuminated 35 Illuminated 36 Illuminated 37 Illuminated 38 Illuminated 39 Illuminated 40 Illuminated 41 Illuminated 42 Illuminated 43 Not illuminated 44 Not illuminated 45 Not illuminated 46 Not illuminated 47 Not illuminated 48 Not illuminated 49 Not illuminated 50 Not illuminated 51 Not illuminated 52 Not illuminated 53 Not illuminated 54 Not illuminated 55 Not illuminated 56 Not illuminated 57 Not illuminated 58 Not illuminated 59 Not illuminated 60 Not illuminated 61 Not illuminated 62 Not illuminated 63 Not illuminated 64 Not illuminated 65 Not illuminated 66 Not illuminated 67 Not illuminated 68 Not illuminated 69 Not illuminated 70 Not illuminated 71 Not illuminated 72 Not illuminated 73 Not illuminated 74 Not illuminated 75 Not illuminated -
Confirm that the cooling fans operate.
*a Cooling Fans - - Tech Tips
-
To discharge the HV battery completely, continue discharging for at least 1 hour after the LED indicators have turned off.
-
Discharge of a fully charged HV battery will complete within 5 hours (including 1 hour waiting time after the LED indicators have turned off).
-
-
Confirm discharge completion
-
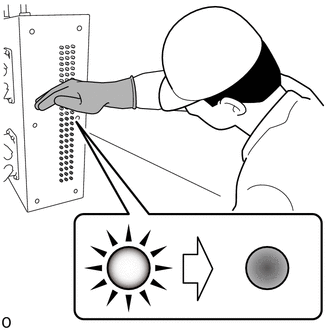
Confirm that all of the LED indicators of the Li-ion battery discharger have turned off.
Note
-
Create a shadow as shown in the illustration and visually check the LED lights from the front.
-
Check that the LED lights are completely off.
-
-
Continue to discharge the battery for 1 hour after all of the LED indicators of the Li-ion battery discharger have turned off.
-
-
Disconnect the Li-ion battery connection cable connector (orange) from the 2 high-voltage connectors (orange) of the No. 1 HV supply stack sub-assembly.
-
-
Discharge the No. 2 HV supply stack sub-assembly
-
Remove the hybrid battery terminal block.
-
Remove the No. 1 hybrid battery exhaust duct.
-
Remove the battery voltage sensor (for Upper Side).
-
Remove the battery ECU assembly.
-
Remove the No. 7 HV battery shield sub-assembly (for Upper Side).
-
Remove the No. 1 HV supply stack sub-assembly.
-
Remove the No. 8 hybrid battery intake duct.
-
Remove the wire harness clamp bracket.
-
Remove the battery cooling blower assembly.
-
Remove the No. 6 hybrid battery intake duct.
-
Remove the HV battery junction block assembly.
-
Remove the upper HV battery carrier sub-assembly.
-
Remove the 4 nuts and No. 1 HV battery protector (for lower side).
-
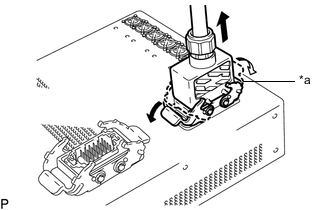
Disconnect the 2 high-voltage connectors (orange) from the battery voltage sensor (for lower side).
-
Connect the Li-ion battery connection cable connectors (orange) to the 2 high-voltage connectors (orange) of the No. 2 HV supply stack sub-assembly.
-
Confirm that all of the LED indicators are illuminated as shown in the following table.
CAUTION:
If all of the LED indicators of the Li-ion battery discharger listed in the following table are not illuminated, the HV battery cannot be discharged using the Li-ion battery discharger. Make sure to soak the HV battery in a salt water solution to complete discharging.
LED Indicator Illumination Status (When discharge has started normally) LED Indicator No. LED Indicator Illumination Status LED Indicator No. LED Indicator Illumination Status LED Indicator No. LED Indicator Illumination Status 1 Illuminated 2 Illuminated 3 Illuminated 4 Illuminated 5 Illuminated 6 Illuminated 7 Illuminated 8 Illuminated 9 Illuminated 10 Illuminated 11 Illuminated 12 Illuminated 13 Illuminated 14 Illuminated 15 Illuminated 16 Illuminated 17 Illuminated 18 Illuminated 19 Illuminated 20 Illuminated 21 Illuminated 22 Illuminated 23 Illuminated 24 Illuminated 25 Illuminated 26 Illuminated 27 Illuminated 28 Illuminated 29 Illuminated 30 Illuminated 31 Illuminated 32 Illuminated 33 Illuminated 34 Illuminated 35 Illuminated 36 Illuminated 37 Illuminated 38 Illuminated 39 Illuminated 40 Illuminated 41 Illuminated 42 Illuminated 43 Not illuminated 44 Not illuminated 45 Not illuminated 46 Not illuminated 47 Not illuminated 48 Not illuminated 49 Not illuminated 50 Not illuminated 51 Not illuminated 52 Not illuminated 53 Not illuminated 54 Not illuminated 55 Not illuminated 56 Not illuminated 57 Not illuminated 58 Not illuminated 59 Not illuminated 60 Not illuminated 61 Not illuminated 62 Not illuminated 63 Not illuminated 64 Not illuminated 65 Not illuminated 66 Not illuminated 67 Not illuminated 68 Not illuminated 69 Not illuminated 70 Not illuminated 71 Not illuminated 72 Not illuminated 73 Not illuminated 74 Not illuminated 75 Not illuminated -
Confirm that the cooling fans operate.
*a Cooling Fans - - Tech Tips
-
To discharge the HV battery completely, continue discharging for at least 1 hour after the LED indicators have turned off.
-
Discharge of a fully charged HV battery will complete within 5 hours (including 1 hour waiting time after the LED indicators have turned off).
-
-
Confirm discharge completion
-
Confirm that all of the LED indicators of the Li-ion battery discharger have turned off.
Note
-
Create a shadow as shown in the illustration and visually check the LED lights from the front.
-
Check that the LED lights are completely off.
-
-
Continue to discharge the battery for 1 hour after all of the LED indicators of the Li-ion battery discharger have turned off.
-
-
Disconnect the Li-ion battery connection cable connector (orange) from the 2 high-voltage connectors (orange) of the No. 2 HV supply stack sub-assembly.
-
-
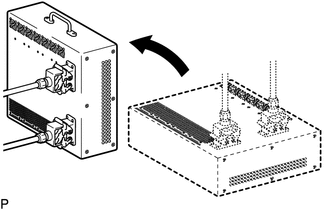
Remove Li-ion battery connection cable
-

Set the Li-ion battery discharger as shown in the illustration.
-
*a Connector B Disconnect the Li-ion battery connection cable connector (B) from the Li-ion battery discharger connector (B).
-
*a Connector A Disconnect the Li-ion battery connection cable connector (A) from the Li-ion battery discharger connector (A).
-
-
-
DISCHARGING (WHEN USING THE SALT WATER SOLUTION)
CAUTION:
Be sure to wear insulated gloves and protective goggles.
Note
-
When discharging using salt water solution, first add a measured amount of water to the container, and then add the concentrated salt water solution.
-
Calculate the salt water concentration based on the measured volume of water in the container so that a 1% salt water solution will be made after adding the concentrated salt water solution to the water in the container where HV battery is set.
-
Prepare HV battery
-
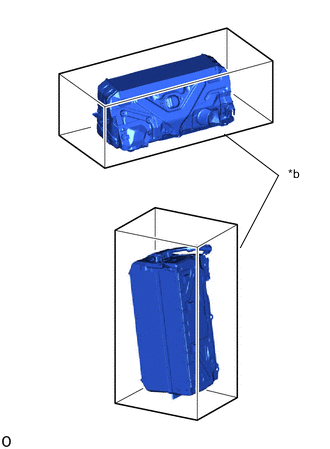
*a Example *b Container A Set the HV battery in the container (A).
-
-
Prepare to discharge (Add water to container)
-
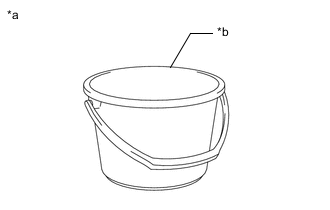
*a Example *b Container B Measure the water capacity of the container (B).
Tech Tips
Water capacity of the container (B) is assumed as X (liter).
-
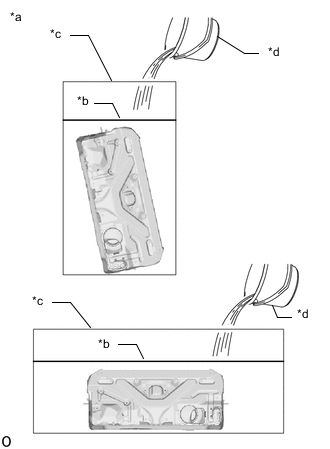
*a Example *b Water Surface *c Container A *d Container B Using the container (B), add water to the container (A) until the HV battery is completely submerged.
Note
Make sure to record the times the container (B) was filled with water to add water to the container (A).
-
Using the following formula, calculate the amount of water added to the container (A).
Amount of water added to the container (A) Y (liter) = Water capacity of the container (B) x Number of times the container (B) was filled with water to submerge the HV battery Tech Tips
Amount of water added to the container (A) is assumed as Y (liter).
-
-
Prepare salt water solution
-
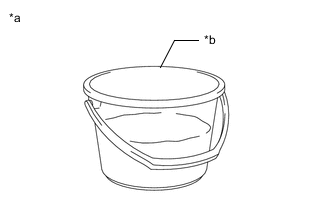
*a Example *b Container B While measuring the amount of water, fill about half of the container (B) with water.
Tech Tips
Amount of water added to the container (B) is assumed as Z (liter).
-
Calculate the amount of salt to be added to the container (A) so that a 1% salt water solution will be made.
Amount of Salt Amount of salt (kg) = (Y (liter) + Z (liter)) x 0.01 -
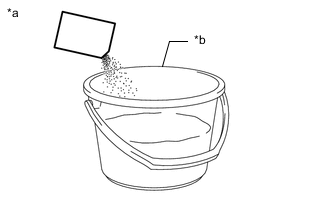
*a Example *b Container B Add the calculated amount of salt to the container (B) and stir it thoroughly.
-
-
Add salt water solution
-
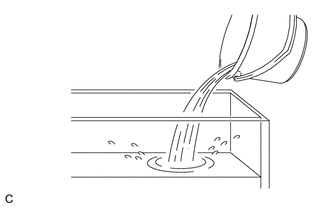
Add the concentrated salt water solution to the container (A).
-
-
Discharge
-
Leave the HV battery as is for 24 hours or more until discharge is complete.
CAUTION:
-
Do not place a lid on the container.
-
Make sure to leave the HV battery and container as is for 24 hours or more.
-
Display a warning sign to inform others that discharge is being performed.
-
-
-
Confirm discharge completion
-
Check that bubbles are not forming in the container.
Note
If bubbles are forming, discharge may not be completed yet. Do not place a lid on the container.
-
-
Display a warning sign such as "DO NOT TOUCH! (DISCHARGE BEING PERFORMED) to inform others. Make a copy of the warning sign and place it near the HV battery being discharged.
-