ROCKER PANEL MOULDING REASSEMBLY
CAUTION / NOTICE / HINT
Tech Tips
-
Use the same procedure for the RH and LH sides.
-
The procedure listed below is for the LH side.
PROCEDURE
-
INSTALL NO. 2 REAR BODY NAME PLATE
-
INSTALL REAR BUMPER PAD
Tech Tips
When installing the rear bumper pad, heat the body rocker panel moulding assembly LH.
Standard Item Temperature Body Rocker Panel Moulding Assembly LH 20 to 30°C (68 to 86°F)
-
Clean the rear bumper pad installation surface with a non-residue solvent.
-
Remove the peeling paper on a new rear bumper pad while making sure not to touch the adhesional surface.
-

*a Mark-off Line Install the rear bumper pad in the position shown in the illustration.
Note
Press the rear bumper pad firmly to install it.
-
-
INSTALL NO. 2 SIDE MUDGUARD PROTECTOR
Tech Tips
When installing the No. 2 side mudguard protector, heat the body rocker panel moulding assembly LH.
Standard Item Temperature Body Rocker Panel Moulding Assembly LH 20 to 30°C (68 to 86°F)
-
Clean the No. 2 side mudguard protector installation surface with a non-residue solvent.
-
Remove the peeling paper on a new No. 2 side mudguard protector while making sure not to touch the adhesional surface.
-
Align the 2 No. 2 side mudguard protectors to the end of vehicle front side rib and install it.
-
for Front Side:
*a Rib - - -
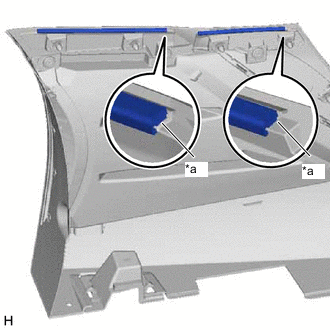
*a Rib for Rear Side:
-
-
-
INSTALL NO. 6 ROCKER PANEL MOULDING PROTECTOR
Tech Tips
When installing the No. 6 rocker panel moulding protector, heat the body rocker panel moulding assembly LH.
Standard Item Temperature Body Rocker Panel Moulding Assembly LH 20 to 30°C (68 to 86°F) CAUTION:
-
Do not touch the heat light and heated parts.
-
Touching the heat light may result in burns.
-
Touching heated parts for a long time may result in burns.
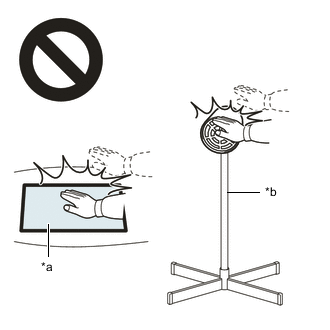
*a Heated Part *b Heat Light
-
Clean the No. 6 rocker panel moulding protector installation surface with a non-residue solvent.
-
Remove the peeling paper on a new No. 6 rocker panel moulding protector while making sure not to touch the adhesional surface.
-
Install the No. 6 rocker panel moulding protector in the position shown in the illustration.
*a R End - - Note
Press the rear bumper pad firmly to install it.
-
-
INSTALL NO. 2 ROCKER PANEL MOULDING PROTECTOR
Tech Tips
When installing the No. 2 rocker panel moulding protector, heat the body rocker panel moulding assembly LH.
Standard Item Temperature Body Rocker Panel Moulding Assembly LH 20 to 30°C (68 to 86°F) CAUTION:
-
Do not touch the heat light and heated parts.
-
Touching the heat light may result in burns.
-
Touching heated parts for a long time may result in burns.
*a Heated Part *b Heat Light
-
Clean the No. 2 rocker panel moulding protector installation surface with a non-residue solvent.
-
Remove the peeling paper on a new No. 2 rocker panel moulding protector while making sure not to touch the adhesional surface.
-
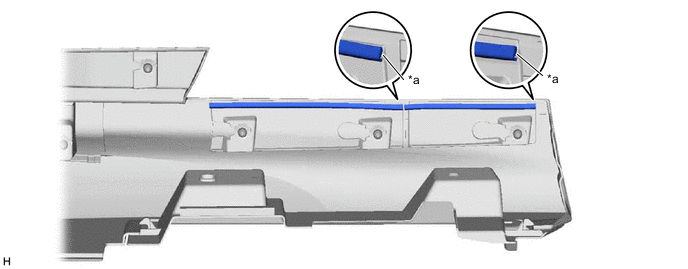
Install the 2 No. 2 rocker panel moulding protectors in the position shown in the illustration.
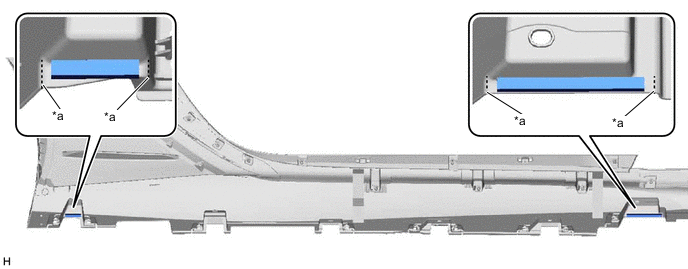
*a Mark-off Line - -
-
-
INSTALL NO. 1 ROCKER PANEL MOULDING PROTECTOR
Tech Tips
When installing the No. 1 rocker panel moulding protector, heat the body rocker panel moulding assembly LH.
Standard Item Temperature Body Rocker Panel Moulding Assembly LH 20 to 30°C (68 to 86°F) CAUTION:
-
Do not touch the heat light and heated parts.
-
Touching the heat light may result in burns.
-
Touching heated parts for a long time may result in burns.
*a Heated Part *b Heat Light
-
Clean the No. 1 rocker panel moulding protector installation surface with a non-residue solvent.
-
Remove the peeling paper on a new No. 1 rocker panel moulding protector while making sure not to touch the adhesional surface.
-
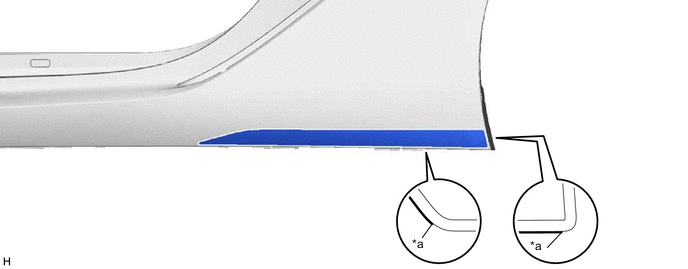
Install the 2 No. 1 rocker panel moulding protectors in the position shown in the illustration.
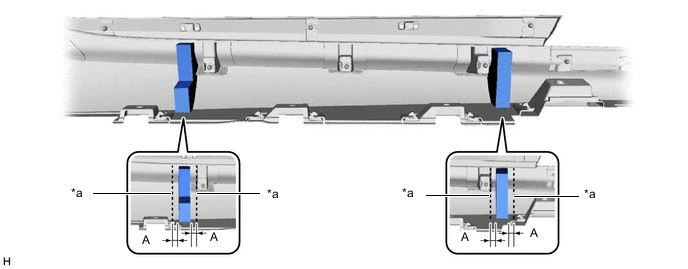
*a Mark-off Line - - Standard: Area Specified Condition Area Specified Condition A 10 mm (0.394 in.) - - Note
Press the rear bumper pad firmly to install it.
-