NAME PLATE INSTALLATION
PROCEDURE
-
INSTALL SYMBOL EMBLEM
Tech Tips
When installing the symbol emblem, heat the luggage compartment door panel and symbol emblem using a heat light.
Standard Item Temperature Luggage Compartment Door Panel 40 to 60°C (104 to 140°F) Symbol Emblem 20 to 30°C (68 to 86°F)
-
Clean the luggage compartment door panel surface.
-
Using a heat light, heat the luggage compartment door panel surface.
-
Remove the double-sided tape from the luggage compartment door panel.
-
Wipe off any tape adhesive residue with cleaner.
-
-
Using a heat light, heat the luggage compartment door panel and a new symbol emblem.
-
Remove the peeling paper from the face of the symbol emblem.
Tech Tips
After removing the peeling paper, keep the exposed adhesive free from foreign matter.
-

*a Boss Align the boss positions and install the symbol emblem.
Tech Tips
Press the symbol emblem firmly to install it.
-
-
INSTALL NO. 3 LUGGAGE COMPARTMENT DOOR PLATE
Tech Tips
When installing the No. 3 luggage compartment door plate, heat the rear bumper cover and No. 3 luggage compartment door plate using a heat light.
Standard Item Temperature Rear Bumper Cover 20 to 30°C (68 to 86°F) No. 3 Luggage Compartment Door Plate
-
Clean the rear bumper cover surface.
-
Using a heat light, heat the rear bumper cover surface.
-
Remove the double-sided tape from the rear bumper cover.
-
Wipe off any tape adhesive residue with cleaner.
-
-
Using a heat light, heat the rear bumper cover and a new No. 3 luggage compartment door plate.
-
Remove the peeling paper from the face of the No. 3 luggage compartment door plate.
Tech Tips
After removing the peeling paper, keep the exposed adhesive free from foreign matter.
-
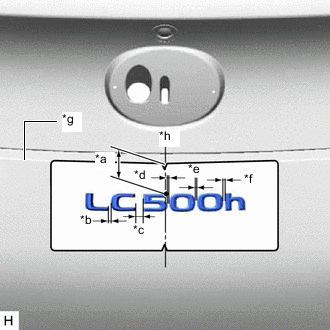
*a 27 mm (1.063 in.) *b 2.147 mm (0.085 in.) *c 7.192 mm (0.283 in.) *d 1.598 mm (0.063 in.) *e 1.809 mm (0.071 in.) *f 2.195 mm (0.086 in.) *g R End *h Center of the Luggage Compartment Door Panel Install the No. 3 luggage compartment door plate as shown in the illustration.
Tech Tips
Press the No. 3 luggage compartment door plate firmly to install it.
-
-
INSTALL NO. 2 REAR BODY NAME PLATE
Tech Tips
When installing the No. 2 rear body name plate, heat the body rocker panel moulding assembly LH and No. 2 rear body name plate using a heat light.
Standard Item Temperature Body Rocker Panel Moulding Assembly LH 20 to 30°C (68 to 86°F) No. 2 Rear Body Name Plate CAUTION:
-
Do not touch the heat light and heated parts.
-
Touching the heat light may result in burns.
-
Touching heated parts for a long time may result in burns.
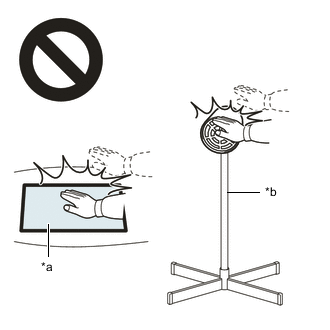
*a Heated Part *b Heat Light
-
Clean the body rocker panel moulding assembly LH surface.
-
Using a heat light, heat the body rocker panel moulding assembly LH surface.
-
Remove the double-sided tape from the body rocker panel moulding assembly LH.
-
Wipe off any tape adhesive residue with cleaner.
-
-
Using a heat light, heat the body rocker panel moulding assembly LH and a new No. 2 rear body name plate.
-
Remove the peeling paper from the face of the No. 2 rear body name plate.
Tech Tips
After removing the peeling paper, keep the exposed adhesive free from foreign matter.
-
Install the No. 2 rear body name plate as shown in the illustration.
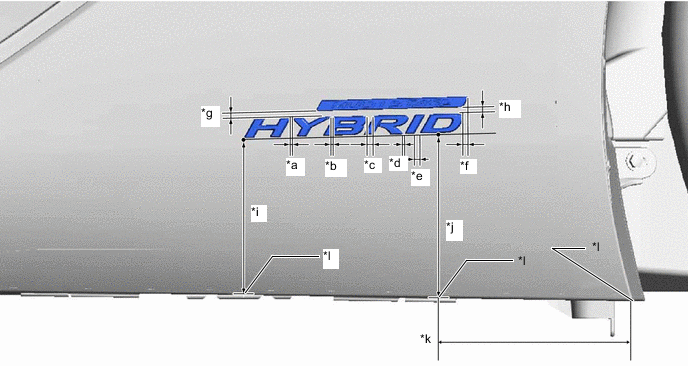
*a 1.4 mm (0.055 in.) *b 1.6 mm (0.063 in.) *c 5.6 mm (0.220 in.) *d 1.7 mm (0.067 in.) *e 4.4 mm (0.173 in.) *f 4.5 mm (0.177 in.) *g 5.0 mm (0.197 in.) *h 5.2 mm (0.205 in.) *i 138.7 mm (5.461 in.) *j 142 mm (5.591 in.) *k 170.8 mm (6.724 in.) *l R End Tech Tips
Press the No. 2 rear body name plate firmly to install it.
-
-
INSTALL NO. 1 REAR BODY NAME PLATE
Tech Tips
When installing the No. 1 rear body name plate, heat the body rocker panel moulding assembly RH and No. 1 rear body name plate using a heat light.
Standard Item Temperature Body Rocker Panel Moulding Assembly RH 20 to 30°C (68 to 86°F) No. 1 Rear Body Name Plate CAUTION:
-
Do not touch the heat light and heated parts.
-
Touching the heat light may result in burns.
-
Touching heated parts for a long time may result in burns.
*a Heated Part *b Heat Light
-
Clean the body rocker panel moulding assembly RH surface.
-
Using a heat light, heat the body rocker panel moulding assembly RH surface.
-
Remove the double-sided tape from the body rocker panel moulding assembly RH.
-
Wipe off any tape adhesive residue with cleaner.
-
-
Using a heat light, heat the body rocker panel moulding assembly RH and a new No. 1 rear body name plate.
-
Remove the peeling paper from the face of the No. 1 rear body name plate.
Tech Tips
After removing the peeling paper, keep the exposed adhesive free from foreign matter.
-
Install the No. 1 rear body name plate as shown in the illustration.
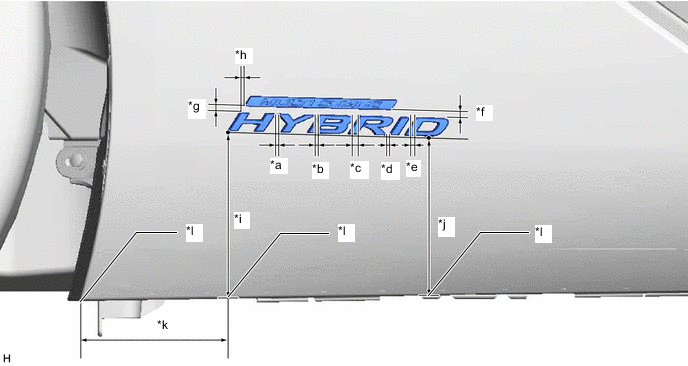
*a 1.4 mm (0.055 in.) *b 1.6 mm (0.063 in.) *c 5.6 mm (0.220 in.) *d 1.7 mm (0.067 in.) *e 4.3 mm (0.169 in.) *f 5.2 mm (0.205 in.) *g 5.0 mm (0.197 in.) *h 3.7 mm (0.146 in.) *i 142.7 mm (5.618 in.) *j 139.4 mm (5.488 in.) *k 118.3 mm (4.657 in.) *l R End Tech Tips
Press the No. 1 rear body name plate firmly to install it.
-