LUGGAGE COMPARTMENT DOOR WEATHERSTRIP INSTALLATION
PROCEDURE
-
INSTALL LUGGAGE COMPARTMENT DOOR WEATHERSTRIP
-
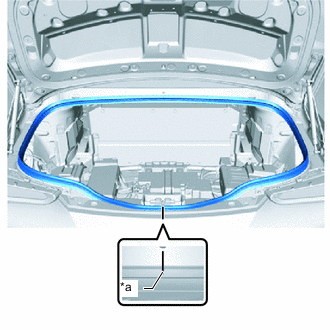
*a Joint Align the joint of a new luggage compartment door weatherstrip with the luggage compartment door lock and install the luggage compartment door weatherstrip.
Note
After the installation, check that the corners are properly installed.
Tech Tips
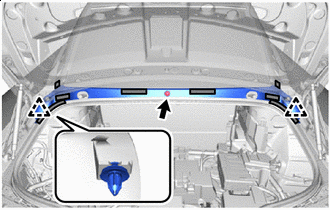
To easily install the luggage compartment door weatherstrip, first install the area with the paint mark as shown in the illustration. Then install the part toward the corners and push any excess length into the corners.
-
-
INSTALL LOWER OUTSIDE BACK WINDOW MOULDING
Tech Tips
When installing the lower outside back window moulding, heat the upper back panel sub-assembly and lower outside back window moulding using a heat light.
Standard Item Temperature Upper Back Panel Sub-assembly 40 to 60°C (104 to 140°F) Lower Outside Back Window Moulding 20 to 30°C (68 to 86°F) CAUTION:
-
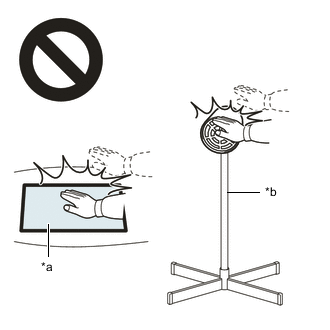
Do not touch the heat light and heated parts.
-
Touching the heat light may result in burns.
-
Touching heated parts for a long time may result in burns.
*a Heated Part *b Heat Light
-
Clean the upper back panel sub-assembly surface.
-
Using a heat light, heat the upper back panel sub-assembly surface.
-
Remove the double-sided tape from the upper back panel sub-assembly.
-
Wipe off any tape adhesive residue with cleaner.
-
-
Using a heat light, heat the upper back panel sub-assembly and a new lower outside back window moulding.
-
Remove the peeling paper from the face of a new lower outside back window moulding.
Tech Tips
After removing the peeling paper, keep the exposed adhesive free from foreign matter.
-

Double-sided Tape Attach the clips to install the lower outside back window moulding.
Tech Tips
Press the lower outside back window moulding firmly to install it.
-
Install the clip.
-
-
INSTALL LUGGAGE COMPARTMENT DOOR HINGE COVER LH
Tech Tips
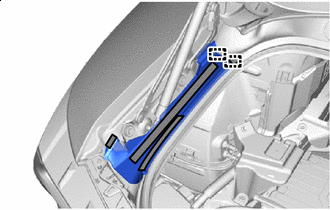
When installing the luggage compartment door hinge cover LH, heat the front luggage door opening trough sub-assembly LH and luggage compartment door hinge cover LH using a heat light.
Standard Item Temperature Front Luggage Door Opening Trough Sub-assembly LH 40 to 60°C (104 to 140°F) Luggage Compartment Door Hinge Cover LH 20 to 30°C (68 to 86°F) CAUTION:
-
Do not touch the heat light and heated parts.
-
Touching the heat light may result in burns.
-
Touching heated parts for a long time may result in burns.
*a Heated Part *b Heat Light
-
Clean the front luggage door opening trough sub-assembly LH surface.
-
Using a heat light, heat the front luggage door opening trough sub-assembly LH surface.
-
Remove the double-sided tape from the front luggage door opening trough sub-assembly LH.
-
Wipe off any tape adhesive residue with cleaner.
-
-
Remove the peeling paper from the face of a new luggage compartment door hinge cover LH.
Tech Tips
After removing the peeling paper, keep the exposed adhesive free from foreign matter.
-
Double-sided Tape Attach the guides to install the luggage compartment door hinge cover LH.
Tech Tips
Press the luggage compartment door hinge cover LH firmly to install it.
-
-
INSTALL LUGGAGE COMPARTMENT DOOR HINGE COVER RH
Tech Tips
Use the same procedure described for the LH side.
-
INSTALL UPPER NO. 1 LUGGAGE COMPARTMENT COVER LH
Tech Tips
When installing the upper No. 1 luggage compartment cover LH, heat the front luggage door opening trough sub-assembly LH and upper No. 1 luggage compartment cover LH using a heat light.
Standard Item Temperature Front Luggage Door Opening Trough Sub-assembly LH 40 to 60°C (104 to 140°F) Upper No. 1 Luggage Compartment Cover LH 20 to 30°C (68 to 86°F) CAUTION:
-
Do not touch the heat light and heated parts.
-
Touching the heat light may result in burns.
-
Touching heated parts for a long time may result in burns.
*a Heated Part *b Heat Light
-
Clean the front luggage door opening trough sub-assembly LH surface.
-
Using a heat light, heat the front luggage door opening trough sub-assembly surface.
-
Remove the double-sided tape from the front luggage door opening trough sub-assembly LH.
-
Wipe off any tape adhesive residue with cleaner.
-
-
Remove the peeling paper from the face of a new upper No. 1 luggage compartment cover LH.
Tech Tips
After removing the peeling paper, keep the exposed adhesive free from foreign matter.
-

Double-sided Tape Attach the clips to install the upper No. 1 luggage compartment cover LH.
Tech Tips
Press the upper No. 1 luggage compartment cover LH firmly to install it.
-
-
INSTALL UPPER NO. 1 LUGGAGE COMPARTMENT COVER RH
Tech Tips
Use the same procedure described for the LH side.
-
INSTALL UPPER QUARTER WINDOW MOULDING LH
-
INSTALL UPPER QUARTER WINDOW MOULDING RH
Tech Tips
Use the same procedure described for the LH side.
-
INSTALL REAR COMBINATION LIGHT BODY BRACKET LH
-
Install the rear combination light body bracket LH with the 2 screws.
-
-
INSTALL REAR COMBINATION LIGHT BODY BRACKET RH
Tech Tips
Use the same procedure described for the LH side.
-
INSTALL REAR BUMPER COVER
-
INSTALL WIRE HARNESS GROMMET
-
INSTALL NO. 4 LUGGAGE ROOM WIRE
-
INSTALL LUGGAGE COMPARTMENT DOOR COVER
-
INSTALL LUGGAGE COMPARTMENT DOOR ASSIST GRIP
-
INSTALL INNER LUGGAGE COMPARTMENT TRIM COVER LH
-
INSTALL INNER LUGGAGE COMPARTMENT TRIM COVER RH
-
INSTALL FRONT LUGGAGE COMPARTMENT TRIM COVER
-
INSTALL NO. 1 LUGGAGE COMPARTMENT LIGHT ASSEMBLY
-
INSTALL LUGGAGE COMPARTMENT TRIM BOX
-
INSTALL REAR FLOOR FINISH PLATE
-
INSTALL SIDE TRIM BOX
-
INSTALL LUGGAGE COMPARTMENT TRIM COVER LH
-
INSTALL LUGGAGE COMPARTMENT TRIM COVER RH
-
INSTALL NO. 1 DECK BOARD
-
INSTALL NO. 2 DECK BOARD