LUGGAGE COMPARTMENT DOOR WEATHERSTRIP REMOVAL
PROCEDURE
-
REMOVE NO. 1 DECK BOARD
-
REMOVE NO. 2 DECK BOARD
-
REMOVE LUGGAGE COMPARTMENT TRIM COVER LH
-
REMOVE LUGGAGE COMPARTMENT TRIM COVER RH
-
REMOVE SIDE TRIM BOX
-
REMOVE REAR FLOOR FINISH PLATE
-
REMOVE LUGGAGE COMPARTMENT TRIM BOX
-
REMOVE NO. 1 LUGGAGE COMPARTMENT LIGHT ASSEMBLY
-
REMOVE FRONT LUGGAGE COMPARTMENT TRIM COVER
-
REMOVE INNER LUGGAGE COMPARTMENT TRIM COVER LH
-
REMOVE INNER LUGGAGE COMPARTMENT TRIM COVER RH
-
REMOVE LUGGAGE COMPARTMENT DOOR ASSIST GRIP
-
REMOVE LUGGAGE COMPARTMENT DOOR COVER
-
REMOVE NO. 4 LUGGAGE ROOM WIRE
-
REMOVE WIRE HARNESS GROMMET
-
REMOVE REAR BUMPER COVER
-
REMOVE REAR COMBINATION LIGHT BODY BRACKET LH
-
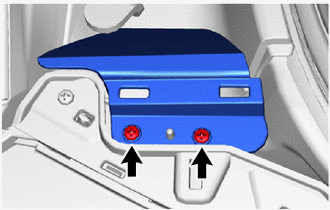
Remove the 2 screws and rear combination light body bracket LH.
-
-
REMOVE REAR COMBINATION LIGHT BODY BRACKET RH
Tech Tips
Use the same procedure described for the LH side.
-
REMOVE UPPER QUARTER WINDOW MOULDING LH
-
REMOVE UPPER QUARTER WINDOW MOULDING RH
Tech Tips
Use the same procedure described for the LH side.
-
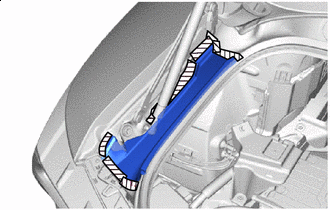
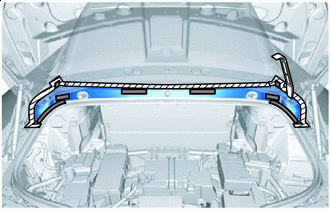
REMOVE UPPER NO. 1 LUGGAGE COMPARTMENT COVER LH
Tech Tips
When removing the upper No. 1 luggage compartment cover LH, heat the upper No. 1 luggage compartment cover LH using a heat light.
Standard Item Temperature Upper No. 1 Luggage Compartment Cover LH 20 to 30°C (68 to 86°F) CAUTION:
-
Do not touch the heat light and heated parts.
-
Touching the heat light may result in burns.
-
Touching heated parts for a long time may result in burns.
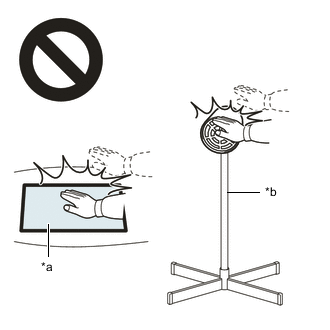
*a Heated Part *b Heat Light
-
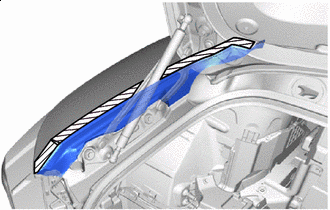

Protective Tape Apply protective tape at the position as shown in the illustration.
-
Protective Tape 
Double-sided Tape Using moulding remover A, scrape off the double-sided tape that holds and detach the claws and remove the upper No. 1 luggage compartment cover LH.
-
-
REMOVE UPPER NO. 1 LUGGAGE COMPARTMENT COVER RH
Tech Tips
Use the same procedure described for the LH side.
-
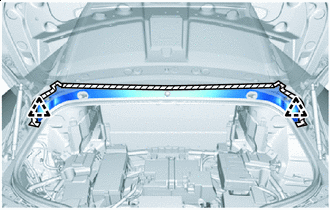
REMOVE LUGGAGE COMPARTMENT DOOR HINGE COVER LH
Tech Tips
When removing the luggage compartment door hinge cover LH, heat the luggage compartment door hinge cover LH using a heat light.
Standard Item Temperature Luggage Compartment Door Hinge Cover LH 20 to 30°C (68 to 86°F) CAUTION:
-
Do not touch the heat light and heated parts.
-
Touching the heat light may result in burns.
-
Touching heated parts for a long time may result in burns.
*a Heated Part *b Heat Light
-
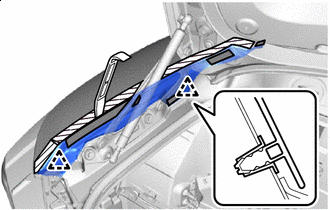
Protective Tape Apply protective tape at the position as shown in the illustration.
-
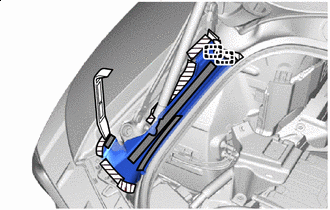
Protective Tape Double-sided Tape Using moulding remover A, scrape off the double-sided tape that holds and detach the guides and remove the luggage compartment door hinge cover LH.
-
-
REMOVE LUGGAGE COMPARTMENT DOOR HINGE COVER RH
Tech Tips
Use the same procedure described for the LH side.
-
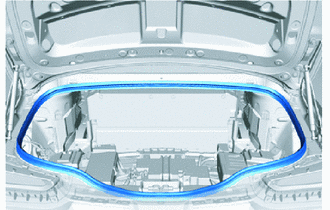
REMOVE LOWER OUTSIDE BACK WINDOW MOULDING
Tech Tips
When removing the lower outside back window moulding, heat the lower outside back window moulding using a heat light.
Standard Item Temperature Lower Outside Back Window Moulding 20 to 30°C (68 to 86°F) CAUTION:
-
Do not touch the heat light and heated parts.
-
Touching the heat light may result in burns.
-
Touching heated parts for a long time may result in burns.
*a Heated Part *b Heat Light
-
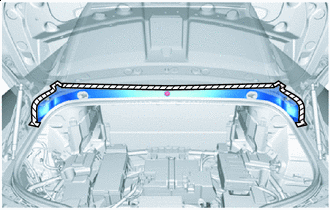
Protective Tape Apply protective tape at the position as shown in the illustration.
-
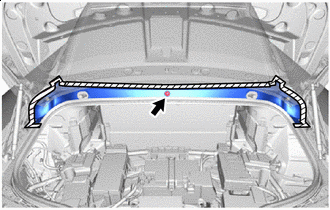
Protective Tape Using a clip remover, remove the clip.
-
Protective Tape Double-sided Tape Using moulding remover A, scrape off the double-sided tape that holds.
-
Protective Tape Detach the clips and remove the lower outside back window moulding.
-
-
REMOVE LUGGAGE COMPARTMENT DOOR WEATHERSTRIP
-
Remove the luggage compartment door weatherstrip.
-
Clean the vehicle body.
-