FRONT SEAT ASSEMBLY REASSEMBLY

CAUTION / NOTICE / HINT
CAUTION:
-
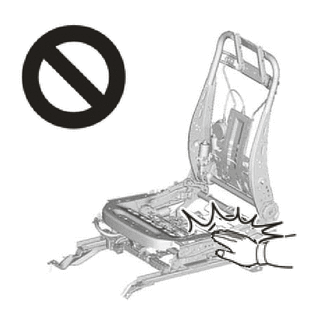
Wear protective gloves. Sharp areas on the parts may injure your hands.
-
There is risk of injury.
Tech Tips
-
Use the same procedure for RHD and LHD vehicles.
-
The procedure listed below is for LHD vehicles.
-
Use the same procedure for the RH side and LH side.
-
The following procedure is for the LH side.
PROCEDURE
-
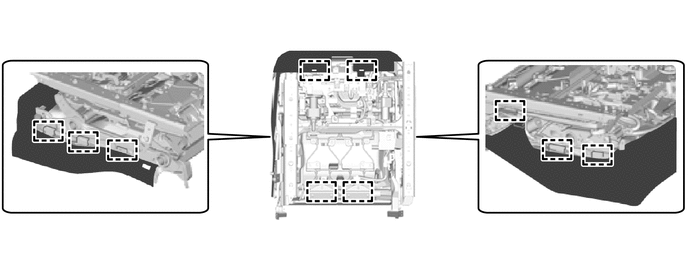
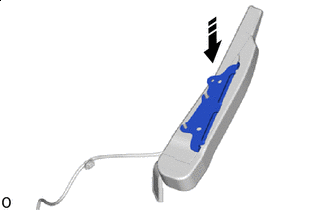
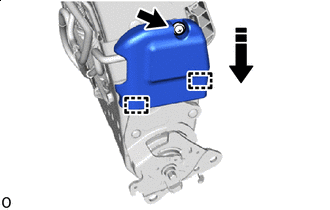
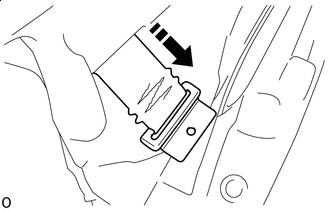
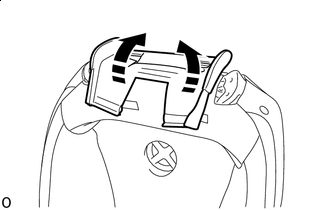
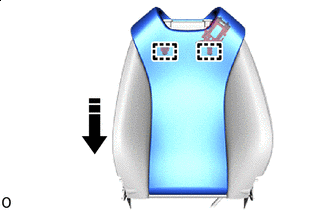
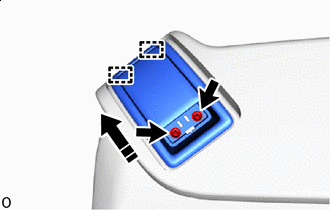
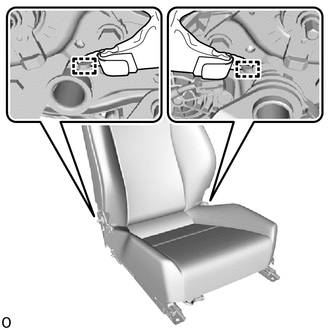
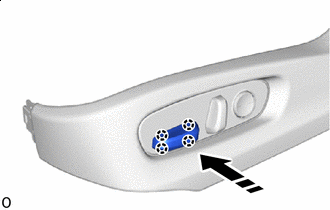
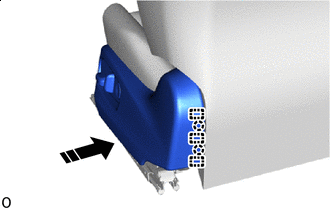
INSTALL UPPER NO. 3 SEAT TRACK COVER
-
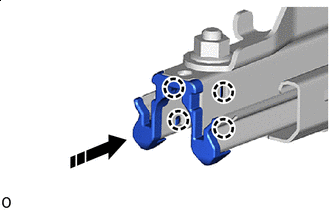

Install in this Direction Slide in the installation direction shown in the illustration and attach the claws to install the upper No. 3 seat track cover.
-
-
INSTALL UPPER NO. 4 SEAT TRACK COVER
Tech Tips
Use the same procedure described for the upper No. 3 seat track cover.
-
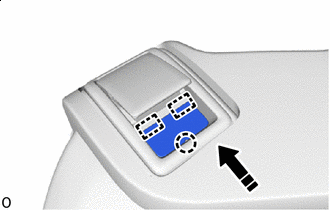
INSTALL UPPER SEAT TRACK RAIL COVER LH
-
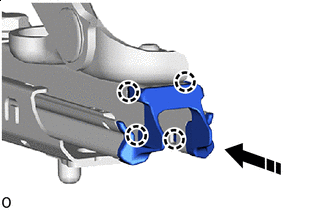
Install in this Direction Slide in the installation direction shown in the illustration and attach the claws to install the upper seat track rail cover LH.
-
-
INSTALL UPPER SEAT TRACK RAIL COVER RH
Tech Tips
Use the same procedure described for the LH side.
-
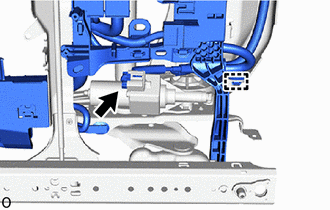
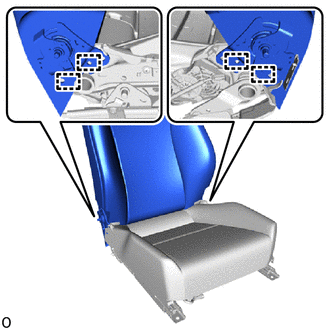
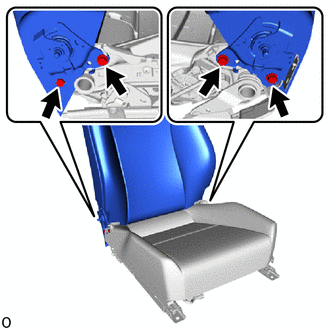
INSTALL POWER SEAT TILT MOTOR ASSEMBLY LH
-
INSTALL POWER SEAT LIFTER MOTOR ASSEMBLY LH
-
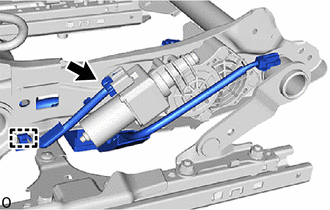
INSTALL SEAT SLIDE POSITION SENSOR PROTECTOR (for Driver Seat)
-
INSTALL SEAT POSITION AIRBAG SENSOR (for Driver Seat)
-
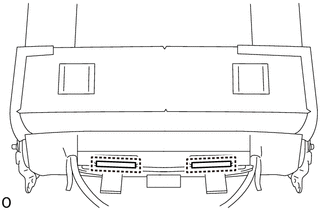
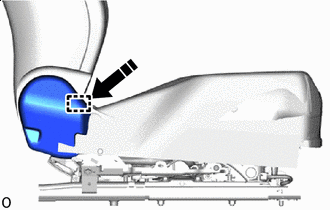
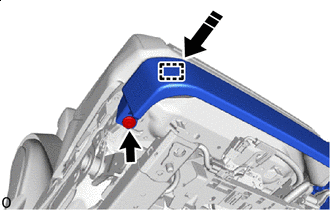
INSTALL FRONT LOWER SEAT CUSHION SHIELD
-
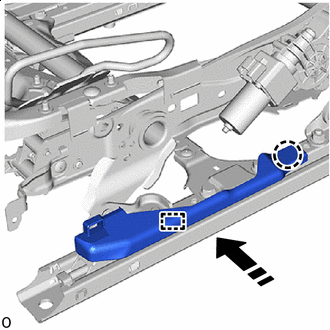
Install in this Direction Slide in the installation direction shown in the illustration to attach the guide.
-
Attach the claw and install the front lower seat cushion shield.
-
-
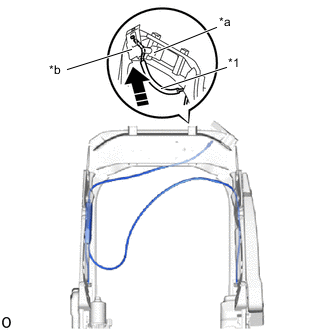
INSTALL FRONT NO. 2 SEAT WIRE LH (for Driver Seat)
-
Attach the claw and install the connector.
-
Attach the wire harness clamp and install the front No. 2 seat wire LH to the front seat cushion wire harness holder LH.
-
-
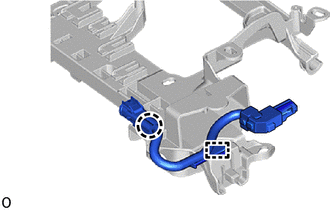
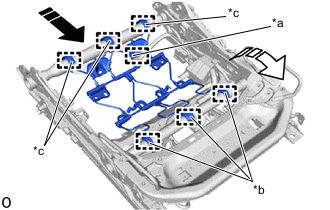
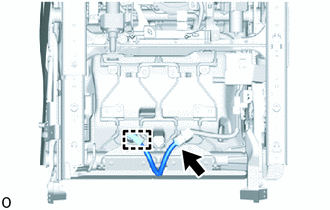
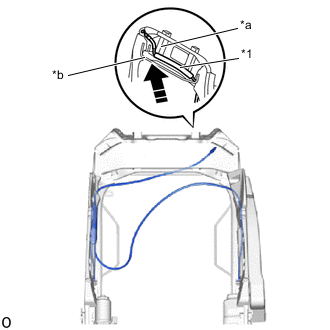
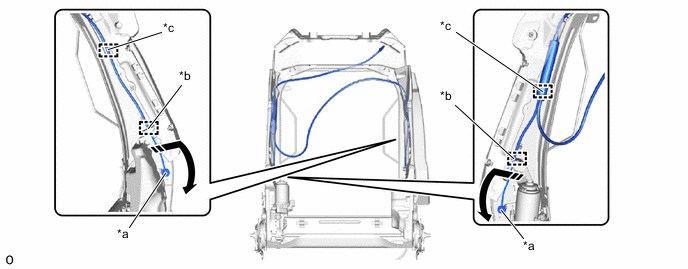
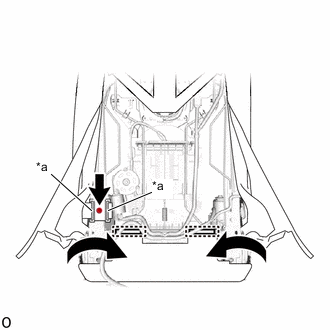
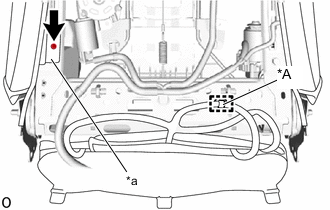
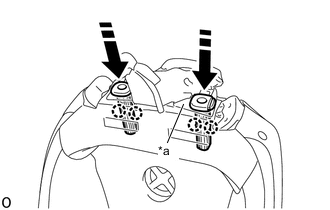
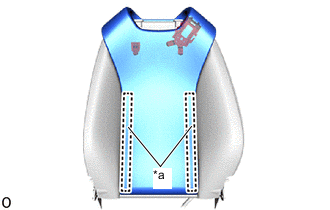
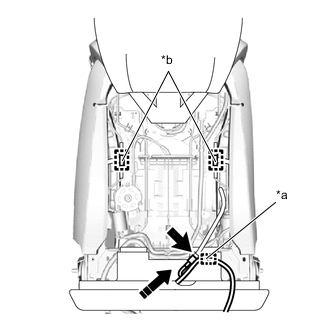
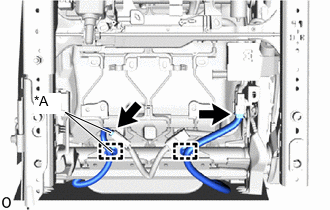
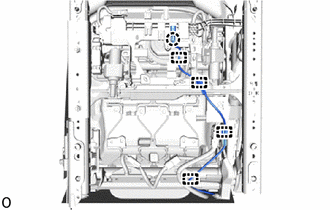
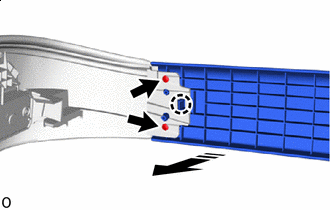
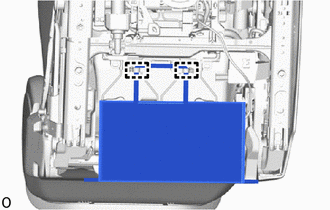
INSTALL FRONT SEAT WIRE LH
-
*a Under the front seat cushion wire harness holder LH Attach the claws and install the 2 connectors in the order shown in the illustration.
-
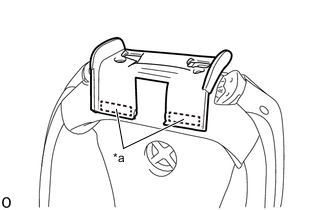
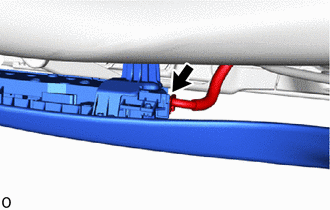
Attach the wire harness clamps and install the front seat wire LH to the front seat cushion wire harness holder LH.
Note
Pass the wire harness indicated in the illustration under the front seat cushion wire harness holder LH.
-
-
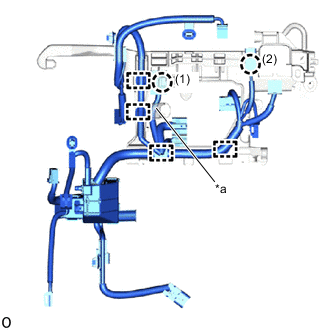
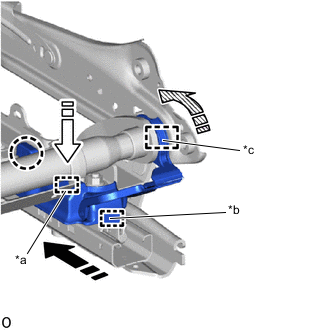
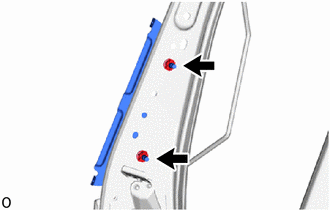
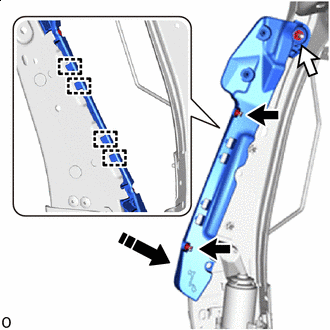
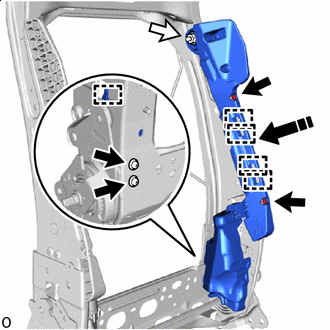
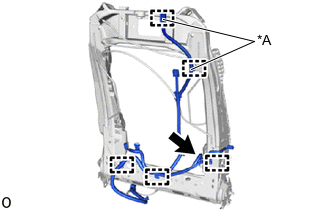
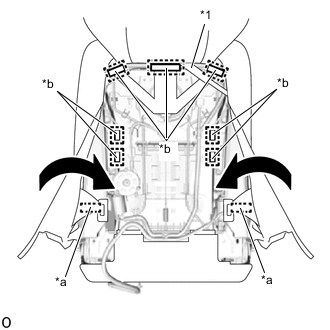
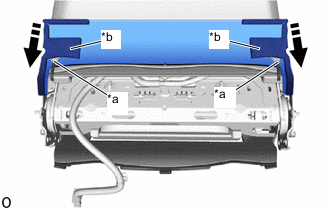
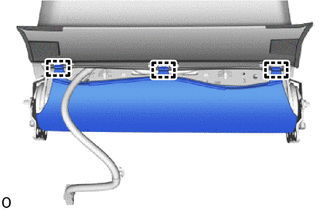
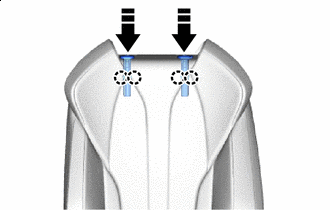
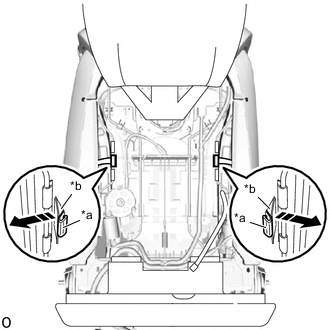
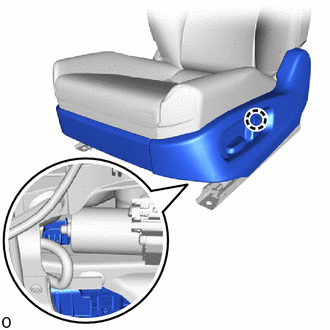
INSTALL FRONT SEAT CUSHION WIRE HARNESS HOLDER LH
-
*a Wire Harness Clamp *b Guide Install in this Direction Slide in the installation direction shown in the illustration to attach the guides and claw.
-
Install the front seat cushion wire harness holder LH with the 2 screws.
-
Install the wire harness clamps.
-
*A for Driver Seat for Driver Seat:
-
Connect the 2 connectors.
-
-
for Front Passenger Seat:
-
Connect the connector.
-
-
Connect the connector and attach the wire harness clamp.
-
Connect the connector and attach the wire harness clamp.
-
-
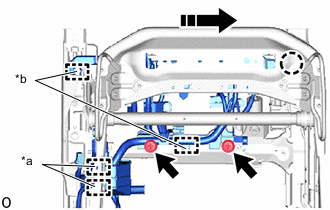
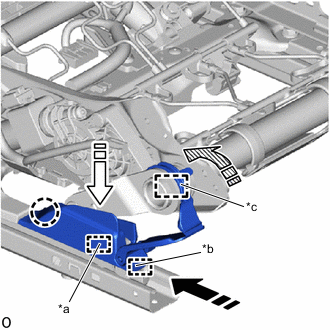
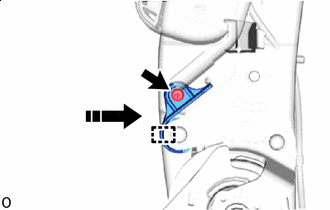
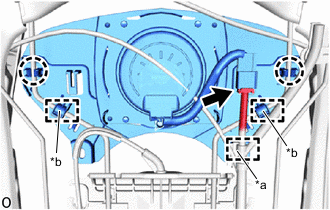
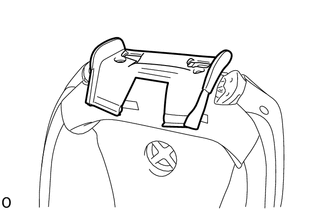
INSTALL FRONT SEAT CUSHION SPRING SUB-ASSEMBLY LH
-
*a Wire Harness Clamp *b Hook A *c Hook B Install in this Direction (1) 
Install in this Direction (2) Push in the installation direction (1) shown in the illustration and attach hook B.
-
Push in the installation direction (2) shown in the illustration to attach hook A and install the front seat cushion spring sub-assembly LH.
-
Attach the wire harness clamp.
-
-
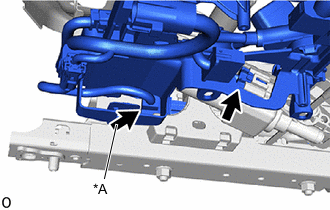
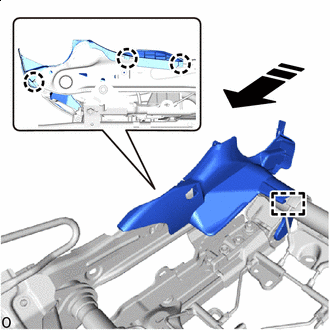
INSTALL FRONT LOWER SEAT CUSHION SHIELD LH
-
*a Guide A *b Guide B *c Hook Install in this Direction (1) Install in this Direction (2) 
Install in this Direction (3) Slide in the installation direction (1) shown in the illustration to attach guide B.
-
Push in the installation direction (2) shown in the illustration to attach guide A and claw.
-
Push in the installation direction (3) shown in the illustration to attach the hook and install the front lower seat cushion shield LH.
-
-
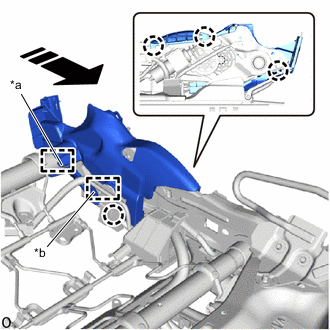
INSTALL FRONT LOWER SEAT CUSHION SHIELD LH
-
*a Guide A *b Guide B *c Hook Install in this Direction (1) Install in this Direction (2) Install in this Direction (3) Slide in the installation direction (1) shown in the illustration to attach guide B.
-
Push in the installation direction (2) shown in the illustration to attach guide A and claw.
-
Push in the installation direction (3) shown in the illustration to attach the hook and install the front lower seat cushion shield LH.
-
-
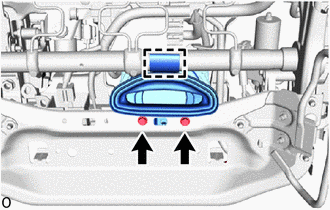
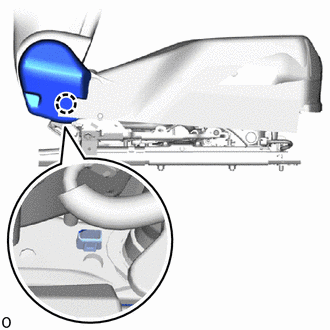
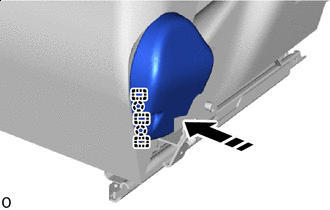
INSTALL RECLINING ADJUSTER INSIDE COVER LH
-
Install in this Direction Push in the installation direction shown in the illustration to attach the hook and claws and install the reclining adjuster inside cover LH.
-
-
INSTALL RECLINING ADJUSTER INSIDE COVER LH
-
*a Hook *b Wire Harness Clamp Install in this Direction Push in the installation direction shown in the illustration to attach the hook and claws and install the reclining adjuster inside cover LH.
-
Attach the claw and install the connector to the reclining adjuster inside cover LH.
-
Attach the wire harness clamp.
-
-
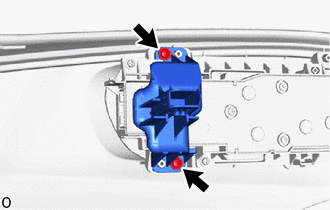
INSTALL SEAT CUSHION CLIMATE CONTROL BLOWER ASSEMBLY LH
-
Attach the hook.
-
Install the seat cushion climate control blower assembly LH with the 2 bolts.
- Torque:
- 3.2 N*m { 33 kgf*cm, 28 in.*lbf }
-
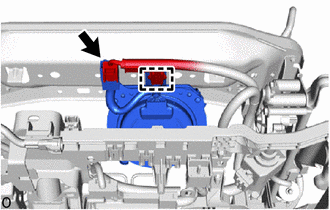
Connect the connector and attach the wire harness clamp.
-
-
INSTALL FRONT SEAT CUSHION HEATER ASSEMBLY LH (for Standard Seat Type)
-
INSTALL SEPARATE TYPE FRONT SEAT CUSHION COVER (for Standard Seat Type)
-
Attach the hooks and install the separate type front seat cushion cover to the separate type front seat cushion pad.
Note
Be careful not to damage the separate type front seat cushion cover.
-
-
INSTALL SEPARATE TYPE FRONT SEAT CUSHION COVER WITH PAD (for Standard Seat Type)
-
Install in this Direction Set the separate type front seat cushion cover with pad on the front seat adjuster assembly LH.
-
for Front Passenger Seat:
-
Attach the claw and install the connector of the occupant detection sensor.
-
-
Attach the hooks.
-
w/ Seat Heater System:
-
Attach the wire harness clamp and connect the connector.
-
-
-
INSTALL FRONT SEAT CUSHION PAD WITH COVER LH (for Sports Seat Type)
Tech Tips
Use the same procedure described for the separate type front seat cushion cover with pad.
-
INSTALL FRONT SEATBACK SUPPORT BRACKET RH
-
Install the front seatback support bracket RH with the 2 nuts.
- Torque:
- 5.5 N*m { 56 kgf*cm, 49 in.*lbf }
-
-
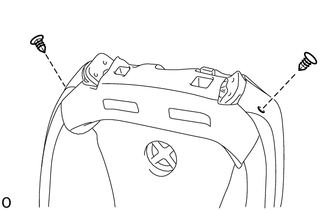
INSTALL FRONT SEATBACK SUPPORT RH
-

Screw 
Nut Install in this Direction Attach the guides.
-
Install the 2 screws.
-
Install the front seatback support RH with the nut.
- Torque:
- 5.5 N*m { 56 kgf*cm, 49 in.*lbf }
-
-
INSTALL FRONT SEAT SIDE SUPPORT BRACKET LH
-
Install in this Direction Install the front seat side support bracket LH to the front seat airbag assembly LH.
-
-
INSTALL FRONT SEAT AIRBAG ASSEMBLY LH
-
INSTALL FRONT SEATBACK SUPPORT LH
-
Screw Nut Install in this Direction Attach the guides.
-
Install the 4 screws.
-
Install the front seatback support LH with the nut.
- Torque:
- 5.5 N*m { 56 kgf*cm, 49 in.*lbf }
-
-
INSTALL RECLINING COVER PROTECTOR LH
-
Install in this Direction Slide in the installation direction shown in the illustration to attach the hook.
-
Install the reclining cover protector LH with the screw.
-
-
INSTALL RECLINING ADJUSTER EQUALIZING CABLE ASSEMBLY LH
-
for Standard Seat Type:
-
*1 Reclining Adjuster Equalizing Cable Assembly LH *a Upper Frame *b Wire Install in this Direction Pass the reclining adjuster equalizing cable assembly LH between the upper frame and wire of the front seatback frame sub-assembly LH.
-
-
for Sports Seat Type:
-
*1 Reclining Adjuster Equalizing Cable Assembly LH *a Upper Frame *b Lever Bracket Install in this Direction Pass the reclining adjuster equalizing cable assembly LH between the upper frame and lever bracket of the front seatback frame sub-assembly LH.
-
-
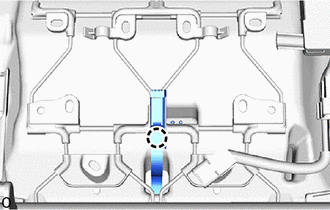
Insert the cable ends of the reclining adjuster equalizing cable assembly LH into the hole of the front seatback frame sub-assembly LH and turn in the installation direction shown in the illustration to lock it.
*a Cable End *b Cable Clamp *c Clamp - - Install in this Direction - - -
Attach the cable clamps and clamps.
-
-
INSTALL FRONT NO. 2 SEAT WIRE LH
-
*A for Standard Seat Type Attach the wire harness clamps, connect the connector and install the front No. 2 seat wire LH.
-
-
INSTALL FRONT SEATBACK EDGE PROTECTOR
-
INSTALL FRONT SEATBACK HOOK
-
INSTALL LUMBAR SUPPORT ADJUSTER ASSEMBLY LH
-
INSTALL SEATBACK CLIMATE CONTROL BLOWER LH
-
*a Wire Harness Clamp *b Hook Attach the claws and hooks and install the seatback climate control blower LH.
-
Connect the connector and attach the wire harness clamp.
-
-
INSTALL LIMIT SWITCH ASSEMBLY
-
INSTALL SEAT RECLINING ADJUSTER INSIDE COVER LH
-
Install in this Direction Slide in the installation direction shown in the illustration to attach the guides.
-
Install the seat reclining adjuster inside cover LH with the screw.
-
-
INSTALL SEAT COVER WIRE (for Standard Seat Type)
-
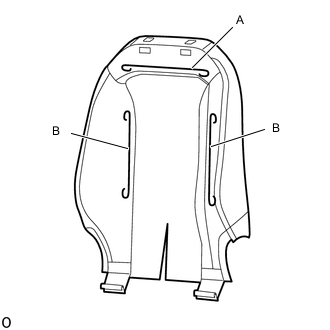
Install the 3 seat cover wires.
Tech Tips
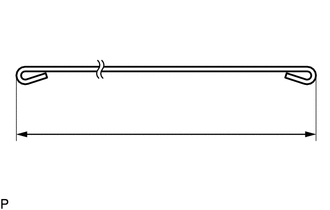
-
Wire 1000 mm (3.28 ft.) or longer and shaped wire are available as supplied parts.
-
For wire 1000 mm (3.28 ft.) or less in length, cut or shape 1000 mm (3.28 ft.) wire into the dimensions shown in the illustration.
-
Make sure to read the precautions before preparing the wire.
Length A 280 mm (11.02 in.) B 330 mm (1.08 ft.) Tech Tips
The dimensions shown in the illustration are the length.
-
-
-
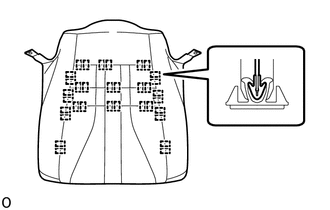
INSTALL SEPARATE TYPE FRONT SEATBACK COVER (for Standard Seat Type)
Tech Tips
When installing a separate type front seatback cover, refer to Precaution in order to prevent wrinkles from forming.
-
Set the separate type front seatback cover on the separate type front seatback pad.
-
Using hog ring pliers, install the separate type front seatback cover to the separate type front seatback pad with 9 new hog rings in the order indicated in the illustration.
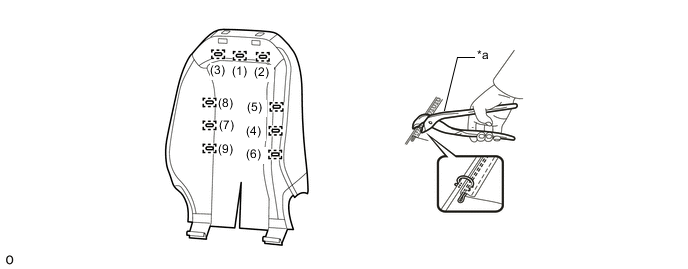
*a Hog Ring Pliers - - Note
-
Be careful not to damage the separate type front seatback cover.
-
Be sure to securely install the hog rings as shown in the illustration while preventing wrinkles from forming on the separate type front seatback cover.
-
-
Install in this Direction Pass the bracket of the separate type front seatback cover through the hole on the separate type front seatback pad.
-
-
INSTALL SEPARATE TYPE FRONT SEATBACK COVER WITH PAD (for Standard Seat Type)
-
Set the separate type front seatback cover with pad on the front seatback frame sub-assembly LH.
-
Fold back the separate type front seatback pad.
-
*a Bracket Attach the hooks.
-
Install the 2 brackets of the separate type front seatback cover with a new nut.
- Torque:
- 5.5 N*m { 56 kgf*cm, 49 in.*lbf }
Note
-
Be sure to wrap the front seat airbag assembly LH with the bracket when installing.
-
Check that the band is not twisted after installing the bracket.
-
If the bracket is not securely installed, the front seat airbag assembly LH may not deploy properly. For this reason, the bracket must be securely installed.
-
Return the separate type front seatback pad.
-
*1 Reclining Adjuster Equalizing Cable Assembly LH *a Fastening Tape *b Hook Attach the hooks.
Note
Set the reclining adjuster equalizing cable assembly LH so that it passes through the position shown in the illustration (between the upper hooks).
-
Fold back the separate type front seatback cover and attach the fastening tape.
-
Return the separate type front seatback cover.
-
Install the 2 clips.
-
-
INSTALL FRONT SEATBACK PAD WITH COVER LH (for Sports Seat Type)
-
Set the front seatback pad with cover LH on the front seatback frame sub-assembly LH.
-
*A w/ Seat Heater System *a Bracket w/ Seat Heater System:
-
Attach the wire harness clamp.
-
-
Install the bracket with a new nut.
- Torque:
- 5.5 N*m { 56 kgf*cm, 49 in.*lbf }
Note
-
Be sure to wrap the front seat airbag assembly LH with the bracket when installing.
-
Check that the band is not twisted after installing the bracket.
-
If the bracket is not securely installed, the front seat airbag assembly LH may not deploy properly. For this reason, the bracket must be securely installed.
-
*a Fastener *b Pocket Close in this Direction Close the fasteners and insert them into the pockets.
-
Attach the hooks.
-
-
INSTALL FRONT UPPER SEATBACK COVER SUB-ASSEMBLY LH (for Standard Seat Type)
-
Set the front upper seatback cover sub-assembly LH on the separate type front seatback cover.
Tech Tips
Do not attach the fastening tape at this time.
-
-
INSTALL FRONT SEAT HEADREST SUPPORT (for Standard Seat Type)
-
Fold in this Direction Fold back the front upper seatback cover sub-assembly LH.
-
*a Plate Install in this Direction Attach the claws and install the 2 front seat headrest supports.
Note
Be sure to insert the headrest support above the plate.
-
*a Fastening Tape Attach the fastening tape of the front upper seatback cover sub-assembly LH.
-
-
INSTALL FRONT SEAT HEADREST SUPPORT (for Sports Seat Type)
-
Install in this Direction Attach the claws and install the 2 front seat headrest supports.
-
-
INSTALL FRONT SEATBACK SUB-ASSEMBLY LH (for Standard Seat Type)
-
Install in this Direction Push in the installation direction shown in the illustration to attach the hooks and temporarily install the front seatback sub-assembly LH.
-
*a Hook *b Hole Install in this Direction Fold back the separate type front seatback cover.
-
Pass the hooks through the hole on the separate type front seatback cover.
-
*a Fastening Tape Attach the fastening tape.
-
Attach the hooks.
-
Fold back the front upper seatback cover sub-assembly LH and install the 2 bolts.
- Torque:
- 5.5 N*m { 56 kgf*cm, 49 in.*lbf }
-
Fold back the front upper seatback cover sub-assembly LH and install the 2 bolts.
- Torque:
- 5.5 N*m { 56 kgf*cm, 49 in.*lbf }
-
Fold back the front upper seatback cover sub-assembly LH and install the bolt.
- Torque:
- 5.5 N*m { 56 kgf*cm, 49 in.*lbf }
-
Return the front upper seatback cover sub-assembly LH.
-
*a Wire Harness Clamp *b Hook Install in this Direction w/ Seat Heater System:
-
Pass the wire harness of the front seatback sub-assembly LH through the hole on the separate type front seatback cover.
-
Connect the connector and attach the wire harness clamp.
-
-
Attach the hooks.
-
Close in this Direction Return the separate type front seatback cover and close the fasteners.
-
Attach the hooks.
-
-
INSTALL FRONT SEATBACK POCKET BAND
-
Set a new front seatback pocket band on the front seatback sub-assembly LH.
-
*a Magnetic Button *b Cap Install in this Direction Push in the installation direction shown in the illustration to lock the cap.
-
Attach the magnetic button.
-
-
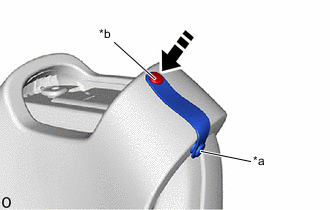
INSTALL RECLINING REMOTE CONTROL LEVER SUB-ASSEMBLY LH
-
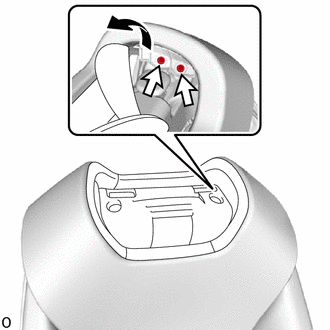
Insert the cable end of the reclining adjuster equalizing cable assembly LH into the insertion hole of the reclining remote control lever sub-assembly LH in the installation direction shown in the illustration (1).
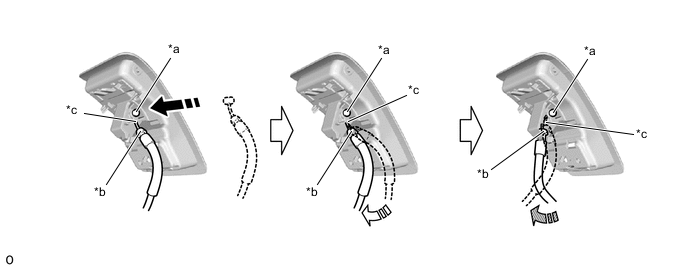
*a Cable End *b Cable Clamp *c Slit - - Install in this Direction (1) Install in this Direction (2) Install in this Direction (3) - - -
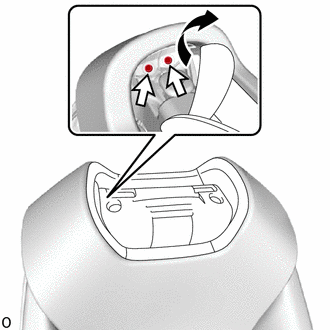
While passing the reclining adjuster equalizing cable assembly LH through the slit of the reclining remote control lever sub-assembly LH, slowly rotate it in the installation direction (2) shown in the illustration until it reaches the cable clamp fixed position.
Note
Be sure to securely insert the wire between the cable end and cable clamp into the slit of the reclining remote control lever sub-assembly LH.
-
Attach the cable clamp.
Note
Be sure to securely attach the cable clamp.
-
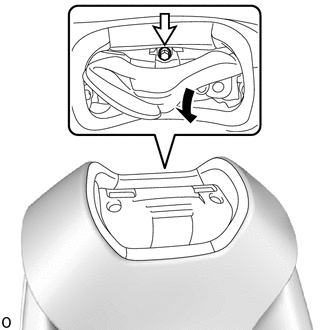
Rotate the reclining adjuster equalizing cable assembly LH in the installation direction (3) and set it as shown in the illustration.
Note
-
Check that the cable clamp is not detached.
-
If the reclining adjuster equalizing cable assembly LH is not in the direction of the line shown in the illustration, the cable end and cable clamp may move out of place according to lever operations after installation.
-
-
Install in this Direction Attach the guides and install the reclining remote control lever sub-assembly LH with the 2 screws.
-
-
INSTALL SEAT ADJUSTER COVER CAP LH
-
Install in this Direction Attach the guides in the installation direction shown in the illustration.
-
Attach the claw and install the seat adjuster cover cap LH.
-
-
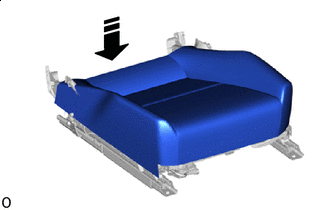
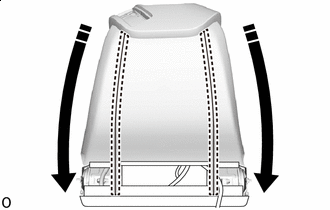
INSTALL SEPARATE TYPE FRONT SEATBACK ASSEMBLY
-
Attach the guides and temporarily install the separate type front seatback assembly to the separate type front seat cushion assembly.
-
Temporarily install 3 bolts or more.
-
Tighten the 4 bolts.
- Torque:
- 42 N*m { 428 kgf*cm, 31 ft.*lbf }
Note
-
When temporarily installing 3 bolts or more, tighten the 4th bolt first.
-
When tightening the bolts, do not apply any load to the seatback.
-
Attach the hooks.
-
*A w/ Seat Heater System Connect the connector and attach the wire harness clamp.
-
w/ Seat Heater System:
-
Connect the connector and attach the wire harness clamp.
-
-
Attach the claw and install the connector to the front seat cushion wire harness holder LH.
-
Attach the wire harness clamps.
-
-
INSTALL LIMIT SWITCH ASSEMBLY
-
INSTALL FRONT INNER SEAT CUSHION SHIELD LH
-
Install in this Direction Slide in the installation direction shown in the illustration to attach the guide.
-
Attach the claw.
-
Install in this Direction Push in the installation direction shown in the illustration to attach the guides and claws and install the front inner seat cushion shield LH.
-
-
INSTALL FRONT POWER SEAT SWITCH LH
-
INSTALL SWITCH BEZEL
-
INSTALL SEAT ADJUSTER SHIELD CLAMP BRACKET LH
-
Install the seat adjuster shield clamp bracket LH with the 2 screws.
-
-
INSTALL RECLINING POWER SEAT SWITCH KNOB
-
Install in this Direction Attach the claws and install the reclining power seat switch knob.
-
-
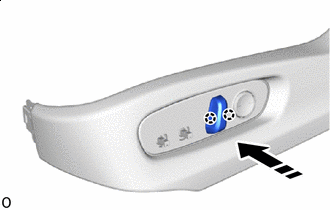
INSTALL SLIDE AND VERTICAL POWER SEAT SWITCH KNOB
-
Install in this Direction Attach the claws and install the slide and vertical power seat switch knob.
-
-
INSTALL FRONT INNER NO. 1 SEAT CUSHION SHIELD LH
-
Install in this Direction Attach the claw and install the front inner No. 1 seat cushion shield LH to the front seat cushion shield LH with the 2 screws.
-
-
INSTALL FRONT SEAT CUSHION SHIELD LH
-
Connect the connector.
-

Install in this Direction Attach the guides in the installation direction shown in the illustration.
-
Attach the claw.
-
Install in this Direction Push in the installation direction shown in the illustration to attach the guides and claws.
-
Install in this Direction Attach the guide in the installation direction shown in the illustration.
-
Install the front seat cushion shield LH with the clip.
-
Attach the rubber band of the separate type front seatback cover to the 2 hooks.
-
-
INSTALL FRONT SEAT INNER BELT ASSEMBLY LH (for Driver Seat)
-
INSTALL FRONT SEAT INNER BELT ASSEMBLY RH (for Front Passenger Seat)
-
INSTALL SEAT HEATER CONTROL SUB-ASSEMBLY LH (w/ Seat Heater System)
-
INSTALL POSITION CONTROL ECU ASSEMBLY