POP UP HOOD ECU INSTALLATION
CAUTION / NOTICE / HINT
Tech Tips
-
Use the same procedure as for the RHD and LHD vehicles.
-
The procedure listed below is for the LHD vehicles.
PROCEDURE
-
INSTALL PEDESTRIAN DETECTION ECU ASSEMBLY
-
Check that the power switch is off.
-
Check that the cable is disconnected from the negative (-) auxiliary battery terminal.
CAUTION:
-
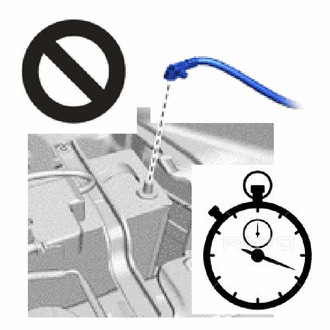
Wait at least 90 seconds after disconnecting the cable from the negative (-) auxiliary battery terminal to disable the SRS system.
-
If this procedure is performed without disconnecting the negative (-) auxiliary battery terminal of the battery, the pop up hood lifter may deploy even if an impact is applied only to the pedestrian detection ECU assembly. Therefore, make sure that the negative (-) auxiliary battery terminal of the battery is disconnected before performing this procedure.
-
-
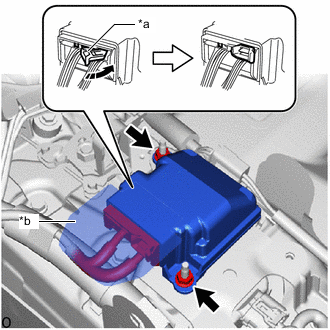
*a Lock Lever *b Water Resistant Sheet 
Lock in this Direction Check if the water resistant sheet is not torn or peeled off.
-
Install the pedestrian detection ECU assembly with the 2 nuts.
- Torque:
- 7.5 N*m { 76 kgf*cm, 66 in.*lbf }
Note
-
Do not reuse the pedestrian detection ECU assembly if subjected to any strong impact (such as dropping) during operation.
-
When the power switch is first turned on (IG) after the pedestrian detection ECU assembly has been replaced, make sure that no one is in the vehicle.
-
Connect the airbag connector and lock it with the lock lever.
Note
Do not allow the water resistant sheet to become pinched.
-
Check that there is no looseness in the installed pedestrian detection ECU assembly.
-
-
INSTALL NO. 1 CONSOLE BOX SUPPORT
-
INSTALL CONSOLE BOX ASSEMBLY
-
CONNECT CABLE TO NEGATIVE AUXILIARY BATTERY TERMINAL
Note
When disconnecting the cable, some systems need to be initialized after the cable is reconnected.
-
INSTALL NO. 2 DECK BOARD
-
PERFORM DIAGNOSTIC SYSTEM CHECK
-
CHECK SRS WARNING LIGHT