SUB RADIATOR REMOVAL
PROCEDURE
-
DRAIN COOLANT (for Inverter)
-
REMOVE RADIATOR SUPPORT TO FRAME SEAL RH
-
REMOVE LOWER RADIATOR AIR DEFLECTOR
-
REMOVE RADIATOR SUPPORT TO CROSSMEMBER BRACE SUB-ASSEMBLY LH
-
REMOVE RADIATOR SUPPORT TO CROSSMEMBER BRACE SUB-ASSEMBLY RH
-
REMOVE NO. 1 AIR CLEANER INLET
-
REMOVE HOOD LOCK RELEASE LEVER PROTECTOR
-
REMOVE HOOD LOCK CONTROL CABLE COVER LH (for LHD)
-
REMOVE HOOD LOCK CONTROL CABLE COVER RH
Tech Tips
Use the same procedure described for the LH side.
-
REMOVE HOOD LOCK ASSEMBLY
-
REMOVE LOW PITCHED HORN ASSEMBLY
-
REMOVE UPPER RADIATOR SUPPORT SUB-ASSEMBLY
-
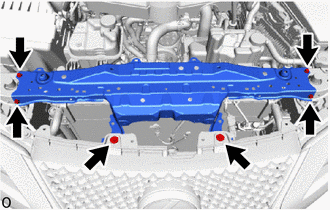
Remove the 3 bolts.
-
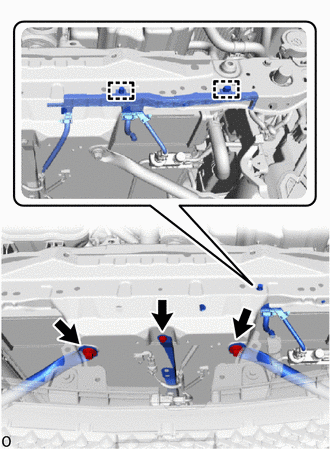
Detach the 2 clamps and disconnect the engine room main wire.
-
Remove the 4 bolts, 2 clips and upper radiator support sub-assembly.
-
-
REMOVE RADIATOR ASSEMBLY (for Inverter Coolant)
-
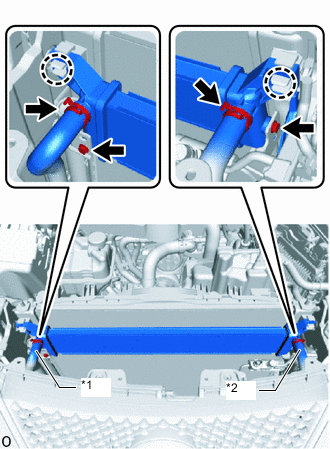
*1 No. 2 Inverter Cooling Hose *2 No. 3 Inverter Cooling Hose Slide the 2 hose clips and disconnect the No. 2 inverter cooling hose and No. 3 inverter cooling hose from the radiator assembly.
-
Remove the 2 bolts.
-
Detach the 2 claws and remove the radiator assembly.
Note
-
Put pieces of cloth into the pipes and disconnected hoses or cover the pipes and hoses with plastic bags to prevent foreign matter from entering the radiator assembly and cooling system.
-
Do not apply excessive force to the No. 2 inverter cooling hose and No. 3 inverter cooling hose.
-
-