PARKING BRAKE SYSTEM ADJUSTMENT
CAUTION / NOTICE / HINT
The necessary procedures (adjustment, calibration, initialization, or registration) that must be performed after parts are removed, installed, or replaced when performing the parking brake shoe clearance adjustment are shown below.
| Replacement Part or Procedure | Necessary Procedure | Effect/Inoperative when not Performed | Link |
|---|---|---|---|
| Adjustment of parking brake shoe clearance | Parking brake bedding | Electric parking brake system |
Tech Tips
-
Use the same procedure for the RH and LH sides.
-
The following procedure is for the LH side.
PROCEDURE
-
REMOVE REAR WHEEL
-
ADJUST PARKING BRAKE SHOE CLEARANCE
-
Temporarily install the 5 hub nuts to the hub bolts.
Tech Tips
Secure the rear disc with the 5 hub nuts.
-
Turn off the electric parking brake AUTO function.
-
With the power switch on (IG), operate the electric parking brake switch to release the parking brake. Then turn the power switch off.
-
Remove the parking brake shoe adjusting hole plug, and rotate the rear disc so that the service hole is aligned with the parking brake shoe adjuster.
-
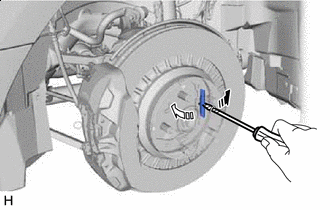

Contract 
Expand Using a screwdriver, turn the parking brake shoe adjuster and expand the shoes until the rear disc locks.
-
With the power switch on (IG), operate the electric parking brake switch to lock and release the parking brake. Repeat again. Then turn the power switch off.
Note
Make sure that the parking brake is released.
-
Turn the parking brake shoe adjuster again in the expansion direction to lock the rear disc.
-
Loosen the parking brake shoe adjuster so that the rear disc can rotate slightly.
Standard Returns 7 notches. -
Check that there is no brake drag against the shoe.
-
Install the parking brake shoe adjusting hole plug.
-
Remove the 5 hub nuts from the hub bolts.
-
Turn the electric parking brake AUTO function back on.
-
-
INSTALL REAR WHEEL
-
PERFORM PARKING BRAKE SHOE BEDDING