ACTIVE REAR WING INSTALLATION
PROCEDURE
-
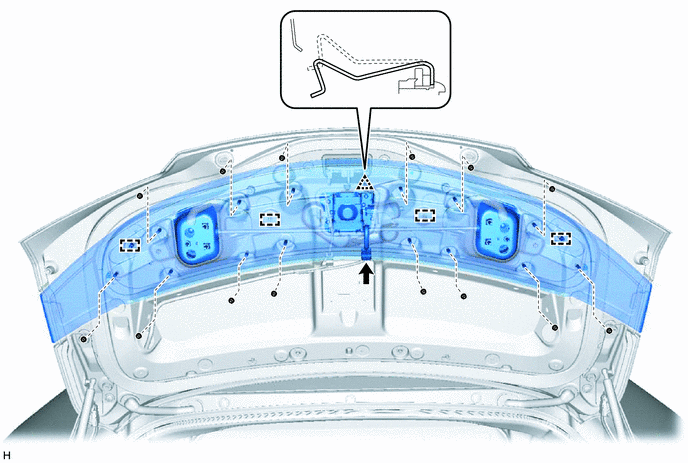
INSTALL COLLAR
-
Install the 8 collars.
-
-
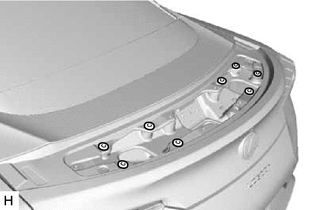
INSTALL ACTIVE REAR WING
-
Insert the guides and attach the clip.
-
Install the active rear wing with the 14 nuts.
- Torque:
- 5.5 N*m { 56 kgf*cm, 49 in.*lbf }
-
Connect the connector.
-
-
INSPECT REAR SPOILER SUB-ASSEMBLY
-
Check the difference in level (a) between the luggage compartment door panel and upper surface of the rear spoiler when the rear spoiler is retracted.

Standard Area Measurement Area Measurement Front [A-A] 0 to 1.5 mm (0 to 0.059 in.)
0 to -1.5 mm (0 to -0.059 in.)
Rear [B-B] 0 to 1.5 mm (0 to 0.059 in.)
0 to -1.5 mm (0 to -0.059 in.)
Tech Tips
-
For the (a) dimension, (+) represents the condition that the rear spoiler is above the luggage compartment door panel level. (-) represents the condition that the rear spoiler is below the luggage compartment door panel level.
-
Use the same procedure for the RH and LH sides.
-
-
-
ADJUST REAR SPOILER SUB-ASSEMBLY
Tech Tips
Use the same procedure for the other side.
-
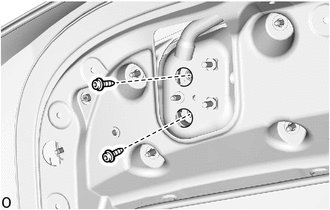
Using a T30 "TORX" socket wrench, remove the 2 "TORX" screws.
-
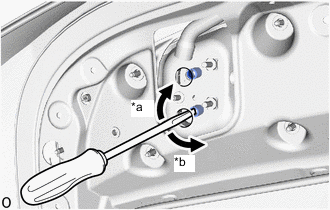
*a Up *b Down Using a screwdriver, turn the 2 collars of the top cover lock control link sub-assembly LH to adjust the height.
-
Using a T30 "TORX" socket wrench, install 2 new "TORX" screws.
- Torque:
- 5.1 N*m { 52 kgf*cm, 45 in.*lbf }
Note
Do not reuse the "TORX" screw that has been removed.
-
-
INSTALL REAR SPOILER DRAIN END CAP LH
Tech Tips
When installing the rear spoiler seal, heat the rear spoiler drain end cap LH and rear spoiler seal.
Standard Item Temperature Rear Spoiler Drain End Cap LH 20 to 30°C (68 to 86°F) Rear Spoiler Seal CAUTION:
-
Do not touch the heat light and heated parts.
-
Touching the heat light may result in burns.
-
Touching heated parts for a long time may result in burns.
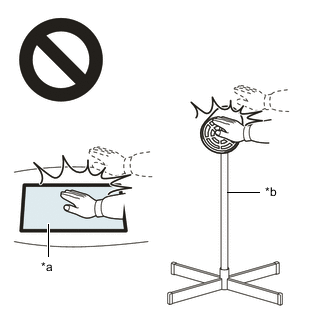
*a Heated Part *b Heat Light
-
When reusing the rear spoiler drain end cap LH, remove the double-sided tape remaining on the installation surface of the rear spoiler seal.
-
Remove the peeling paper of the double-sided tape trying not to touch the adhesional surface.
-

Install a new rear spoiler seal to the rear spoiler drain end cap LH.
Tech Tips
Press the rear spoiler firmly to install it.
-
Install the rear spoiler drain end cap LH with the 3 nuts.
- Torque:
- 6.7 N*m { 68 kgf*cm, 59 in.*lbf }
Tech Tips
Use the same procedure for the RH and LH sides.
-
-
INSTALL REAR SPOILER DRAIN END CAP RH
Tech Tips
Use the same procedure described for the LH side.
-
CONNECT SLIDING ROOF DRAIN HOSE
-
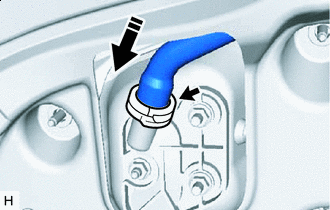

Install in this Direction Connect the sliding roof hose with the clip.
Tech Tips
Use the same procedure for the RH and LH sides.
-
-
INSTALL LUGGAGE COMPARTMENT DOOR COVER
-
INSTALL LUGGAGE COMPARTMENT DOOR ASSIST GRIP
-
INITIALIZE ACTIVE REAR WING SYSTEM
-
CHECK ACTIVE REAR WING SYSTEM