ILLUMINATION LIGHT ASSEMBLY(for Front Door) INSTALLATION
CAUTION / NOTICE / HINT
Tech Tips
-
Use the same procedure for RHD and LHD vehicles.
-
The procedure listed below is for LHD vehicles.
-
Use the same procedure for the RH and LH sides.
-
The procedure described below is for the LH side.
PROCEDURE
-
INSTALL DOOR OUTSIDE HANDLE SUB-ASSEMBLY LH (ILLUMINATION LIGHT ASSEMBLY)
-
Apply MP grease to the sliding area of the door outside handle sub-assembly LH (illumination light assembly).
-
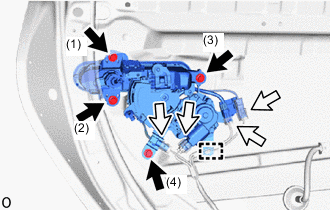

Bolt 
Connector Tighten the 4 bolts in the order shown in the illustration to install the door outside handle sub-assembly LH (illumination light assembly).
- Torque:
- 5.5 N*m { 56 kgf*cm, 49 in.*lbf }
Note
When tightening the handle, check there is no significant gaps or differences.
-
Connect the 4 connectors and attach the wire harness clamp.
-
-
INSTALL FRONT DOOR INSIDE PANEL SUB-ASSEMBLY LH
-
CONNECT CABLE TO NEGATIVE BATTERY TERMINAL
Note
When disconnecting the cable, some systems need to be initialized after the cable is reconnected.
-
INSTALL NO. 2 DECK BOARD
-
PERFORM DIAGNOSTIC SYSTEM CHECK
-
CHECK SRS WARNING LIGHT