VALVE BODY ASSEMBLY REMOVAL
CAUTION / NOTICE / HINT
The necessary procedures (adjustment, calibration, initialization, or registration) that must be performed after parts are removed, installed, or replaced during the transmission valve body assembly removal/installation are shown below.
| Replacement Part or Procedure | Necessary Procedure | Effect/Inoperative when not Performed | Link |
|---|---|---|---|
|
Perform road test to allow ECM to learn |
|
|
| Automatic transmission fluid | ATF thermal degradation estimate reset | The value of the Data List item "ATF Thermal Degradation Estimate" is not estimated correctly. |
CAUTION:
-
Be careful not to burn yourself when the automatic transmission fluid temperature is high.
-

To prevent burns, do not touch the engine, exhaust pipe other high temperature components while the engine is hot.
PROCEDURE
-
REMOVE NO. 2 ENGINE UNDER COVER ASSEMBLY
-
REMOVE FRONT EXHAUST PIPE ASSEMBLY
-
REMOVE NO. 1 EXHAUST PIPE SUPPORT BRACKET SUB-ASSEMBLY
-
DRAIN AUTOMATIC TRANSMISSION FLUID
-
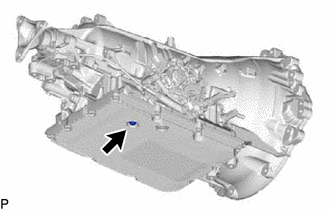
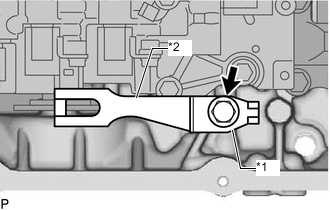
Using a 6 mm hexagon socket wrench, remove the drain plug from the automatic transmission oil pan sub-assembly and drain the automatic transmission fluid.
Note
The overflow plug and drain plug are located nearby one another. Make sure not to remove the incorrect plug.
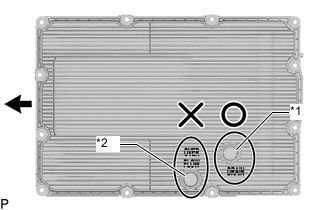
*1 Drain Plug *2 Overflow Plug 
Front of Vehicle -
Remove the O-ring from the drain plug.
-
Install a new O-ring to the drain plug.
-
Using a 6 mm hexagon socket wrench, install the drain plug to automatic transmission oil pan sub-assembly.
- Torque:
- 40 N*m { 408 kgf*cm, 30 ft.*lbf }
-
-
REMOVE AUTOMATIC TRANSMISSION OIL PAN SUB-ASSEMBLY
CAUTION:
Automatic transmission fluid is left in the automatic transmission oil pan sub-assembly when the automatic transmission oil pan sub-assembly is removed. As a result, if the procedures described in the repair manual are not performed correctly, the automatic transmission fluid may spill and result in burns.
-
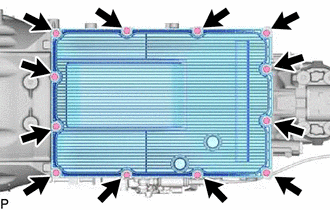
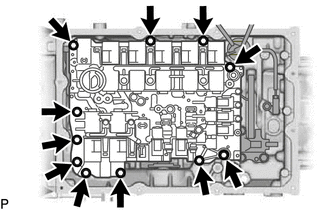
Loosen the 12 bolts by 1 turn.
-

Remove the 8 bolts at the positions shown in the illustration.
-

Set the transmission jack so that it contacts the automatic transmission oil pan sub-assembly.
CAUTION:
Set the transmission jack so that it is level with the automatic transmission oil pan sub-assembly.
If the automatic transmission oil pan sub-assembly is not level when it is removed the automatic transmission fluid may spill and result in burns.
-
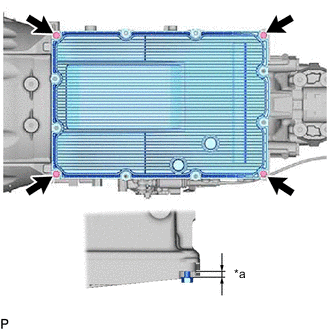
*a Approximately 10 mm (0.394 in.) Loosen the 4 bolts by approximately 10 mm (0.394 in.) from the installation surface.
-
Lower the transmission jack by approximately 10 mm (0.394 in.).
-
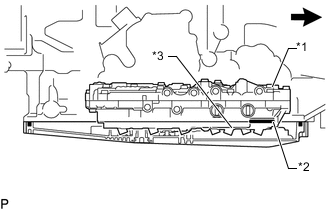
*1 Transmission Valve Body Assembly *2 O-Ring *3 Oil Strainer Front of Vehicle Remove the oil strainer O-ring from the transmission valve body assembly.
CAUTION:
Disconnect slowly to prevent the automatic transmission fluid from spraying out.
Tech Tips
The oil strainer is integrated into the automatic transmission oil pan sub-assembly.
-
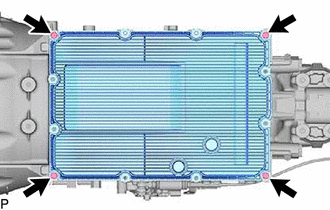
Remove the 4 bolts.
-
Lower the transmission jack and remove the automatic transmission oil pan sub-assembly from the transmission case.
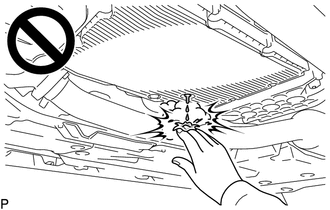
CAUTION:
-
Hot automatic transmission fluid is left in the automatic transmission oil pan sub-assembly. Therefore, remove it parallel to the ground so that the fluid does not spill.
-
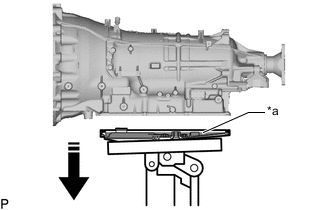
*a Automatic Transmission Fluid 
Lower it slowly and level Lower the transmission jack slowly so that the hot automatic transmission fluid left in the automatic transmission oil pan sub-assembly does not spill.
-
-
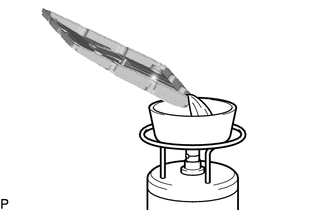
Drain the automatic transmission fluid from the automatic transmission oil pan sub-assembly.
CAUTION:
Be careful of burns as the automatic transmission fluid is hot.
-

Examine the particles in the automatic transmission oil pan sub-assembly.
-
Use the removed oil pan magnets to collect any steel chips.
Examine the chips and particles in the automatic transmission oil pan sub-assembly and on the oil pan magnets to determine what type of wear might be found in the automatic transmission assembly.
Result Steel (magnetic) Bearing, gear and clutch plate wear Brass (non-magnetic) Bushing wear
-
-
-
REMOVE NO. 1 TRANSMISSION OIL FILLER TUBE
-
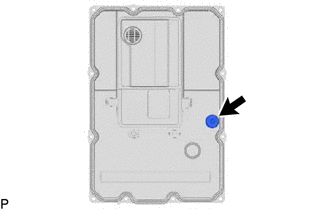
Remove the No. 1 transmission oil filler tube from the automatic transmission oil pan sub-assembly.
-
-
REMOVE TRANSMISSION VALVE BODY ASSEMBLY
-
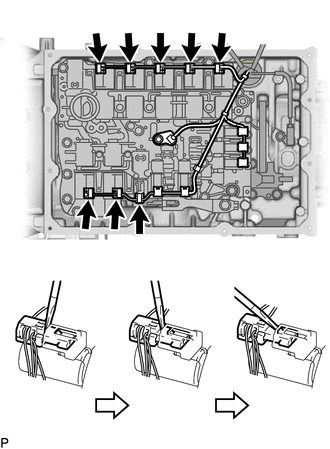
Using a screwdriver, disconnect the 8 connectors of each of the solenoid valves as shown in the illustration.
Note
Do not damage the solenoid valves or solenoid valve connectors.
-
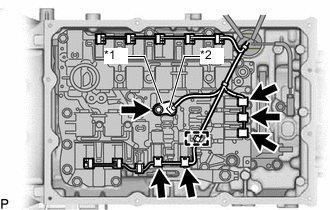
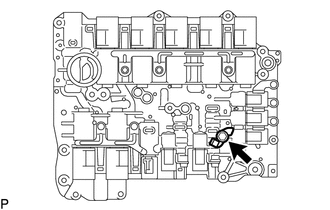
*1 Lock Plate *2 ATF Temperature Sensor Disconnect the 5 connectors.
Note
Do not damage the solenoid valves or solenoid valve connectors.
-
Remove the bolt and lock plate, and disconnect the ATF temperature sensor from the transmission valve body assembly.
-
Disconnect the transmission wire from the wire harness clamp.
-
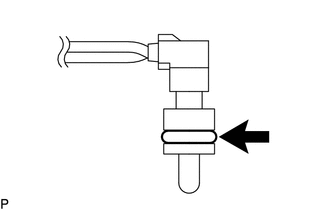
Remove the O-ring from the ATF temperature sensor.
-
*1 Manual Detent Spring Cover *2 Manual Detent Spring Sub-assembly Remove the bolt, manual detent spring cover and manual detent spring sub-assembly from the automatic transmission case.
-
Remove the 11 bolts and transmission valve body assembly from the automatic transmission case.
-

Remove the 5 gaskets from the automatic transmission case.
-

Remove the 3 brake drum gaskets from the automatic transmission case.
-
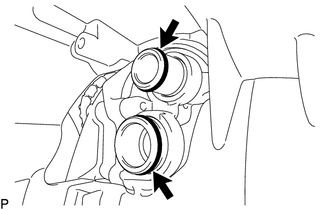
Remove the 2 O-rings from the oil pump suction pipe and oil pump delivery pipe.
-
-
REMOVE WIRE HARNESS CLAMP
-
Remove the bolt and wire harness clamp from the transmission valve body assembly.
-