SUB BATTERY RELAY INSTALLATION
PROCEDURE
-
INSTALL BACKUP RELAY
-
Attach the claw and install the backup relay to the relay block assembly.
-
Connect the connector to the backup relay.
-
Install the backup relay to the relay block assembly with the 2 bolts.
- Torque:
- 5.4 N*m { 55 kgf*cm, 48 in.*lbf }
-
Install the bolt and nut to the backup relay terminal.
- Torque:
- 5.4 N*m { 55 kgf*cm, 48 in.*lbf }
-
Attach the 3 claws and connect the relay block assembly to the No. 1 luggage room relay block ( No. 1 luggage room relay block left side).
-
Attach the 7 claws and install the relay block lower cover to the No. 1 luggage room relay block (No. 1 luggage room relay block right side).
-
-
INSTALL NO. 1 LUGGAGE ROOM RELAY BLOCK
-
Attach the 2 clamps and connect the No. 1 luggage room relay harness to the luggage room panel.
-
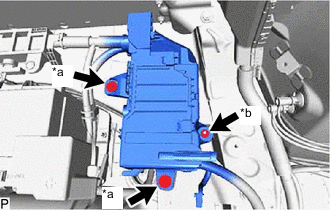
*a Bolt *b Nut w/o Dynamic Rear Steering:
Connect the No. 1 luggage room relay block with the 2 bolts and nut.
- Torque:
- 8.0 N*m { 82 kgf*cm, 71 in.*lbf }
-
w/ Dynamic Rear Steering:
-
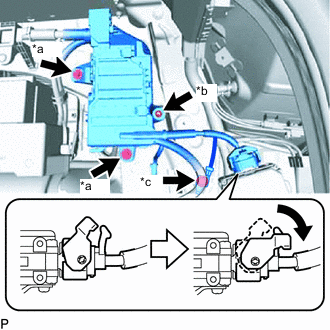
*a Bolt *b Nut *c Ground Wire Bolt Pull down the lock lever and connect the connector of the DRS control ECU as shown in the illustration.
-
Connect the No. 1 luggage room relay block with the 2 bolts and nut.
-
Install the ground wire with the bolt.
- Torque:
- 9.5 N*m { 97 kgf*cm, 84 in.*lbf }
-
-
Install the relay block cover.
-
Connect the positive (+) sub-battery terminal to the sub-battery module assembly with the nut.
- Torque:
- 8.7 N*m { 89 kgf*cm, 77 in.*lbf }
-
-
INSTALL NO. 1 DECK BOARD BRACKET RH
-
Install the No. 1 deck board bracket RH with the bolt and nut.
- Torque:
- 15.8 N*m { 161 kgf*cm, 12 ft.*lbf }
-
-
INSTALL CONNECTOR COVER
-
INSTALL NO. 2 DECK BOARD BRACKET
-
INSTALL INNER LUGGAGE COMPARTMENT TRIM COVER RH
-
INSTALL FRONT LUGGAGE COMPARTMENT TRIM COVER
-
INSTALL NO. 1 LUGGAGE COMPARTMENT LIGHT ASSEMBLY
-
INSTALL LUGGAGE COMPARTMENT TRIM BOX
-
INSTALL REAR FLOOR FINISH PLATE
-
INSTALL SIDE TRIM BOX
-
INSTALL LUGGAGE COMPARTMENT TRIM COVER RH
-
INSTALL LUGGAGE COMPARTMENT TRIM COVER LH
-
INSTALL NO. 1 DECK BOARD
-
CONNECT CABLE TO NEGATIVE BATTERY TERMINAL
Note
When disconnecting the cable, some systems need to be initialized after the cable is reconnected.
-
INSTALL NO. 2 DECK BOARD