REAR CROSSING TRAFFIC ALERT BUZZER REMOVAL
CAUTION / NOTICE / HINT
The necessary procedures (adjustment, calibration, initialization or registration) that must be performed after parts are removed, installed or replaced during the blind spot monitor buzzer removal/installation are shown below.
| Replacement Part or Procedure | Necessary Procedures | Effects / Inoperative when not Performed | Link |
|---|---|---|---|
| Disconnect cable from negative (-) battery terminal | Memorize steering angle neutral point | LKA/LDA system | |
| Pre-collision system | |||
| Parking assist monitor system | |||
| Steering sensor zero point calibration | Variable gear ratio steering system | ||
|
Initialize position control ECU | Front Power Seat Control System |
PROCEDURE
-
PRECAUTION
Note
After turning the engine switch off, waiting time may be required before disconnecting the cable from the negative (-) battery terminal. Therefore, make sure to read the disconnecting the cable from the negative (-) battery terminal notices before proceeding with work.
-
REMOVE FRONT SEAT ASSEMBLY LH
-
REMOVE FRONT SEAT ASSEMBLY RH
Tech Tips
Use the same procedure described for the LH side.
-
REMOVE REAR SEAT ASSEMBLY
-
REMOVE QUARTER INSIDE TRIM BOARD LH
-
REMOVE QUARTER INSIDE TRIM BOARD RH
Tech Tips
Use the same procedure described for the LH side.
-
REMOVE REAR NO. 1 SEAT INNER BELT ASSEMBLY LH
-
REMOVE REAR SEAT INNER BELT ASSEMBLY RH
Tech Tips
Use the same procedure described for the rear No. 1 seat inner belt assembly LH.
-
REMOVE FRONT DOOR SCUFF PLATE LH
-
REMOVE FRONT DOOR SCUFF PLATE RH
Tech Tips
Use the same procedure described for the LH side.
-
REMOVE OUTER LAP BELT ANCHOR COVER
-
REMOVE FRONT SEAT OUTER BELT ASSEMBLY LH(FLOOR ANCHOR)
-
REMOVE FRONT SEAT OUTER BELT ASSEMBLY RH(FLOOR ANCHOR)
Tech Tips
Use the same procedure described for the LH side.
-
REMOVE QUARTER TRIM PANEL ASSEMBLY LH
-
REMOVE QUARTER TRIM PANEL ASSEMBLY RH
Tech Tips
Use the same procedure described for the LH side.
-
REMOVE CENTER PILLAR GARNISH ASSEMBLY LH
-
REMOVE CENTER PILLAR GARNISH ASSEMBLY RH
Tech Tips
Use the same procedure described for the LH side.
-
REMOVE INNER ROOF SIDE GARNISH LH
-
REMOVE INNER ROOF SIDE GARNISH RH
Tech Tips
Use the same procedure described for the LH side.
-
REMOVE ROOF SIDE RAIL GARNISH ASSEMBLY LH
-
REMOVE ROOF SIDE RAIL GARNISH ASSEMBLY RH
Tech Tips
Use the same procedure described for the LH side.
-
REMOVE INNER ROOF SIDE GARNISH ASSEMBLY LH
-
REMOVE INNER ROOF SIDE GARNISH ASSEMBLY RH
Tech Tips
Use the same procedure described for the LH side.
-
REMOVE CHILD RESTRAINT SEAT TETHER ANCHOR COVER
-
REMOVE REAR NO. 1 SEAT OUTER BELT ASSEMBLY LH(FLOOR ANCHOR)
-
REMOVE REAR NO. 1 SEAT OUTER BELT ASSEMBLY RH(FLOOR ANCHOR)
Tech Tips
Use the same procedure described for the LH side.
-
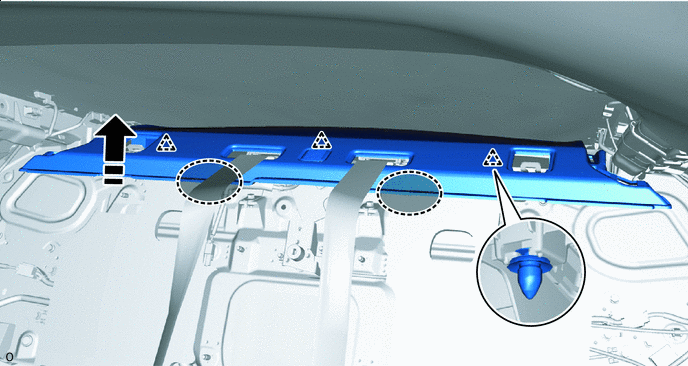
REMOVE PACKAGE TRAY TRIM PANEL ASSEMBLY
-

Remove in this Direction (1) 
Remove in this Direction (2) Using moulding remover A, detach the claws.
-
Detach the guide and while pulling toward the front of the vehicle, detach the No. 1 rear seat outer belt assembly RH belt guide.
Tech Tips
Use the same procedure for the other side.
-
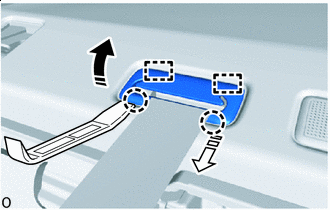
Place your hand at the position shown in the illustration and lift up the vehicle front side of the package tray trim panel assembly to detach the clips.

Place Hands Here Release in this Direction -

Disconnect the connector.
-
Pull toward the front of the vehicle and detach the guides.
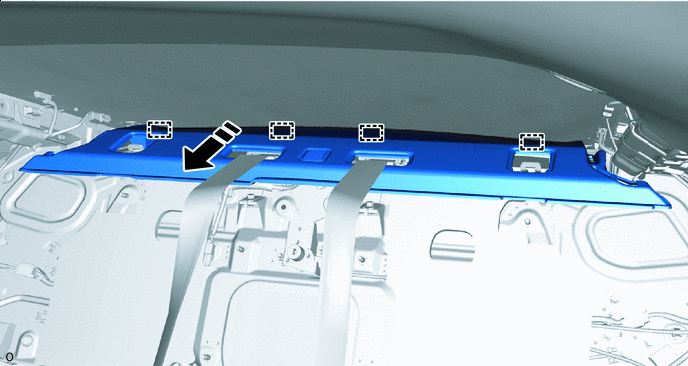
Remove in this Direction - - -
Pass the rear No. 1 seat outer belt floor anchors through the package tray trim panel assembly and remove the package tray trim panel assembly.
-
-
REMOVE BLIND SPOT MONITOR BUZZER
-
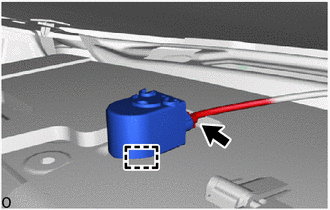
Disconnect the connector.
-
Detach the clamp and remove the blind spot monitor buzzer.
-