AUTOMATIC TRANSMISSION FLUID REPLACEMENT
CAUTION / NOTICE / HINT
The necessary procedures (adjustment, initialization or registration) that must be performed after replacing the automatic transmission fluid are shown below.
| Replacement Part or Procedure | Necessary Procedure | Effect/Inoperative when not Performed | Link |
|---|---|---|---|
| Automatic transmission fluid | ATF thermal degradation estimate reset | The value of the Data List item "ATF Thermal Degradation Estimate" is not estimated correctly. |
CAUTION:
-
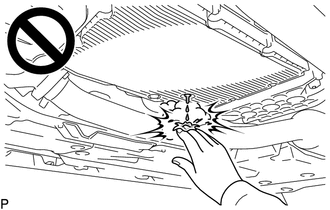
Be careful not to burn yourself when the automatic transmission fluid temperature is high.
-

To prevent burns, do not touch the engine, exhaust pipe or other high temperature components while the engine is hot.
PROCEDURE
-
REPLACE AUTOMATIC TRANSMISSION FLUID
-
Lift the vehicle. [#1]
Note
The automatic transmission fluid level cannot be measured accurately if the vehicle is not level. Make sure it is held level.
-
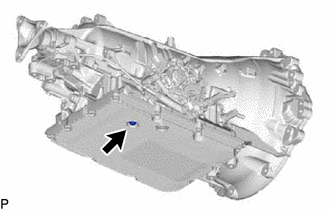
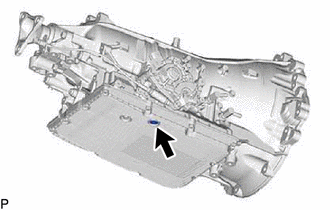
Using a 6 mm hexagon socket wrench, remove the drain plug from the automatic transmission assembly and drain the automatic transmission fluid. [#2]
Note
The overflow plug and drain plug are located nearby one another. Make sure not to remove the incorrect plug.
*1 Drain Plug *2 Overflow Plug 
Front of Vehicle -
Using a 6 mm hexagon socket wrench, temporarily install the drain plug to the automatic transmission assembly. [#3]
Tech Tips
O-ring replacement and tightening of the drain plug are performed at step [#17] to [#19].
-
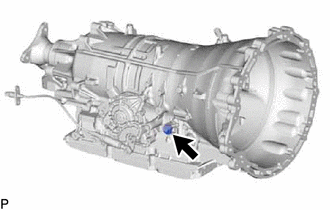
Remove the refill plug and gasket from the automatic transmission assembly. [#4]
CAUTION:
Make sure not to touch the high temperature parts such as the exhaust pipe, etc.
-
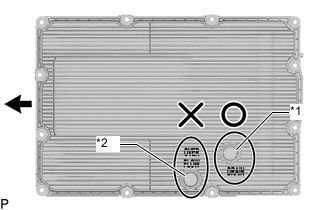
Using a 6 mm hexagon socket wrench, remove the overflow plug from the automatic transmission assembly. [#5]
Note
The overflow plug and drain plug are located nearby one another. Make sure not to remove the incorrect plug.
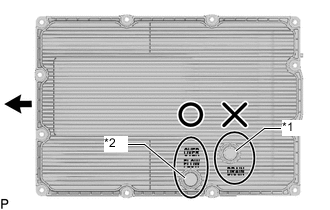
*1 Drain Plug *2 Overflow Plug Front of Vehicle -
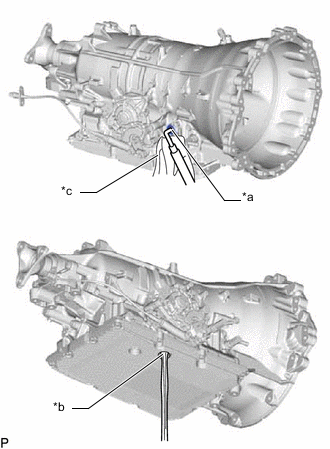
*a Refill Hole *b Overflow Hole *c Cloth Add automatic transmission fluid to the refill hole until it flows out of the overflow hole. [#6]
Note
-
Use Toyota Genuine ATF WS.
-
Be sure to add automatic transmission fluid slowly. If automatic transmission fluid is added quickly, the automatic transmission fluid may hit internal parts and bounce back, resulting in automatic transmission fluid coming out of the refill hole.
Tech Tips
When pouring automatic transmission fluid into the refill hole, cover the area surrounding the refill hole with a cloth.
If automatic transmission fluid adheres to the automatic transmission oil pan sub-assembly, it may be mistaken for an automatic transmission fluid leak.
-
-
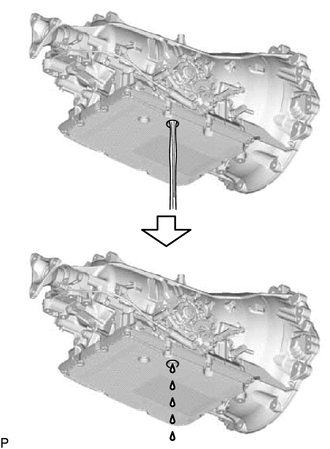
Wait until the automatic transmission fluid flow slows and only drips come out. [#7]
-
Using a 6 mm hexagon socket wrench, temporarily install the overflow plug to the automatic transmission assembly. [#8]
Tech Tips
O-ring replacement and tightening of the overflow plug are performed after the automatic transmission fluid level is adjusted.
-
Pour the specified amount of automatic transmission fluid into the refill plug. [#9]
Specified Amount of Fluid 0.7 liters (0.7 US qts, 0.6 Imp. qts) Note
-
Use Toyota Genuine ATF WS.
-
Be sure to add automatic transmission fluid slowly. If automatic transmission fluid is added quickly, the automatic transmission fluid may hit internal parts and bounce back, resulting in automatic transmission fluid coming out of the refill hole.
Tech Tips
-
When pouring automatic transmission fluid into the refill hole, cover the area surrounding the refill hole with a cloth.
If automatic transmission fluid adheres to the automatic transmission oil pan sub-assembly, it may be mistaken for an automatic transmission fluid leak.
-
When pouring automatic transmission fluid into the refill hole, it may not be possible to pour the specified amount of automatic transmission fluid because of overflow into the refill hole. In this case, perform the steps [#10] through [#15] below. Once the automatic transmission fluid has been circulated through the oil lines in the automatic transmission assembly and the torque converter assembly, continue to pour in the specified amount of automatic transmission fluid through the refill hole.
-
-
Temporarily install the gasket and refill plug to the automatic transmission assembly. [#10]
Tech Tips
Gasket replacement and tightening of the refill plug are performed after the automatic transmission fluid level is adjusted.
-
Lower the vehicle. [#11]
-
Depress and hold the brake pedal. [#12]
-
Start the engine. [#13]
Note
To reduce load, make sure that all electrical systems, such as the air conditioning and audio system are off.
-
Slowly move the shift position from P to M in the order of P → R → N → D → M, and then move the shift position back to P. [#14]
Tech Tips
Keep the shift position in each position for approximately 3 seconds.
-
Allow the engine to idle for 30 seconds to warm it up. [#15]
-
Turn the engine switch off. [#16]
-
Repeat steps [#1] to [#16].
-
Repeat steps [#1] to [#2].
-
Remove the O-ring from the drain plug. [#17]
-
Install a new O-ring to the drain plug. [#18]
-
Using a 6 mm hexagon socket wrench, install the drain plug to the automatic transmission assembly. [#19]
- Torque:
- 40 N*m { 408 kgf*cm, 30 ft.*lbf }
-
Repeat steps [#4] to [#11].
-
-
ADJUST AUTOMATIC TRANSMISSION FLUID
-
AFTER FILLING AUTOMATIC TRANSMISSION