IGNITION SYSTEM ON-VEHICLE INSPECTION
PROCEDURE
-
PERFORM SPARK TEST
CAUTION:
-
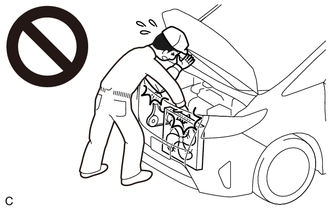
When working near the engine room while the engine has started or the power source mode is engine switch on (IG), do not touch the fan and generator V belt or rotating components such as the fan, etc.
-
Touching the fan and generator V belt or rotating components such as the fan, etc. could result in your hand or clothing getting caught and pulled in.
Tech Tips
Perform "Inspection After Repair" after replacing a spark plug.
-
w/ Canister Pump Module:
-
w/o Canister Pump Module:
-
Check for DTCs.
-
w/ Canister Pump Module:
-
w/o Canister Pump Module:
Note
If any DTCs are output, perform troubleshooting in accordance with the procedure for each DTC.
-
-
Remove the 8 ignition coil assemblies and 8 spark plugs.
Note
If an ignition coil assembly or spark plug has been struck or dropped, replace it.
Tech Tips
Arrange the removed parts in the correct order.
-
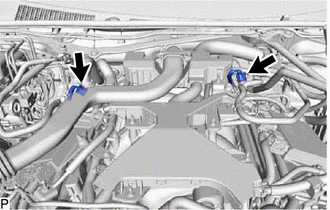
Disconnect the 2 fuel delivery pipe sub-assembly connectors.
-
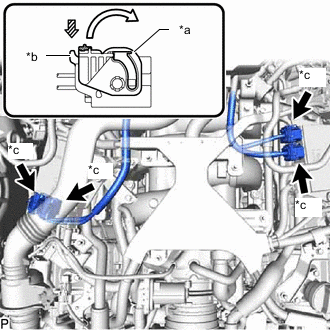
*a Lock Lever *b Lock *c Connector with Lock 
Raise 
Push Push the lock and move the lock lever of each connector (with lock) as shown in the illustration and disconnect the 4 connectors (with lock) from the 2 injector drivers.
-
Install the spark plug to the ignition coil assembly, and then connect the ignition coil assembly connector.
-
Ground the spark plug.
-
Check that spark occurs at each spark plug while the engine is being cranked.
Note
-
Be sure to ground the spark plugs when checking them.
-
Do not crank the engine for more than 2 seconds.
-
If an ignition coil assembly or spark plug has been struck or dropped, replace it.
Tech Tips
If spark does not occur, perform the following procedure.
-
-
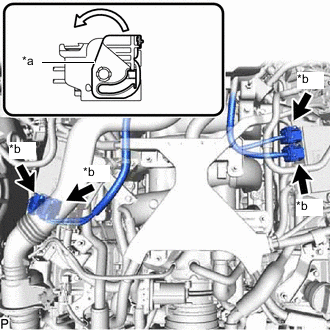
*a Lock Lever *b Connector with Lock Return Connect the 4 connectors (with lock) to the 2 injector drivers and move the lock lever to engage the lock of each connector (with lock) as shown in the illustration.
Note
Securely connect the connectors (with lock) to the injector driver and engage the lock.
-
Install the 8 spark plugs and 8 ignition coil assemblies.
Note
If an ignition coil assembly or spark plug has been struck or dropped, replace it.
Tech Tips
Install the same parts to their original positions.
-
Check for DTCs.
-
w/ Canister Pump Module:
-
w/o Canister Pump Module:
-
-
Clear the DTCs.
-
w/ Canister Pump Module:
-
w/o Canister Pump Module:
-
-
-
INSPECT IGNITION COIL ASSEMBLY AND SPARK TEST
CAUTION:
-
When working near the engine room while the engine has started or the power source mode is engine switch on (IG), do not touch the fan and generator V belt or rotating components such as the fan, etc.
-
Touching the fan and generator V belt or rotating components such as the fan, etc. could result in your hand or clothing getting caught and pulled in.
Tech Tips
Perform "Inspection After Repair" after replacing a spark plug or ignition coil assembly.
-
w/ Canister Pump Module:
-
w/o Canister Pump Module:
-
Check that the ignition coil assembly connector is securely connected.
Result Result Action NG Connect securely OK Go to next step -
Perform a spark test on each ignition coil assembly.
-
Replace the ignition coil assembly with a known good one.
-
Perform the spark test again.
Result Result Action NG Go to next step OK Replace ignition coil assembly
-
-
Perform a spark test on each spark plug.
-
Replace the spark plug with a known good one.
-
Perform the spark test again.
Result Result Action NG Inspect the ignition system
-
w/ Canister Pump Module:
-
w/o Canister Pump Module:
OK Replace spark plug Note
If an ignition coil assembly or spark plug has been struck or dropped, replace it.
-
-
-
*a Lock Lever *b Connector with Lock Return Connect the 4 connectors (with lock) to the 2 injector drivers and move the lock lever to engage the lock of each connector (with lock) as shown in the illustration.
Note
Securely connect the connectors (with lock) to the injector driver and engage the lock.
-
Install the 8 spark plugs and 8 ignition coil assemblies.
Note
If an ignition coil assembly or spark plug has been struck or dropped, replace it.
Tech Tips
Install the same parts to their original positions.
-
Check for DTCs.
-
w/ Canister Pump Module:
-
w/o Canister Pump Module:
-
-
Clear the DTCs.
-
w/ Canister Pump Module:
-
w/o Canister Pump Module:
-
-
-
INSPECT SPARK PLUG
CAUTION:
-
When working near the engine room while the engine has started or the power source mode is engine switch on (IG), do not touch the fan and generator V belt or rotating components such as the fan, etc.
-
Touching the fan and generator V belt or rotating components such as the fan, etc. could result in your hand or clothing getting caught and pulled in.
Note
-
Be careful not to damage the iridium tip or platinum tip of the spark plug.
-
Check the iridium tip visually as it is easily damaged.
-
Never attempt to adjust the electrode gap of a used spark plug.
-
If the spark plug is extremely dirty with oil, etc., replace it.
-
Replace a spark plug if it is damaged at all.
-
When installing a new spark plug, do not remove the protective cap from the spark plug tip until just before installing the spark plug to the engine.
-
If the spark plug has been struck or dropped, replace it.
-
Do not use a wire brush for cleaning.
Tech Tips
Perform "Inspection After Repair" after replacing a spark plug.
-
w/ Canister Pump Module:
-
w/o Canister Pump Module:
-
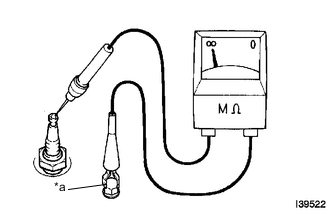
*a Body Ground Check the electrode.
-
Using a megohmmeter, measure the insulation resistance.
Standard Insulation Resistance Tester Connection Condition Specified Condition Spark plug (terminal part) - Body ground Always 10 MΩ or higher Tech Tips
-
If the result is not as specified, clean the spark plug with a spark plug cleaner and measure the resistance again.
-
If a megohmmeter is not available, perform the following simple inspection instead.
-
-
-
Alternative inspection method.
-
Start the engine.
Note
Do not perform this step when any of the following DTCs are output; P0300, P0301, P0302, P0303, P0304, P0305, P0306, P0307, P0308 (Cylinder Misfire Detected)
-
Quickly accelerate the engine to 2500 rpm 5 times.
Note
Do not perform this step when any of the following DTCs are output; P0300, P0301, P0302, P0303, P0304, P0305, P0306, P0307, P0308 (Cylinder Misfire Detected)
-
Remove the spark plug.
-
Visually check the spark plug.
Tech Tips
If the electrode is dry, the spark plug is functioning properly. If the electrode is damp, proceed to the next step.
-
-
Check the spark plug for any damage to its threads and insulator.
If there is any damage, replace the spark plug.
Recommended Spark Plug Manufacturer Spark Plug Type DENSO FK20HBR-J8 -
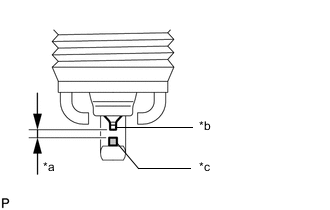
*a Spark Plug Electrode Gap *b Iridium Tip *c Platinum Tip Check the spark plug electrode gap.
Maximum Electrode Gap for Used Spark Plug 1.0 mm (0.0394 in.) Note
Never attempt to adjust the electrode gap of a used spark plug.
If the electrode gap is more than the maximum, replace the spark plug.
Standard Electrode Gap for New Spark Plug 0.7 to 0.8 mm (0.0276 to 0.0315 in.) -
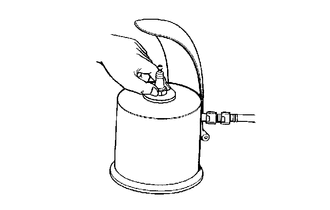
Clean the spark plug.
If the electrode has traces of wet carbon, clean the electrode with a spark plug cleaner and then dry it.
Standard Air Pressure 588 kPa (6.0 kgf/cm2, 85 psi) Standard Duration 20 seconds or less Tech Tips
Only use the spark plug cleaner when the electrode is free of oil. If the electrode has traces of oil, use gasoline to clean off the oil before using the spark plug cleaner.
-
Install the spark plug.
-