SLIDING ROOF HOUSING(for Panoramic Moon Roof) REASSEMBLY
PROCEDURE
-
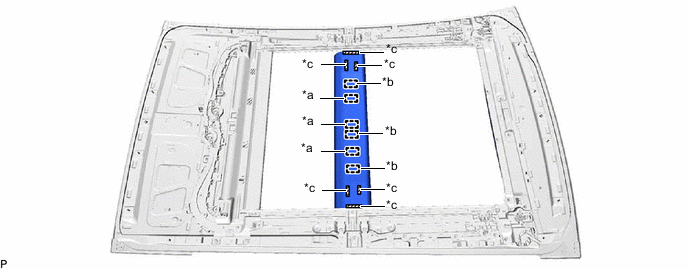
INSTALL SUNSHADE TRIM SUB-ASSEMBLY
-
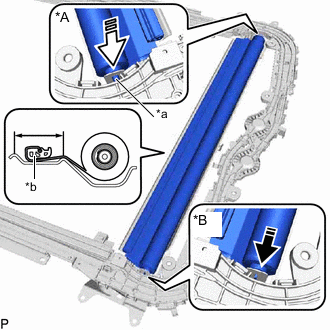
*A RH Side *B LH Side *a Retractor Cap *b Portion A 
Install in this Direction (1) 
Install in this Direction (2) Install the sunshade trim sub-assembly as shown in the illustration.
Note
To prevent the sunshade trim sub-assembly from being damaged, fully push in the RH side retractor cap when installing the sunshade trim sub-assembly.
Tech Tips
-
Connect the LH side first.
-
Set the portion (A) within the area shown in the illustration when installing the sunshade trim sub-assembly.
-
-
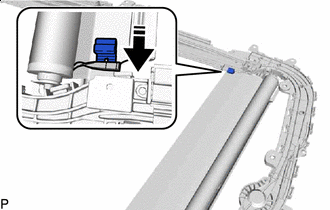
Install in this Direction Insert the sliding roof sunshade runner into the sunshade trim sub-assembly as shown in the illustration.
Tech Tips
Use the same procedure for the RH side and LH side.
-
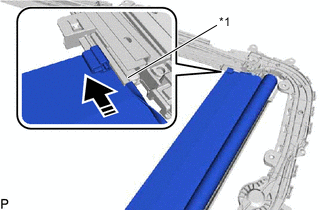
*1 Sliding Roof Guide Rail Sub-assembly RH Install in this Direction Slide the sliding roof sunshade runner and sunshade trim sub-assembly as shown in the illustration to install them to the sliding roof guide rail sub-assembly RH.
Tech Tips
Use the same procedure for the RH side and LH side.
-
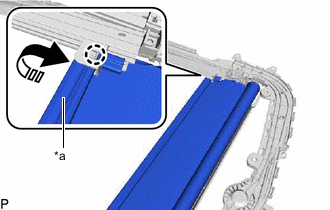
*a Portion A Install in this Direction Move the portion (A) as shown in the illustration to engage the claw.
Tech Tips
Use the same procedure for the RH side and LH side.
-
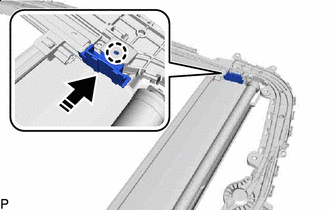
Install in this Direction Engage the claw to install the sliding roof sunshade guide RH as shown in the illustration.
Tech Tips
Use the same procedure for the RH side and LH side.
-
-
INSTALL SLIDE ROOF RAIL SUB-ASSEMBLY
-
Install the slide roof rail sub-assembly with the 42 nuts.
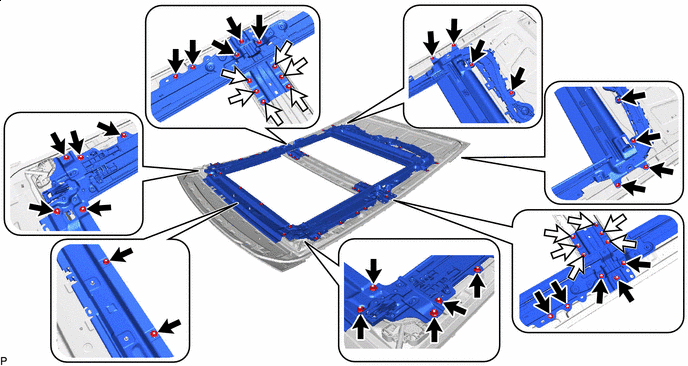

Nut (A) 
Nut (B) - Torque:
- Nut (A)
- 6.2 N*m { 63 kgf*cm, 55 in.*lbf }
- Nut (B)
- 9.4 N*m { 96 kgf*cm, 83 in.*lbf }
-
-
INSTALL ROOM LIGHT BRACKET
-
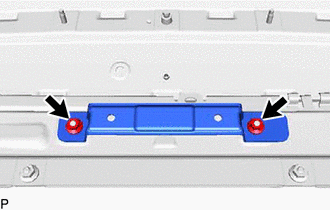
Install the room light bracket with the 2 nuts.
- Torque:
- 6.2 N*m { 63 kgf*cm, 55 in.*lbf }
-
-
INSTALL REAR SLIDING ROOF GARNISH
-
Clean the sliding roof housing panel.
-
Using a heat light, heat the sliding roof housing panel.
Heating Temperature Item Temperature Sliding Roof Housing Panel 40 to 60°C (104 to 140°F) CAUTION:
-
Do not touch the heat light and heated parts, touching the heat light may result in burns.
-
Touching heated parts for a long time may result in burns.
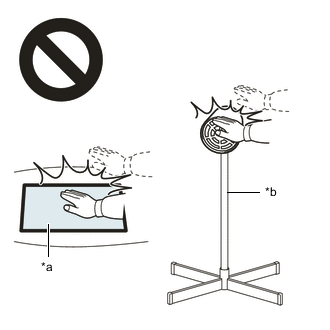
*a Heated Part *b Heat Light Note
Do not heat the sliding roof housing panel excessively.
-
-
Remove the double-sided tape from the sliding roof housing panel.
-
Clean off any tape adhesive residue with cleaner.
-
-
Coat the installation area of the sliding roof housing panel with primer.
-
Remove the release paper from a new rear sliding roof garnish.
Tech Tips
After removing the release paper, keep the exposed adhesive free from foreign matter.
-
Engage the 3 guides and 3 fasteners to install the rear sliding roof garnish.
*a Fastener *b Guide *c Double-sided Tape - -
-
-
INSTALL SLIDING ROOF DRIVE GEAR ASSEMBLY (for Roof Sunshade)
-
Apply MP grease to the gear of the sliding roof drive gear assembly.
-
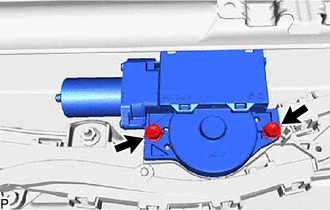
Install the sliding roof drive gear assembly with the 2 bolts.
- Torque:
- 5.4 N*m { 55 kgf*cm, 48 in.*lbf }
-
-
INSTALL SLIDING ROOF DRIVE GEAR ASSEMBLY (for Sliding Roof Glass)
-
Apply MP grease to the gear of the sliding roof drive gear assembly.
-
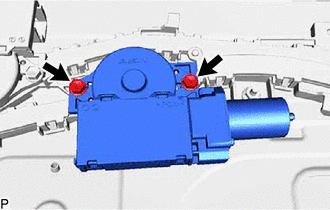
Install the sliding roof drive gear assembly with the 2 bolts.
- Torque:
- 5.4 N*m { 55 kgf*cm, 48 in.*lbf }
-
-
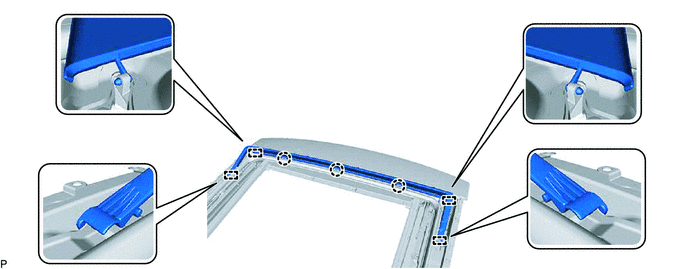
INSTALL ROOF WIND DEFLECTOR PANEL SUB-ASSEMBLY
-
Engage the 4 pins as shown in the illustration.
-
Engage the 3 claws to install the roof wind deflector panel sub-assembly.
-
-
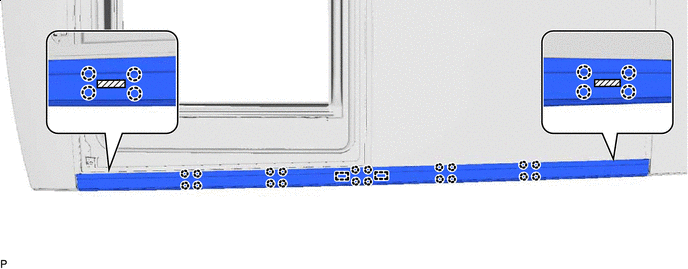
INSTALL NO. 2 ROOF WIRE
-
Engage the 16 clamps to install the No. 2 roof wire.
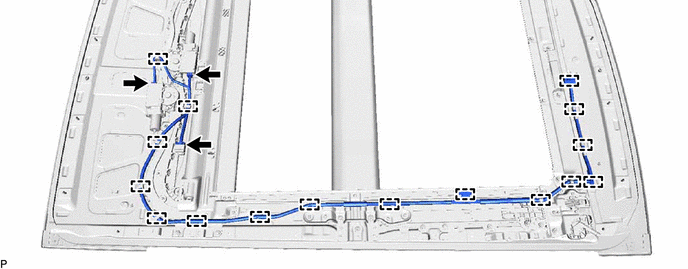
-
Connect the 3 connectors.
-
-
INSTALL NO. 1 SLIDING ROOF SIDE GARNISH LH
-
Clean the sliding roof housing panel.
-
Using a heat light, heat the sliding roof housing panel.
Heating Temperature Item Temperature Sliding Roof Housing Panel 40 to 60°C (104 to 140°F) CAUTION:
-
Do not touch the heat light and heated parts, touching the heat light may result in burns.
-
Touching heated parts for a long time may result in burns.
*a Heated Part *b Heat Light Note
Do not heat the sliding roof housing panel excessively.
-
-
Remove the double-sided tape from the sliding roof housing panel.
-
Clean off any tape adhesive residue with cleaner.
-
-
Coat the installation area of the sliding roof housing panel with primer.
-
Remove the release paper from a new No. 1 sliding roof side garnish LH.
Tech Tips
After removing the release paper, keep the exposed adhesive free from foreign matter.
-
Engage the 2 guides and 28 claws to install the No. 1 sliding roof side garnish LH.

Double-sided Tape - -
-
-
INSTALL NO. 1 SLIDING ROOF SIDE GARNISH RH
Tech Tips
Use the same procedure as for the LH side.