REAR SEAT RECLINING CONTROL CABLE REMOVAL
CAUTION / NOTICE / HINT
The necessary procedures (adjustment, calibration, initialization or registration) that must be performed after parts are removed and installed, or replaced during rear seatback lock assembly removal/installation are shown below.
| Replaced Part or Performed Procedure | Necessary Procedure | Effect/Inoperative Function when Necessary Procedure not Performed | Link |
|---|---|---|---|
| Disconnect cable from negative battery terminal | Perform steering sensor zero point calibration | Lane departure alert system (w/ Steering Control) | |
| Pre-collision system | |||
| Memorize steering angle neutral point | Parking assist monitor system |
CAUTION:
-
Wear protective gloves. Sharp areas on the parts may injure your hands.
-
Some of these service operations affect the SRS airbag system. Read the precautionary notices concerning the SRS airbag system before servicing.
PROCEDURE
-
REMOVE SPARE WHEEL COVER ASSEMBLY
-
REMOVE REAR SEAT ASSEMBLY
-
REMOVE CENTER STOP LIGHT SET
-
REMOVE LUGGAGE COMPARTMENT TRIM INNER PAD
-

Remove the luggage compartment trim inner pad.
-
-
DISCONNECT REAR SEAT OUTER BELT ASSEMBLY LH
-
DISCONNECT REAR SEAT OUTER BELT ASSEMBLY RH
Tech Tips
Use the same procedure as for the LH side.
-
REMOVE INNER ROOF SIDE GARNISH LH
-
REMOVE INNER ROOF SIDE GARNISH RH
Tech Tips
Use the same procedure as for the LH side.
-
REMOVE REAR SEAT SHOULDER BELT HOLE COVER
-
REMOVE PACKAGE TRAY TRIM PANEL ASSEMBLY (w/o Rear Sunshade)
-
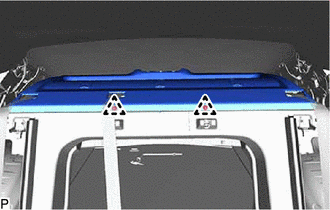
Remove the 2 clips.
-
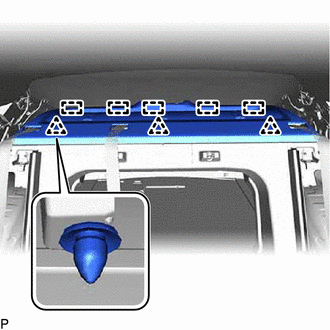
Disengage the 3 clips and 5 guides.
-
Pass the 3 rear seat belt floor anchors through the package tray trim panel assembly then remove the package tray trim panel assembly.
-
-
REMOVE PACKAGE TRAY TRIM PANEL ASSEMBLY (w/ Rear Sunshade)
-
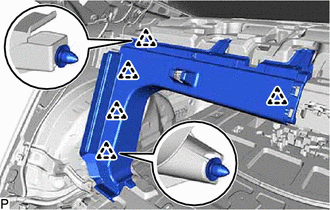
REMOVE ROOM PARTITION BOARD LH
-
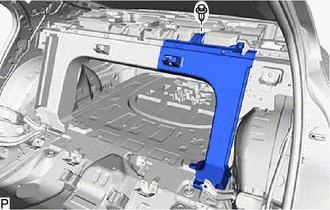
Remove the clip.
-
Disengage the 2 claws.
-
Disengage the 4 clips to remove the room partition board LH.
-
-
REMOVE ROOM PARTITION BOARD RH
-
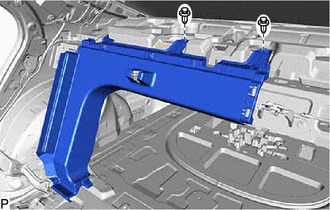
Remove the 2 clips.
-
Disengage the 5 clips to remove the room partition board RH.
-
-
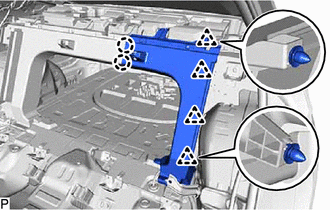
REMOVE REAR SEATBACK LOCK ASSEMBLY LH
-
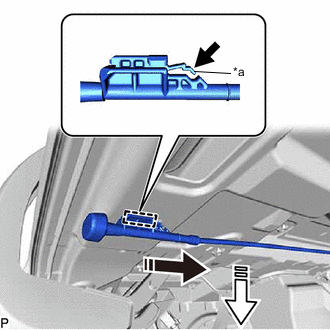
*a Stopper 
Release 
Remove in this Direction (1) 
Remove in this Direction (2) Release the stopper and disengage the guide as shown in the illustration.
-
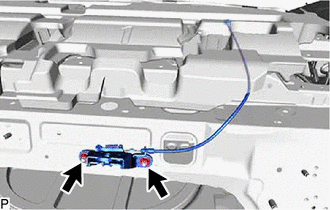
Remove the 2 nuts and rear seatback lock assembly LH.
-
-
REMOVE REAR SEATBACK LOCK ASSEMBLY RH
Tech Tips
Use the same procedure as for the LH side.