CENTER AIRBAG SENSOR ASSEMBLY INSTALLATION
CAUTION / NOTICE / HINT
Tech Tips
-
Use the same procedure for RHD and LHD vehicles.
-
The following procedure is for an LHD vehicle.
PROCEDURE
-
INSTALL AIRBAG SENSOR ASSEMBLY
-
Check that the ignition switch is off.
-
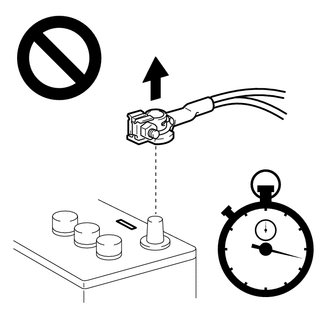
Check that the cable is disconnected from the negative (-) battery terminal.
CAUTION:
Wait at least 90 seconds after disconnecting the cable from the negative (-) battery terminal to disable the SRS system.
-
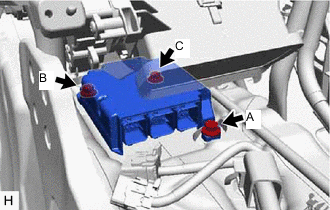
Install the airbag sensor assembly with the 3 bolts.
- Torque:
- 17.5 N*m { 178 kgf*cm, 13 ft.*lbf }
Note
-
Temporarily tighten the 2 bolts in the order of (A), (B) and then fully tighten the 3 bolts in the order of (C), (A) and (B).
-
If the airbag sensor assembly has been dropped, or there are any cracks, dents or other defects in the case or connector, replace it with a new one.
-
When installing the airbag sensor assembly, make sure that the SRS wiring does not interfere with or is not pinched between other parts.
-
When the ignition switch is first turned to ON after the airbag sensor assembly has been replaced, make sure that no one is in the vehicle.
-
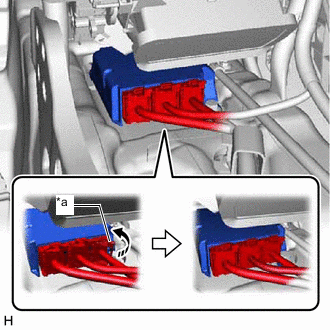
*a Lock Lever 
Move in this Direction Temporarily connect the connector and then move the lock lever in the direction indicated by the arrow to securely connect the connectors.
Note
When connecting any airbag connector, take care not to damage the airbag wire harness.
-
Check that there is no looseness in the installed parts of the airbag sensor assembly.
-
-
INSTALL NO. 1 CONSOLE BOX DUCT
-
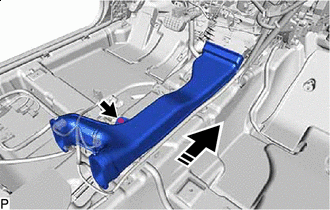
Install in this Direction Install the No. 1 console box duct with the clip as shown in the illustration.
-
-
INSTALL FRONT FLOOR CARPET ASSEMBLY
-
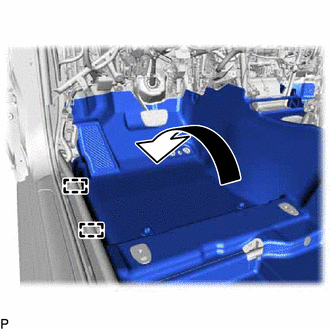
Install the front floor carpet assembly to its original position as shown in the illustration.
-
Engage the 2 guides.
-
Install the 2 front floor carpet clips.
-
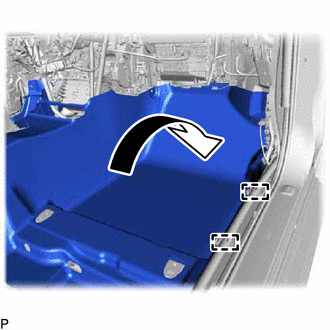
Install the front floor carpet assembly to its original position as shown in the illustration.
-
Engage the 2 guides.
-
for LHD:
-
Install the 2 front floor carpet clips.
-
-
for RHD:
-
Install the front floor carpet clip.
-
-
-
INSTALL FRONT FLOOR CAUTION PLATE COVER
-
INSTALL ACCELERATOR PEDAL
for 2AR-FE: Click here
for A25A-FKS: Click here
for 2GR-FKS: Click here
-
INSTALL ACCELERATOR PEDAL PAD
for 2AR-FE: Click here
for A25A-FKS: Click here
for 2GR-FKS: Click here
-
INSTALL NO. 1 INSTRUMENT PANEL UNDER COVER SUB-ASSEMBLY (for LHD)
-
INSTALL NO. 1 INSTRUMENT PANEL UNDER COVER SUB-ASSEMBLY (for RHD)
-
INSTALL LOWER CENTER PILLAR GARNISH LH
-
CONNECT REAR DOOR OPENING TRIM WEATHERSTRIP LH
-
INSTALL REAR DOOR SCUFF PLATE LH
-
CONNECT FRONT DOOR OPENING TRIM WEATHERSTRIP LH
-
INSTALL COWL SIDE TRIM SUB-ASSEMBLY LH
-
INSTALL FRONT DOOR SCUFF PLATE LH
-
INSTALL NO. 2 INSTRUMENT PANEL UNDER COVER SUB-ASSEMBLY
-
INSTALL LOWER CENTER PILLAR GARNISH RH
-
CONNECT REAR DOOR OPENING TRIM WEATHERSTRIP RH
-
INSTALL REAR DOOR SCUFF PLATE RH
-
CONNECT FRONT DOOR OPENING TRIM WEATHERSTRIP RH
-
INSTALL COWL SIDE TRIM SUB-ASSEMBLY RH
-
INSTALL FRONT DOOR SCUFF PLATE RH
-
INSTALL REAR SEAT CUSHION LOCK HOOK
for Fold Down Seat Type: Click here
for Reclining Seat Type: Click here
-
INSTALL REAR SEAT CUSHION ASSEMBLY
for Fold Down Seat Type: Click here
for Reclining Seat Type: Click here
-
CONNECT REAR CENTER SEAT OUTER BELT ASSEMBLY
for Fold Down Seat Type: Click here
for Reclining Seat Type: Click here
-
INSTALL CONSOLE BOX ASSEMBLY
-
INSTALL FRONT SEAT ASSEMBLY LH
-
INSTALL FRONT SEAT ASSEMBLY RH (for Power Seat)
-
INSTALL FRONT SEAT ASSEMBLY RH (for Manual Seat)
-
PERFORM DIAGNOSTIC SYSTEM CHECK
-
PERFORM YAW RATE AND ACCELERATION SENSOR ZERO POINT CALIBRATION
-
When the airbag sensor assembly is replaced, perform zero point learning for the yaw rate and acceleration sensor.
Tech Tips
The yaw rate and acceleration sensor is built into the airbag sensor assembly.
-