TIRE PRESSURE WARNING RECEIVER INSTALLATION
PROCEDURE
-
INSTALL TIRE PRESSURE WARNING ECU AND RECEIVER
Note
-
Do not drop, strike or otherwise subject the tire pressure warning ECU and receiver to impact.
-
If the tire pressure warning ECU and receiver is subjected to an impact, replace it with a new one.
-
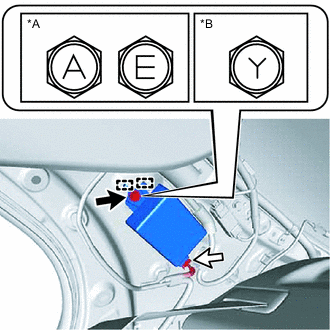
*A for Type A *B for Type B Connect the connector.
-
Engage the 2 guides and install the tire pressure warning ECU and receiver with the bolt.
- Torque:
- for Type A
- 8.3 N*m { 85 kgf*cm, 73 in.*lbf }
- for Type B
- 10 N*m { 102 kgf*cm, 7 ft.*lbf }
Note
There are three types of bolts and the tightening torque depends on the type of bolt used as shown in the illustration. Therefore, confirm the tightening torque before installing the bolt.
-
-
INSTALL INNER ROOF SIDE GARNISH RH
-
INSTALL REAR SIDE SEATBACK ASSEMBLY RH
-
INSTALL REAR DOOR OPENING TRIM WEATHERSTRIP RH
-
INSTALL REAR SEAT CUSHION LOCK HOOK
-
INSTALL REAR SEAT CUSHION ASSEMBLY
-
CONNECT REAR CENTER SEAT OUTER BELT ASSEMBLY
-
CONNECT CABLE TO NEGATIVE BATTERY TERMINAL
-
REGISTER TRANSMITTER ID
-
INSPECT TIRE PRESSURE WARNING SYSTEM
-
PERFORM INITIALIZATION
-
PERFORM DIAGNOSTIC SYSTEM CHECK
-
INSPECT SRS WARNING LIGHT