STARTER INSTALLATION
PROCEDURE
-
INSTALL STARTER ASSEMBLY
-
Install the starter assembly to the cylinder block sub-assembly with the 2 bolts.
- Torque:
- 46 N*m { 469 kgf*cm, 34 ft.*lbf }
-
Connect the No. 2 engine wire to terminal 30 with the nut.
- Torque:
- 9.8 N*m { 100 kgf*cm, 87 in.*lbf }
-
Close the terminal cap.
-
Connect the starter assembly connector.
-
Install the No. 1 radiator bracket to the front engine mounting with the bolt.
- Torque:
- 19 N*m { 194 kgf*cm, 14 ft.*lbf }
-
Engage the 3 clamps to install the radiator hose, vacuum hoses and No. 2 engine wire to the No. 1 radiator bracket.
-
Engage the 2 clamps to install the engine wire and No. 2 engine wire to the automatic transaxle assembly.
-
Engage the clamp to install the radiator hose to the fan shroud assembly.
-
Install the engine wire to the vehicle body with the bolt.
- Torque:
- 8.0 N*m { 82 kgf*cm, 71 in.*lbf }
-
-
INSTALL FLYWHEEL HOUSING SIDE COVER
-
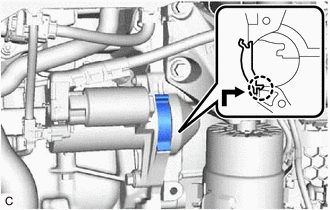
Align the protrusion with the cylinder block sub-assembly and engage the claw as shown in the illustration to install the flywheel housing side cover.
Note
-
Make sure the claw makes a click sound, indicating that it fits tightly.
-
Replace the flywheel housing side cover with a new one if the claw does not fit tightly or is deformed.
-
-
-
INSTALL AIR CLEANER ASSEMBLY WITH AIR CLEANER HOSE
-
INSTALL INLET AIR CLEANER ASSEMBLY
-
INSTALL COOL AIR INTAKE DUCT SEAL
-
INSTALL NO. 1 ENGINE COVER SUB-ASSEMBLY
-
CONNECT CABLE TO NEGATIVE BATTERY TERMINAL