RADIATOR INSTALLATION
PROCEDURE
-
INSTALL LOWER RADIATOR SUPPORT
-
Install the 2 lower radiator supports to the radiator assembly.
-
-
INSTALL RADIATOR SUPPORT CUSHION
-
Install the 2 radiator support cushions to the radiator assembly.
-
-
INSTALL RADIATOR ASSEMBLY
-
Engage the 2 guides.
-
Engage the 2 claws to install the fan with motor assembly to the radiator assembly.
Note
Do not damage the radiator assembly when installing the fan with motor assembly.
-
Install the radiator assembly with the fan with motor assembly to the vehicle body.
Note
Do not apply excessive force to the cooler condenser assembly or pipe when installing the radiator assembly with the fan with motor assembly.
-
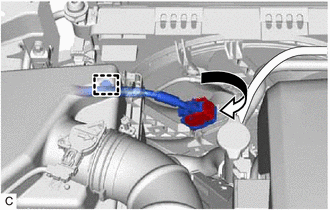
Connect the cooling fan motor connector. (for 330 W Cooling Fan Motor)
-

*a Lock Lever Engage the wire harness clamp.
-
Connect the cooling fan motor connector and push down the lock lever to engage the claw as shown in the illustration.
Note
-
When connecting the cooling fan motor connector, make sure that the connecting parts of the cooling fan motor connector are free of dirt, water or other foreign matter.
-
Be sure to securely connect the cooling fan motor connector.
-
-
-
Connect the cooling fan motor connector. (for 500 W Cooling Fan Motor)
-
Engage the wire harness clamp.
-
Connect the cooling fan motor connector and rotate the lever to lock it.
Note
-
When connecting the cooling fan motor connector, make sure that the connecting parts of the cooling fan motor connector are free of dirt, water and other foreign matter.
-
Be sure to securely connect the cooling fan motor connector.
-
-
Engage the wire harness clamp.
-
Connect the cooling fan motor connector.
-
-
Engage the 2 guides.
-
Engage the 2 claws to install the cooler condenser assembly to the radiator assembly.
Note
Make sure not to damage the cooler condenser assembly when installing the cooler condenser assembly.
-
-
CONNECT NO. 2 RADIATOR HOSE
-
Connect the No. 2 radiator hose to the radiator assembly and slide the clip to secure it.
-
-
CONNECT NO. 1 RADIATOR HOSE
-
Connect the No. 1 radiator hose to the radiator assembly and slide the clip to secure it.
-
Engage the clamp to connect the No. 1 radiator hose to the fan with motor assembly.
-
-
CONNECT NO. 5 WATER BY-PASS HOSE
-
Connect the No. 5 water by-pass hose to the radiator assembly and slide the clip to secure it.
-
Engage the 2 clamps to install the hose clamp (B) to the No. 5 water by-pass hose and No. 6 water by-pass hose.
-
Engage the 4 clamps to connect the No. 5 water by-pass hose and No. 6 water by-pass hose to the hose clamp (A).
-
-
INSTALL UPPER RADIATOR SUPPORT SUB-ASSEMBLY
-
Install the upper radiator support sub-assembly with the 4 bolts.
- Torque:
- 12.5 N*m { 127 kgf*cm, 9 ft.*lbf }
-
Engage the clamp to connect the hood lock control cable assembly to the upper radiator support sub-assembly.
-
-
INSTALL NO. 1 RADIATOR AIR GUIDE RH
-
Engage the guide and claw.
-
Install the No. 1 radiator air guide RH with the clip.
-
-
INSTALL NO. 1 RADIATOR AIR GUIDE LH
-
Engage the guide and claw.
-
Install the No. 1 radiator air guide LH with the front radiator side air guide plate LH with the clip.
-
-
INSTALL UPPER RADIATOR MOUNTING BRACKET
-
Install the 2 upper radiator mounting brackets with the 2 bolts and 2 nuts.
- Torque:
- 12.5 N*m { 127 kgf*cm, 9 ft.*lbf }
-
Connect the 2 horn connectors.
-
-
INSTALL INLET AIR CLEANER ASSEMBLY
-
INSTALL HOOD LOCK ASSEMBLY
-
INSTALL FRONT BUMPER REINFORCEMENT
-
INSTALL FRONT BUMPER ENERGY ABSORBER
-
INSTALL THERMISTOR ASSEMBLY
-
INSTALL HEADLIGHT ASSEMBLY
for LED Type Turn Signal Light: Click here
for Bulb Type Turn Signal Light: Click here
-
ADD ENGINE COOLANT
-
INSPECT FOR COOLANT LEAK
-
INSTALL NO. 1 ENGINE UNDER COVER
-
INSTALL FRONT WHEEL OPENING EXTENSION PAD LH
-
INSTALL FRONT WHEEL OPENING EXTENSION PAD RH