PROCEDURE
- Click here
INSTALL FRONT ENGINE MOUNTING INSULATOR
-
Install the stay to the front engine mounting insulator with the nut.
6.0 N*m 61 kgf*cm 53 in.*lbf -
Install the front engine mounting insulator to the front frame assembly with the 3 nuts.
72 N*m 734 kgf*cm 53 ft.*lbf -
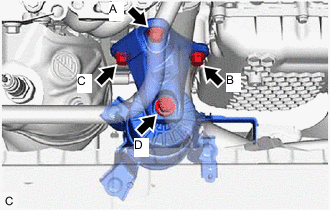
Install the front engine mounting bracket to the transaxle housing with the 3 bolts.
Bolt (A), (B) and (C) 42 N*m 428 kgf*cm 31 ft.*lbf Note:Temporarily tighten the bolt (A), and then fully tighten the 3 bolts in the order of (B), (C) and (A).
-
Install the front engine mounting bracket to the front engine mounting insulator with the bolt.
Bolt (D) 72 N*m 734 kgf*cm 53 ft.*lbf -
Connect the vacuum hose to the front engine mounting insulator.
-
Engage the 2 clamps to install the vacuum hoses to the front engine mounting insulator.
-
- Click here
INSTALL NO. 1 ENGINE UNDER COVER
- Click here
INSTALL FRONT WHEEL OPENING EXTENSION PAD LH
- Click here
INSTALL FRONT WHEEL OPENING EXTENSION PAD RH
- Click here
INSTALL V-BANK COVER SUB-ASSEMBLY
- Click here
INSTALL VACUUM SWITCHING VALVE (for Active Control Engine Mount System)