CAMSHAFT OIL CONTROL SOLENOID INSTALLATION
CAUTION / NOTICE / HINT
Note
This procedure includes the installation of small-head bolts. Refer to Small-Head Bolts of Basic Repair Hint to identify the small-head bolts.
PROCEDURE
-
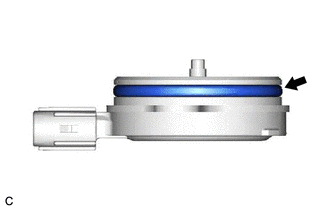
INSTALL O-RING
Tech Tips
Perform this procedure only when replacement of the O-ring is necessary.
-
Clean the O-ring groove of the cam timing oil control solenoid assembly.
Note
Make sure the O-ring groove is free of foreign matter.
-
Install a new O-ring to the cam timing oil control solenoid assembly.
Note
Do not damage the O-ring when installing it.
-
-
INSTALL CAM TIMING OIL CONTROL SOLENOID ASSEMBLY
-
Apply a light coat of engine oil to the O-ring of the cam timing oil control solenoid assembly.
Note
If reusing the cam timing oil control solenoid assembly, be sure to inspect the O-ring.
-
Using an 8 mm socket wrench, install the cam timing oil control solenoid assembly to the No. 2 timing gear cover assembly with 2 new bolts.
- Torque:
- 10 N*m { 102 kgf*cm, 7 ft.*lbf }
Note
-
If the cam timing oil control solenoid assembly has been struck or dropped, replace it.
-
Make sure that the O-ring is not cracked or moved out of place when installing the cam timing oil control solenoid assembly.
-
Connect the cam timing oil control solenoid assembly connector.
-
-
INSPECT FOR ENGINE OIL LEAK
-
INSTALL NO. 2 ENGINE COVER
-
INSTALL NO. 2 BRAKE TUBE CLAMP BRACKET
-
Engage the clamp to install the No. 2 brake tube clamp bracket.
-
Connect the No. 2 brake tube clamp bracket to the vehicle body with the bolt.
- Torque:
- 7.0 N*m { 71 kgf*cm, 62 in.*lbf }
-
Engage the 3 clamps to install the piping clamp.
-
-
INSTALL NO. 1 ENGINE COVER SUB-ASSEMBLY