AUTOMATIC TRANSAXLE SYSTEM HYDRAULIC TEST

-
PERFORM HYDRAULIC TEST
CAUTION:
-
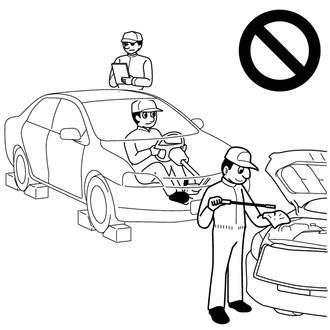
Do not perform a stall test if there are any people or objects near the vehicle.
-
The vehicle could begin moving suddenly, resulting in a serious accident.
-
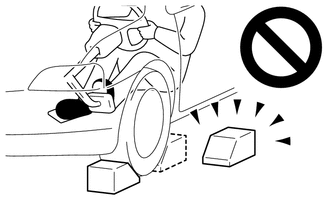
Do not perform a stall test if any wheel chocks are out of position.
-
The vehicle could begin moving suddenly, resulting in a serious accident.
-
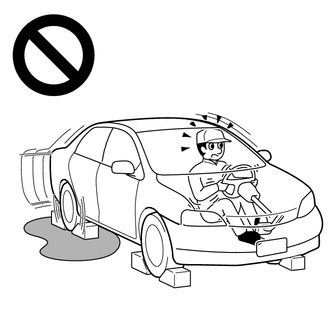
Do not perform the stall test on a slippery or low-friction surface that could allow the tires to spin.
-
The vehicle could begin moving suddenly, resulting in a serious accident.
Note
-
Perform this test with the ATF (Automatic Transaxle Fluid) at the normal operating temperature: 50 to 80°C (122 to 176°F)
-
Be careful to prevent the SST hose from contacting the exhaust pipe.
-
This test must be performed after checking and confirming that the engine is normal.
-
Perform this test with the air conditioning off.
-
Do not perform the stall test for longer than 5 seconds.
-
When performing the stall speed test repeatedly, wait for 15 seconds or more between tests.
-
Perform this test with the AUTO function (shift-linked function) of the electronic parking brake system off.
-
Measure the line pressure.
-
Warm up the ATF.
-
Lift the vehicle.
-
Remove the engine under cover.
-
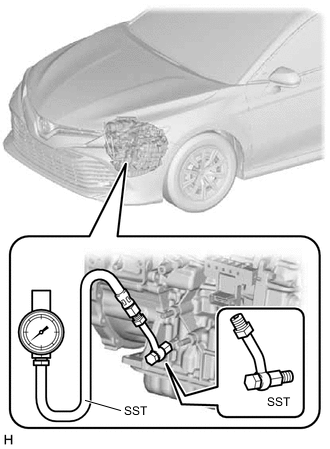
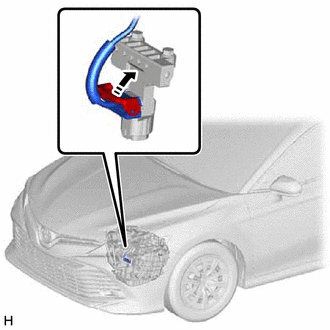
Remove the test plug on the front left side of the transaxle case and install SST.
- SST
- 09993-19015 (09993-00010, 09993-00040)
-
Lower the vehicle.
-
Fully apply the parking brake and chock all 4 wheels.
Tech Tips
When the parking brake indicator (red) is illuminated after the electric parking brake switch (electric parking brake switch assembly) has been pulled to the lock side, the maximum amount of braking force is applied if the electric parking brake switch (electric parking brake switch assembly) is pulled to the lock side one more time.
-
Connect the GTS to the DLC3.
-
Start the engine.
-
Enter the following menus: Powertrain / Engine and ECT / Active Test / Control the Shift Position.
Powertrain > Engine and ECT > Active TestTester Display Control the Shift Position -
Move the shift lever to D, and then use the GTS to perform the Active Test and hold 3rd gear. Measure the line pressure with the engine idling.
-
Turn the ignition switch off.
-
Disconnect the connector from the wiring harness connector.
Tech Tips
Disconnect the connector only when performing the D position stall test.
-
Start the engine.
-
Depress the brake pedal firmly with your left foot, move the shift lever to D, depress the accelerator pedal as much as possible with your right foot, and quickly read the line pressure when the engine reaches the stall speed.
-
Turn the ignition switch off.
-
Connect the connector to the wiring harness connector.
-
Depress the brake pedal firmly with your left foot, move the shift lever to R, and check the line pressure with the engine idling and then depress the accelerator pedal as much as possible with your right foot and quickly read the line pressure when the engine reaches the stall speed.
-
Remove SST and install the test plug.
-
Clear the DTCs.
Powertrain > Engine and ECT > Clear DTCsEvaluation Test Result Possible Cause Measured values are higher than the specified value in all positions
-
Solenoid (SLT) valve malfunction
-
Regulator valve malfunction
Measured values are lower than the specified value in all positions
-
Solenoid (SLT) valve malfunction
-
Regulator valve malfunction
-
Oil pump malfunction
Pressure is low in D only
-
D position circuit fluid leak
-
No. 1 clutch (C1) malfunction
Pressure is low in R only
-
R position circuit fluid leak
-
No. 2 brake (B2) malfunction
-
No. 3 brake (B3) malfunction
-
-
-