AUTOMATIC TRANSAXLE SYSTEM INITIALIZATION
-
RESET TRANSAXLE COMPENSATION CODE
Note
-
If the following parts have been replaced, initialize the ECM, perform Reset Memory and Perform Road Test to Allow ECM to Learn.
-
ECM (When transaxle compensation code cannot be transferred.)
-
Transmission valve body assembly
-
Solenoid (SL1) valve
-
Solenoid (SL2) valve
-
Solenoid (SL3) valve
-
Solenoid (SL4) valve
-
Solenoid (SL5) valve
-
Solenoid (SL6) valve
-
The transaxle compensation code can only be initialized with the GTS.
Tech Tips
The ECM (ECT) memorizes the vehicle conditions when controlling the automatic transaxle assembly and engine assembly.
Therefore, if the automatic transaxle assembly or ECM has been replaced, it is necessary to reset the memory so that the ECM can memorize the new information. The reset procedure is as follows:
-
Make sure the shift lever is in P or N.
-
Connect the GTS to the DLC3.
-
Turn the ignition switch to ON.
-
Turn the GTS on.
-
Enter the following menus: Powertrain / Transmission / Utility / A/T Code Reset.
Powertrain > Transmission > UtilityTester Display A/T Code Reset -
Press "Next" again to proceed.
Note
After the transaxle compensation code is initialized, perform Reset Memory and Perform Road Test to Allow ECM to Learn.
-
Press "Exit".
-
-
RESET MEMORY
Note
-
Perform Reset Memory (AT initialization) after replacing the automatic transaxle assembly, transmission valve body assembly or any of the solenoid (SL1, SL2, SL3, SL4, SL5 and/or SL6) valves.
-
Reset Memory can only be performed with the GTS.
-
Reset Memory cannot be completed by only disconnecting and reconnecting the cable to the negative (-) battery terminal.
Tech Tips
The ECM (ECT) memorizes the vehicle conditions when controlling the automatic transaxle assembly and engine assembly.
-
Connect the GTS to the DLC3.
-
Turn the ignition switch to ON.
-
Turn the GTS on.
-
Enter the following menus: Powertrain / Transmission / Utility / Reset Memory.
Powertrain > Transmission > UtilityTester Display Reset Memory -
Press "Next".
Note
After performing Reset Memory, be sure to perform Perform Road Test to Allow ECM to Learn.
-
-
PERFORM ROAD TEST TO ALLOW ECM TO LEARN
CAUTION:
-
Perform the following procedures while strictly observing all traffic laws and speed limits.
-
Do not accelerate or decelerate rapidly.
-
The "road test" procedure is as follows:
-
Warm up the engine.
-
According to the replaced parts, perform the appropriate road test shown below.
Replaced Parts Road Test
-
Automatic transaxle assembly
-
ECM
-
Transmission valve body assembly
-
Solenoid (SL1) valve
-
Solenoid (SL2) valve
-
Solenoid (SL3) valve
-
Solenoid (SL4) valve
-
Solenoid (SL5) valve
-
Solenoid (SL6) valve
-
Engine assembly
Perform pattern
-
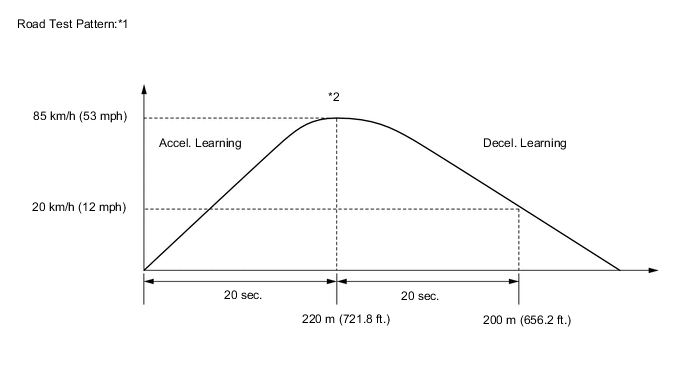
With the shift lever in D, after gradually accelerating to 85 km/h (53 mph) or more, gradually decelerate to approximately 20 km/h (12 mph).
Tech Tips
-
After gradually accelerating over a distance of approximately 220 m (721.9 ft.) for a period of approximately 20 seconds, gradually decelerate over a distance of approximately 200 m (656.2 ft.) for a period of approximately 20 seconds.
-
When decelerating, apply the brakes as necessary to adjust the vehicle speed.
Note
-
*1: The speed, time and distance values are approximate values.
-
*2: After accelerating, deceleration does not need to be performed immediately.
-
-
Repeat the road test until the shift shock and engine speed overrun (engine speed flare when shifting) reach an acceptable level.
Note
When repeating the acceleration/deceleration cycle of a road test pattern, bring the vehicle to a complete stop before accelerating again.
-
-