HEADLIGHT ASSEMBLY(for Single Beam Headlight) INSPECTION
PROCEDURE
-
INSPECT HEADLIGHT UNIT ASSEMBLY LH
-
Remove the headlight assembly LH.
-
Remove the headlight unit LH from the headlight assembly LH.
-
Measure the resistance according to the value(s) in the table below.
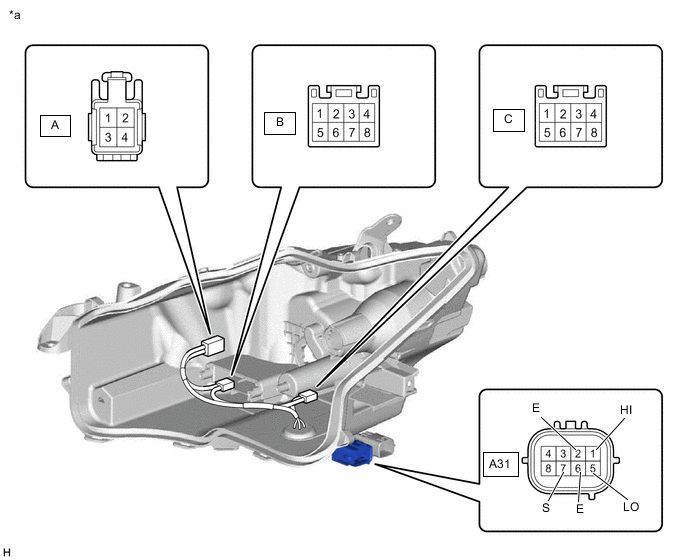
*a Component without harness connected
(Headlight Unit Assembly LH)
- - Standard Resistance Tester Connection Condition Specified Condition A-1 - C-7 Always Below 1 Ω A-3 - C-2 Always Below 1 Ω A-2 - B-2 Always Below 1 Ω A-4 - B-7 Always Below 1 Ω B-5 - A31-5 (LO) Always Below 1 Ω B-1 - A31-6 (E) Always Below 1 Ω B-8 - A31-7 (S) Always Below 1 Ω C-5 - A31-1 (HI) Always Below 1 Ω C-1 - A31-2 (E) Always Below 1 Ω If the result is not as specified, replace the headlight unit assembly LH.
-
-
INSPECT HEADLIGHT CORD LH
-
Disconnect the headlight cord LH.
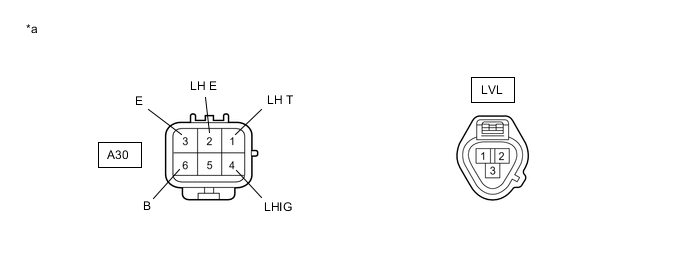
*a Component without harness connected
(Headlight Cord LH)
- - -
Measure the resistance according to the value(s) in the table below.
Standard Resistance Tester Connection Condition Specified Condition A30-2 (LH E) - LVL-1 Always Below 1 Ω A30-1 (LH T) - LVL-2 Always Below 1 Ω A30-4 (LHIG) - LVL-3 Always Below 1 Ω If the result is not as specified, replace the headlight cord LH.
-
Reconnect the headlight cord LH to the headlight unit LH.
-
Apply battery voltage to the headlight cord RH and check that the light comes on.
OK Condition Specified Condition Battery positive (+) → A30-6 (B)
Battery negative (-) → A30-3 (E)
Turn signal light LH comes on If the result is not as specified, replace the headlight cord LH or bulb.
-
-
INSPECT HEADLIGHT UNIT ASSEMBLY RH
-
Remove the headlight assembly RH.
-
Remove the headlight unit RH from the headlight assembly RH.
-
Measure the resistance according to the value(s) in the table below.
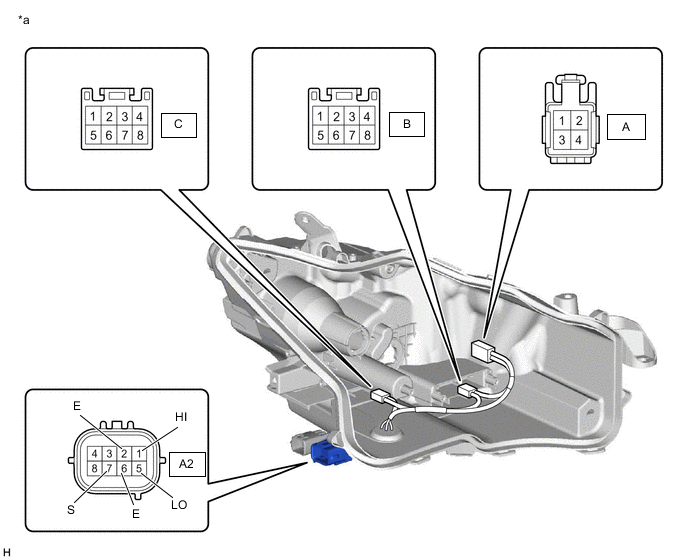
*a Component without harness connected
(Headlight Unit Assembly RH)
- - Standard Resistance Tester Connection Condition Specified Condition A-1 - C-7 Always Below 1 Ω A-3 - C-2 Always Below 1 Ω A-2 - B-2 Always Below 1 Ω A-4 - B-7 Always Below 1 Ω B-5 - A2-5 (LO) Always Below 1 Ω B-1 - A2-6 (E) Always Below 1 Ω B-8 - A2-7 (S) Always Below 1 Ω C-5 - A2-1 (HI) Always Below 1 Ω C-1 - A2-2 (E) Always Below 1 Ω If the result is not as specified, replace the headlight unit assembly RH.
-
-
INSPECT HEADLIGHT CORD RH
-
Disconnect the headlight cord RH.
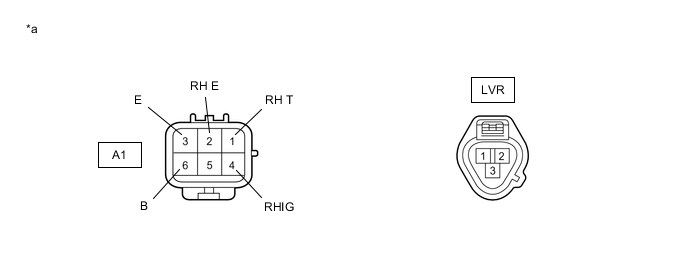
*a Component without harness connected
(Headlight Cord RH)
- - -
Measure the resistance according to the value(s) in the table below.
Standard Resistance Tester Connection Condition Specified Condition A1-2 (RH E) - LVR-1 Always Below 1 Ω A1-1 (RH T) - LVR-2 Always Below 1 Ω A1-4 (RHIG) - LVR-3 Always Below 1 Ω If the result is not as specified, replace the headlight cord RH.
-
Reconnect the headlight cord RH to the headlight unit RH.
-
Apply battery voltage to the headlight cord RH and check that the light comes on.
OK Condition Specified Condition Battery positive (+) → A1-6 (B)
Battery negative (-) → A1-3 (E)
Turn signal light RH comes on If the result is not as specified, replace the headlight cord RH or bulb.
-