AUDIO AND VISUAL SYSTEM(w/ Parallel Parking Assist Function) CUSTOMIZE PARAMETERS
-
CUSTOMIZING WITH MULTI-DISPLAY
-
Turn the power switch on (IG).
-
Enter the following menus: Setup / General / General Settings.
-
Select the setting by referring to the table below.
Item Default Content Setting Relevant ECU Feedback Force LEVEL3 (middle bar) Touchpad vibration feedback reaction force setting of the remote touch* LEVEL1 (No Vibration)/LEVEL2/LEVEL3/LEVEL4/LEVEL5 Radio receiver assembly Tech Tips
*: The higher the set value, the stronger the touchpad vibration feedback reaction force becomes.
-
-
CUSTOMIZING WITH REMOTE TOUCH
-
Customizing with remote touch example
-
Turn the power switch on (IG).
-
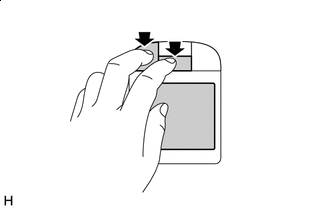
*a Example Simultaneously press and hold the applicable switches* for 5 seconds or more.
Tech Tips
*: The combination of switches pressed and held differs depending on the item to be customized.
-
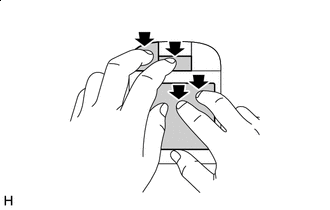
*a Example While pressing and holding the applicable switches*, use 2 fingers from your other hand to touch the touchpad.
Tech Tips
*: The combination of switches pressed and held differs depending on the item to be customized.
-
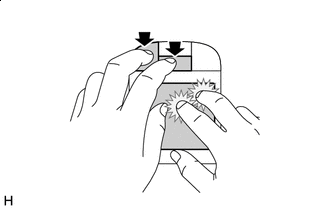
*a Example Check that the setting changes and the answer-back function vibrates the specified number of times.
-
Release the applicable switches* to set the customize setting.
Tech Tips
-
Repeat steps ii through v until the desired setting is selected.
-
*: The combination of switches pressed and held differs depending on the item to be customized.
-
-
-
Customize pointer/cursor movement speed
Tech Tips
The speed at which the pointer/cursor moves when the touchpad is touched with a finger can be changed.
-
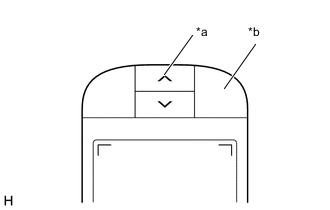
*a Up Switch *b "MENU" Switch Following "Customizing with remote touch example", simultaneously press the "MENU" switch and up switch and perform the procedure.
-
Determine the pointer/cursor movement speed from the number of times answer-back vibration is generated by the remote touch (remote operation controller assembly).
Setting Pointer/Cursor Movement Speed Answer-back Vibrations Average
(Default)
2 Fast 3 Slow 1 Tech Tips
The settings cycle in the following order: "Average", "Fast", "Slow".
-
-
Customize flick operation sensitivity
Tech Tips
The flick operation sensitivity for when a finger is quickly swiped on the touchpad can be changed.
-
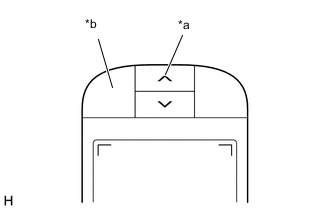
*a Up Switch *b Home Switch Following "Customizing with remote touch example", simultaneously press the home switch and up switch and perform the procedure.
-
Determine the flick operation sensitivity from the number of times answer-back vibration is generated by the remote touch (remote operation controller assembly).
Setting Flick Operation Recognition Speed Answer-back Vibrations Average
(Default)
1 Fast 3 Slow 2 Tech Tips
-
When the customize setting is set to "Average", a flick operation is recognized when a finger is quickly swiped on the touchpad.
-
When the customize setting is set to "Fast", a flick operation is recognized when a finger is very quickly swiped on the touchpad.
-
When the customize setting is set to "Slow", a flick operation is recognized when a finger is somewhat quickly swiped on the touchpad.
-
The settings cycle in the following order: "Average", "Fast", "Slow".
-
-
-
Customize screen (map/list) scroll direction during flick operation
Tech Tips
The screen (map/list) scroll direction for when a finger is used to flick the touchpad can be changed.
-
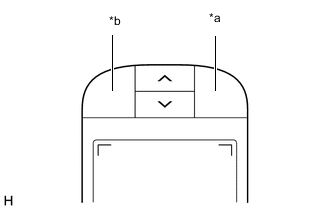
*a "MENU" Switch *b Home Switch Following "Customizing with remote touch example", simultaneously press the home switch and "MENU" switch and perform the procedure.
-
Determine the screen (map/list) scroll direction during a flick operation from the number of times answer-back vibration is generated by the remote touch (remote operation controller assembly).
Setting Screen (map/list) scroll direction during flick operation Answer-back Vibrations Same Direction as Flick Operation
(Default)
2 Opposite Direction of Flick Operation 1 Tech Tips
-
When the customize setting is set to "Same Direction as Flick Operation", the screen (map/list) scrolls in the same direction as the finger used to flick the touchpad.
-
When the customize setting is set to "Opposite Direction of Flick Operation", the screen (map/list) scrolls in the opposite direction of the finger used to flick the touchpad.
-
-
-
Customize pinch in/out operation function availability
Tech Tips
The availability of the zoom-in/zoom-out function of the map screen when fingers are used to pinch in/out on the touchpad can be changed.
-
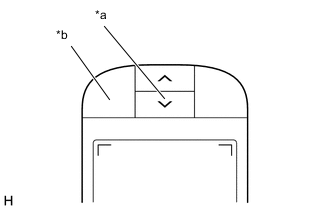
*a Down Switch *b Home Switch Following "Customizing with remote touch example", simultaneously press the home switch and down switch and perform the procedure.
-
Determine the pinch in/out operation function availability from the number of times answer-back vibration is generated by the remote touch (remote operation controller assembly).
Setting Pinch In/Out Operation Function Availability Answer-back Vibrations Function enabled
(Default)
2 Function disabled 1
-
-
Customize Flick Operation Function Availability
Tech Tips
The availability of the flick operation function on the map screen and list screens (screens with a vertical scroll tab) when a finger is used to flick the touchpad can be changed.
-

*a Up Switch *b "MENU" Switch *c Home Switch Following "Customizing with remote touch example", simultaneously press the home switch, up switch and "MENU" switch and perform the procedure.
-
Determine the flick operation function availability from the number of times answer-back vibration is generated by the remote touch (remote operation controller assembly).
Setting Flick Operation Function Availability Answer-back Vibrations Map Function Enabled, List Function Enabled
(Default)
1 Map Function Enabled, List Function Disabled 2 Map Function Disabled, List Function Disabled 3 Map Function Disabled, List Function Enabled 4 Tech Tips
-
When the customize setting is set to "Map Function Disabled, List Function Enabled" the flick operation cannot be used on the map screen, but can be used on list screens (screens with a vertical scroll tab).
-
When the customize setting is set to "Map Function Enabled, List Function Enabled" the flick operation can be used on both the map screen and list screens (screens with a vertical scroll tab).
-
When the customize setting is set to "Map Function Enabled, List Function Disabled" the flick operation can be used on the map screen, but cannot be used on list screens (screens with a vertical scroll tab).
-
When the customize setting is set to "Map Function Disabled, List Function Disabled" the flick operation cannot be used on the map screen or list screens (screens with a vertical scroll tab).
-
The settings cycle in the following order: "Map Function Disabled, List Function Enabled", "Map Function Enabled, List Function Enabled", "Map Function Enabled, List Function Disabled", "Map Function Disabled, List Function Disabled".
-
-
-