FRONT DISC BRAKE PAD REPLACEMENT

CAUTION / NOTICE / HINT
Note
-
After replacing the front disc brake pads, the brake pedal may feel soft due to clearance between the front disc brake pads and front disc. Depress the brake pedal several times until the brake pedal feels firm.
-
When the brake pedal is first depressed after replacing the brake pads or pushing back the disc brake piston, DTC C1341, C1342, C1343 and/or C1344 may be stored. As there is no malfunction, clear the DTCs.
-
While the auxiliary battery is connected, even if the power switch is off, the brake control system activates when the brake pedal is depressed or the door courtesy switch is turned on. Therefore, even if only brake pads are to be removed and installed, be sure to remove the ABS motor relays before beginning work.
Tech Tips
-
Use the same procedure for the RH side and LH side.
-
The following procedure is for the LH side.
PROCEDURE
-
REMOVE ABS MOTOR RELAY
for LHD: Click here
for RHD: Click here
-
REMOVE FRONT WHEEL
-
REMOVE FRONT DISC BRAKE PAD
-
REMOVE FRONT DISC BRAKE ANTI-SQUEAL SHIM KIT
-
INSTALL FRONT DISC BRAKE ANTI-SQUEAL SHIM KIT
-
INSTALL FRONT DISC BRAKE PAD
-
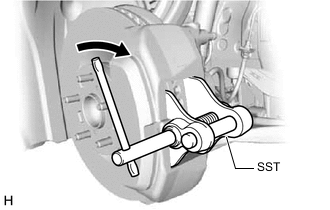
Using SST, push in the front disc brake piston.
- SST
- 09719-77020
Note
-
Make sure the brake fluid does not overflow from the reservoir.
-
Do not forcibly push in the front disc brake piston.
-
Install the front disc brake pad.
-
-
INSTALL ABS MOTOR RELAY
-
With the power switch off, install the 2 ABS motor relays (ABS motor No. 1 relay and ABS motor No. 2 relay).
-
Clear the DTCs.
-
-
INSPECT BRAKE FLUID LEVEL IN RESERVOIR
-
INSTALL FRONT WHEEL