BATTERY VOLTAGE SENSOR INSTALLATION
PROCEDURE
-
INSTALL BATTERY VOLTAGE SENSOR
CAUTION:
Wear insulated gloves.
-
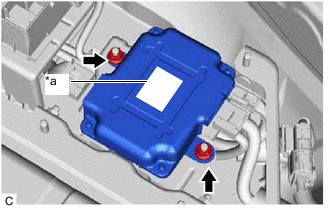
*a Red Label Install the battery voltage sensor to the upper No. 5 HV battery carrier bracket with the 2 nuts.
- Torque:
- 7.5 N*m { 76 kgf*cm, 66 in.*lbf }
Note
-
Check color of the label.
-
If the battery voltage sensor has been struck or dropped, replace it.
-
Connect the 3 battery voltage sensor connectors.
Note
Make sure that the connectors are connected securely.
-
-
INSTALL UPPER NO. 1 HYBRID BATTERY COVER SUB-ASSEMBLY
CAUTION:
Wear insulated gloves.
-
Install the upper No. 1 hybrid battery cover sub-assembly to the HV battery with the 9 nuts.
- Torque:
- 7.5 N*m { 76 kgf*cm, 66 in.*lbf }
-
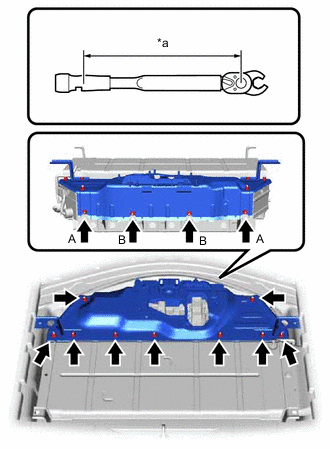
*a Torque Wrench Fulcrum Length Using a 10 mm union nut wrench, tighten the 2 nuts (A) and 2 nuts (B).
- Torque:
- Specified tightening torque
- 7.5 N*m { 76 kgf*cm, 66 in.*lbf }
Tech Tips
-
Calculate the torque wrench reading when changing the fulcrum length of the torque wrench.
-
When using a 10 mm union nut wrench (fulcrum length of 22 mm (0.866 in.)) + torque wrench (fulcrum length of 155 mm (6.1 in.)): 7.0 N*m (71 kgf*cm, 62 in.*lbf)
-
-
CONNECT FRAME WIRE
-
INSTALL NO. 4 HV BATTERY SHIELD PANEL
-
INSTALL REAR NO. 1 FLOOR CROSSMEMBER BRACE LH
-
INSTALL REAR NO. 1 FLOOR CROSSMEMBER BRACE RH
-
INSTALL REAR LUGGAGE COMPARTMENT TRIM COVER
-
INSTALL FRONT LUGGAGE COMPARTMENT TRIM COVER
-
INSTALL SERVICE PLUG GRIP