BACK DOOR OUTSIDE GARNISH INSTALLATION
PROCEDURE
-
INSTALL NO. 1 BACK DOOR NAME PLATE
-
Engage the 2 guide and 4 claws to install the No. 1 back door name plate.
-
-
INSTALL BACK DOOR OUTSIDE GARNISH SUB-ASSEMBLY
-
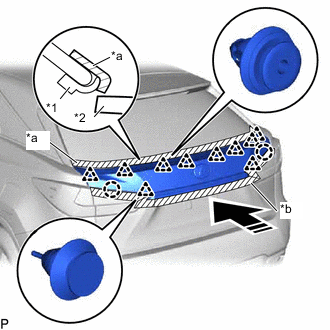
*1 Lower Back Window Moulding *2 Back Door Outside Garnish Sub-assembly *a Tape *b Protective Tape 
Install in this Direction Pull back the lower back window moulding and secure it with tape as shown in the illustration.
Note
Be careful not to damage the lower back window moulding.
-
Engage the 2 claws and 10 clips as shown in the illustration.
Tech Tips
Check that the lower back window moulding is not caught under the back door outside garnish sub-assembly.
-
Install the back door outside garnish sub-assembly with the 4 bolts.
- Torque:
- 5.0 N*m { 51 kgf*cm, 44 in.*lbf }
-
w/ Touchless Power Back Door:
-
Connect the connector.
-
-
-
INSTALL BACK DOOR TRIM PANEL ASSEMBLY (w/o Rear No. 2 Seat)
-
INSTALL BACK DOOR TRIM PANEL ASSEMBLY (w/ Rear No. 2 Seat)
-
INSTALL NO. 1 LUGGAGE COMPARTMENT LIGHT ASSEMBLY
-
INSTALL BACK DOOR FINISH COVER LH (w/o Power Back Door)
-
INSTALL BACK DOOR FINISH COVER RH (w/o Power Back Door)
Tech Tips
Use the same procedure as for the LH side.
-
INSTALL DOOR PULL HANDLE (w/ Power Back Door)
-
INSTALL BACK DOOR TRIM BASE (w/ Power Back Door)
-
INSTALL BACK DOOR LOCK COVER (w/o Rear No. 2 Seat)
-
INSTALL BACK DOOR LOCK COVER (w/ Rear No. 2 Seat)
-
INSTALL BACK DOOR TRIM COVER LH (w/o Rear No. 2 Seat)
-
INSTALL BACK DOOR TRIM COVER LH (w/ Rear No. 2 Seat)
-
INSTALL BACK DOOR TRIM COVER RH
Tech Tips
Use the same procedure as for the LH side.
-
INSTALL BACK WINDOW UPPER PANEL TRIM (w/o Rear No. 2 Seat)
-
INSTALL BACK WINDOW UPPER PANEL TRIM (w/ Rear No. 2 Seat)