REAR SPOILER INSTALLATION
PROCEDURE
-
INSTALL SIDE REAR SPOILER PROTECTOR SUB-ASSEMBLY LH
-
Install 3 new clips to the side rear spoiler protector sub-assembly LH.
-
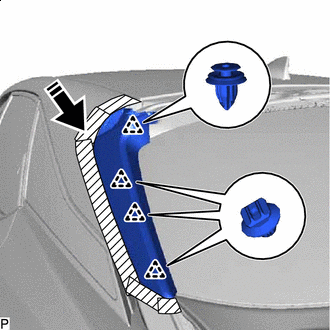

Install in this Direction Engage the 4 clips as shown in the illustration to install the side rear spoiler protector sub-assembly LH.
-
-
INSTALL SIDE REAR SPOILER PROTECTOR SUB-ASSEMBLY RH
Tech Tips
Use the same procedure as for the LH side.
-
INSTALL REAR SPOILER SUB-ASSEMBLY (w/o Rear No. 2 Seat)
-
When reusing the rear spoiler sub-assembly:
-
Wipe off any adhesive residue with cleaner.
-
-
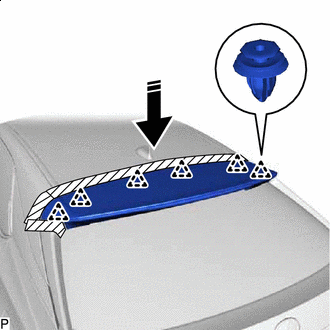
Install in this Direction Engage the 6 clips as shown in the illustration to install the rear spoiler sub-assembly.
-
Apply adhesive to the threads of the bolt.
Adhesive Toyota Genuine Adhesive 1324, Three Bond 1324 or equivalent -
Install the rear spoiler sub-assembly with the 2 bolts and 5 nuts.
- Torque:
- 6.6 N*m { 67 kgf*cm, 58 in.*lbf }
-
Install the 2 hole plugs.
-
Connect each connector.
-
-
INSTALL REAR SPOILER SUB-ASSEMBLY (w/ Rear No. 2 Seat)
-
When reusing the rear spoiler sub-assembly:
-
Wipe off any adhesive residue with cleaner.
-
-
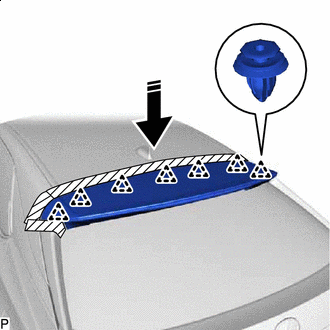
Install in this Direction Engage the 7 clips as shown in the illustration to install the rear spoiler sub-assembly.
-
Apply adhesive to the threads of the bolt.
Adhesive Toyota Genuine Adhesive 1324, Three Bond 1324 or equivalent -
Install the rear spoiler sub-assembly with the 4 bolts and 3 nuts.
- Torque:
- 6.6 N*m { 67 kgf*cm, 58 in.*lbf }
-
Install the 2 hole plugs.
-
Connect each connector.
-
-
INSTALL BACK WINDOW UPPER PANEL TRIM (w/o Rear No. 2 Seat)
-
INSTALL BACK WINDOW UPPER PANEL TRIM (w/ Rear No. 2 Seat)