POWER BACK DOOR DRIVE UNIT REMOVAL
CAUTION / NOTICE / HINT
Tech Tips
-
Use the same procedure for the RH side and LH side.
-
The following procedure is for the LH side.
PROCEDURE
-
REMOVE BACK WINDOW UPPER PANEL TRIM (w/o Rear No. 2 Seat)
-
REMOVE BACK WINDOW UPPER PANEL TRIM (w/ Rear No. 2 Seat)
-
REMOVE BACK DOOR TRIM COVER LH (w/o Rear No. 2 Seat)
-
REMOVE BACK DOOR TRIM COVER LH (w/ Rear No. 2 Seat)
-
REMOVE BACK DOOR TRIM COVER RH
Tech Tips
Use the same procedure as for the LH side.
-
REMOVE BACK DOOR LOCK COVER (w/o Rear No. 2 Seat)
-
REMOVE BACK DOOR LOCK COVER (w/ Rear No. 2 Seat)
-
REMOVE BACK DOOR TRIM BASE
-
REMOVE DOOR PULL HANDLE
-
REMOVE NO. 1 LUGGAGE COMPARTMENT LIGHT ASSEMBLY
-
REMOVE BACK DOOR TRIM PANEL ASSEMBLY (w/o Rear No. 2 Seat)
-
REMOVE BACK DOOR TRIM PANEL ASSEMBLY (w/ Rear No. 2 Seat)
-
REMOVE POWER BACK DOOR UNIT SET ASSEMBLY
-
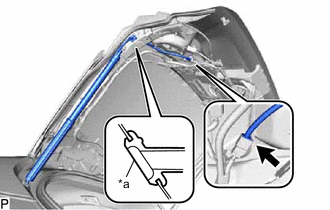
*a Grommet Disconnect the connector.
-
Disengage the grommet.
-
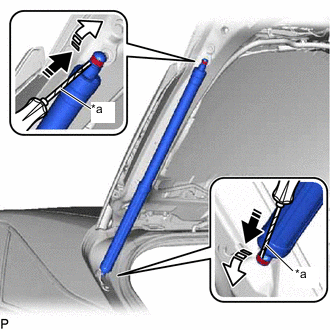
*a Protective Tape 
Remove in this Direction (1) 
Remove in this Direction (2) Using a screwdriver with its tip wrapped with protective tape, slightly raise the 2 stop rings as indicated by the arrows, in the order shown in the illustration.
-
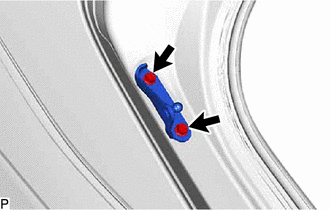
Disengage the 2 ball joints to remove the power back door unit set assembly.
Note
-
Remove the power back door unit set assembly while supporting the back door by hand.
-
Make sure to replace the power back door unit set assembly with a new one.
-
-
-
REMOVE BACK DOOR DAMPER STAY UPPER BRACKET
-
Remove the 2 bolts and back door damper stay upper bracket.
-
-
REMOVE BACK DOOR DAMPER STAY LOWER BRACKET
-

Remove the 2 bolts and back door damper stay lower bracket.
-