REAR NO. 2 SEAT ASSEMBLY INSPECTION
PROCEDURE
-
INSPECT NO. 2 SEAT CUSHION FRAME SUB-ASSEMBLY RH
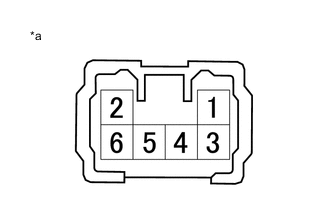
*a Component without harness connected
(No. 2 Seat Cushion Frame Sub-assembly RH)
-
Apply battery voltage to the lifter motor connector, and check that the No. 2 seat cushion frame sub-assembly RH operates smoothly as follows.
OK Battery Connection Specified Condition Battery positive (+) → Terminal 4
Battery negative (-) → Terminal 3
Downward Battery positive (+) → Terminal 3
Battery negative (-) → Terminal 4
Upward
-
-
INSPECT NO. 2 SEATBACK FRAME SUB-ASSEMBLY RH
*a Component without harness connected
(No. 2 Seatback Frame Sub-assembly RH)
-
Apply battery voltage to the reclining motor connector, and check that the No. 2 seatback frame sub-assembly RH operates smoothly as follows.
OK Battery Connection Specified Condition Battery positive (+) → Terminal 3
Battery negative (-) → Terminal 4
Forward Battery positive (+) → Terminal 4
Battery negative (-) → Terminal 3
Backward
-
-
INSPECT NO. 2 SEAT CUSHION FRAME SUB-ASSEMBLY LH
*a Component without harness connected
(No. 2 Seat Cushion Frame Sub-assembly LH)
-
Apply battery voltage to the lifter motor connector, and check that the No. 2 seat cushion frame sub-assembly LH operates smoothly as follows.
OK Battery Connection Specified Condition Battery positive (+) → Terminal 4
Battery negative (-) → Terminal 3
Downward Battery positive (+) → Terminal 3
Battery negative (-) → Terminal 4
Upward
-
-
INSPECT NO. 2 SEATBACK FRAME SUB-ASSEMBLY LH
*a Component without harness connected
(No. 2 Seatback Frame Sub-assembly LH)
-
Apply battery voltage to the reclining motor connector, and check that the No. 2 seatback frame sub-assembly LH operates smoothly as follows.
OK Battery Connection Specified Condition Battery positive (+) → Terminal 3
Battery negative (-) → Terminal 4
Forward Battery positive (+) → Terminal 4
Battery negative (-) → Terminal 3
Backward
-