REAR SEAT ASSEMBLY(for 60/40 Split Seat Type RH Side) REASSEMBLY
CAUTION / NOTICE / HINT
CAUTION:
Wear protective gloves. Sharp areas on the seat frame may injure your hands.
PROCEDURE
-
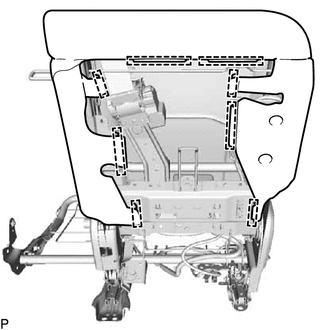
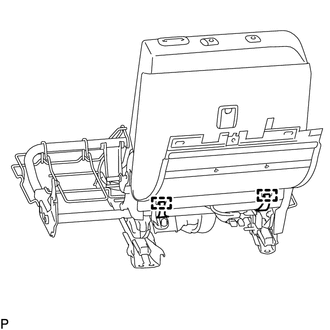
INSTALL REAR SEATBACK FRAME SUB-ASSEMBLY RH
-
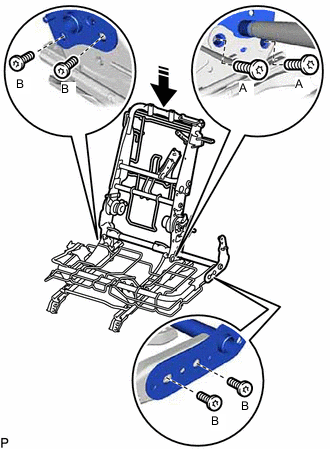

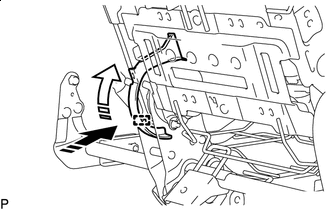
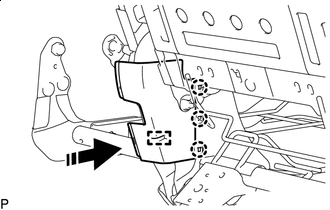
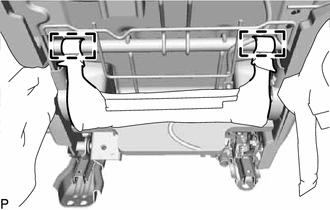
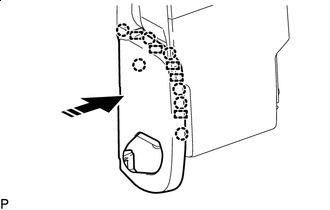
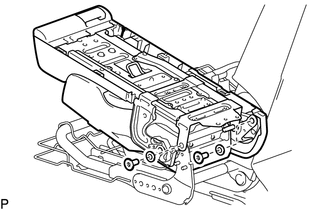
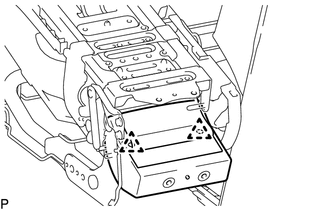
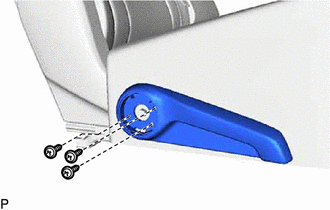
Install in this Direction Using a T40 "TORX" socket wrench, install the 4 bolts (B).
- Torque:
- 29 N*m { 296 kgf*cm, 21 ft.*lbf }
-
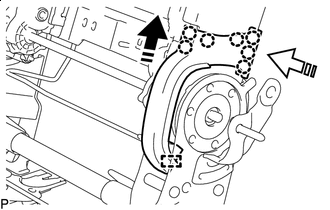
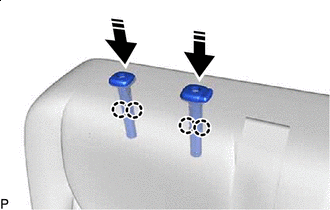
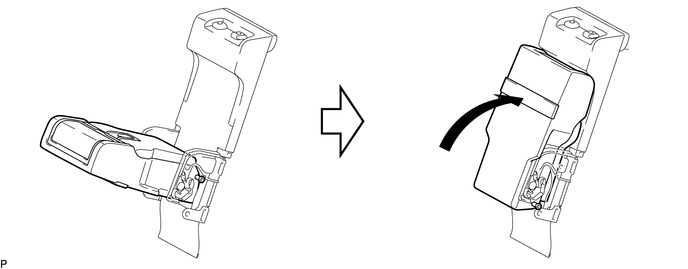
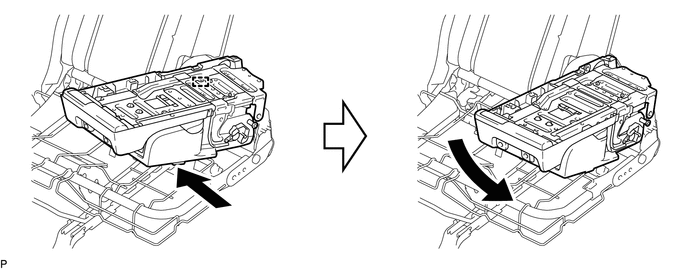
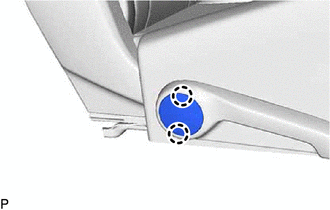
Using a T55 "TORX" socket wrench, install the rear seatback frame sub-assembly to the rear seat cushion frame sub-assembly RH with the 2 bolts (A) as shown in the illustration
- Torque:
- 64 N*m { 653 kgf*cm, 47 ft.*lbf }
-
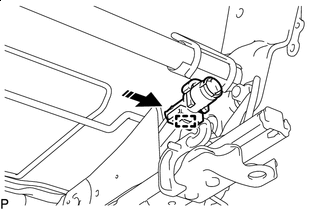
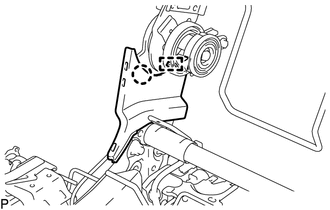
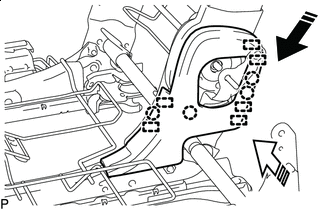
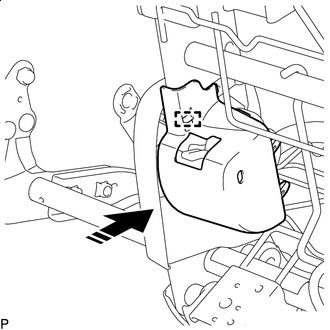
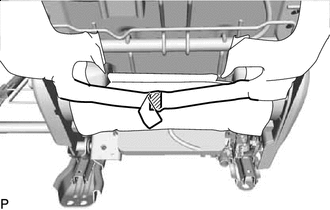
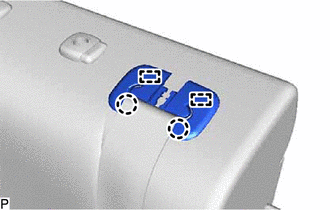
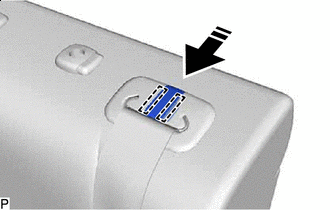
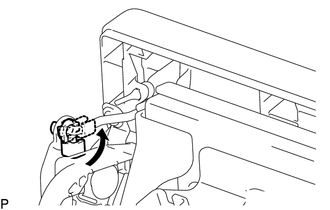
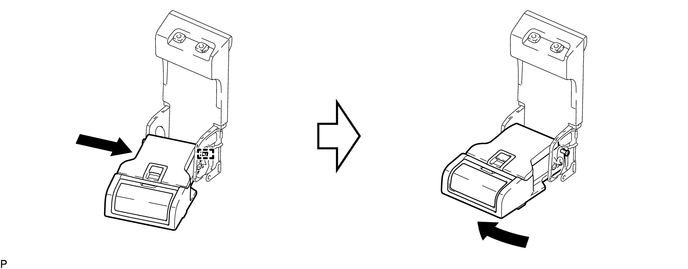
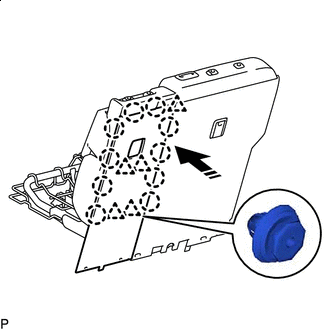
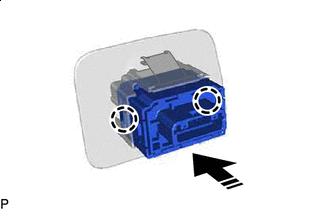
Install in this Direction Engage the clamp to install the joint case as shown in the illustration.
-
-
INSTALL REAR SEAT LEG PLATE SUB-ASSEMBLY RH
-
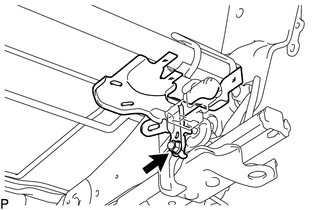
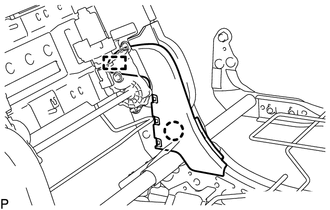
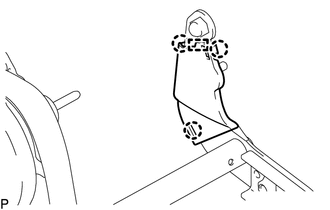
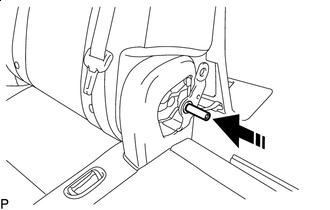
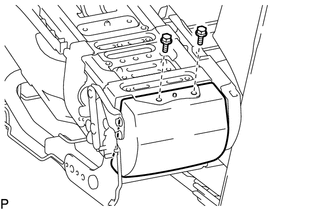
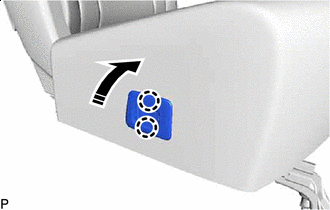
Install the rear seat leg plate sub-assembly RH with the nut.
- Torque:
- 7.5 N*m { 76 kgf*cm, 66 in.*lbf }
-
-
INSTALL REAR SEAT RECLINING CONTROL CABLE (for Manual Seat)
-
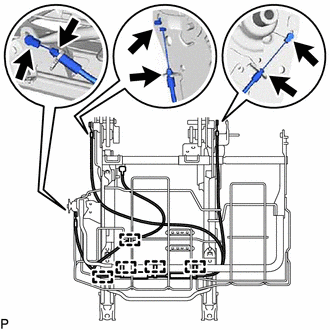
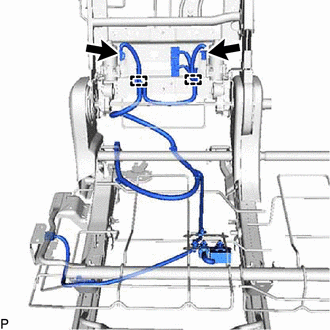
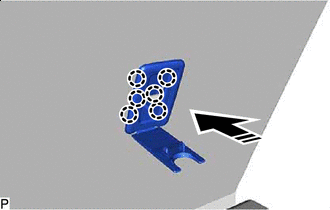
Connect the 6 cable clamps.
-
Engage the 5 clamps to install the No. 2 rear seat reclining control cable.
-
-
INSTALL RECLINING ADJUSTER INSIDE COVER LH (for Manual Seat)
-
Engage the guide and claw to install the reclining adjuster inside cover LH.
-
-
INSTALL UPPER NO. 1 REAR SEATBACK MOULDING (for Power Seat)
-
Install in this Direction (1) 
Install in this Direction (2) Engage the guide and install the upper No. 1 rear seatback moulding as indicated by the arrows, in the order shown in the illustration.
-
-
INSTALL UPPER NO. 2 REAR SEATBACK MOULDING (for Power Seat)
-
Install in this Direction (1) Install in this Direction (2) Engage the guide and 7 claws as indicated by the arrows, in the order shown in the illustration to install the upper No. 2 rear seatback moulding.
-
-
INSTALL RECLINING ADJUSTER INSIDE COVER LH (for Power Seat)
-
Engage the guide and claw to install the reclining adjuster inside cover LH.
-
-
INSTALL RECLINING ADJUSTER INSIDE COVER LH (for Power Seat)
-
Install in this Direction Engage the guide and 3 claws to install the reclining adjuster inside cover LH as shown in the illustration.
-
-
INSTALL REAR SEAT INNER RECLINING COVER RH
-
Install in this Direction (1) Install in this Direction (2) Engage the 6 guides and 4 claws as indicated by the arrows, in the order shown in the illustration to install the rear seat inner reclining cover RH.
-
-
INSTALL RECLINING ADJUSTER INSIDE COVER RH
-
Engage the guide and claw to install the reclining adjuster inside cover RH.
-
-
INSTALL REAR SEATBACK MOULDING RH
-

Install in this Direction (1) Install in this Direction (2) Engage the 6 guides and 6 claws as indicated by the arrow, in the order shown in the illustration to install the rear seatback moulding RH.
-
-
INSTALL RECLINING ADJUSTER INSIDE COVER LH
-
Engage the 3 claws and guide to install the reclining adjuster inside cover LH.
-
-
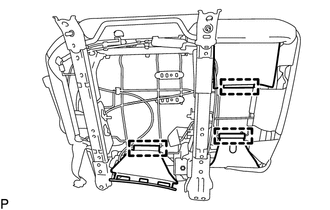
INSTALL REAR SEAT WIRE RH (for Power Seat)
-
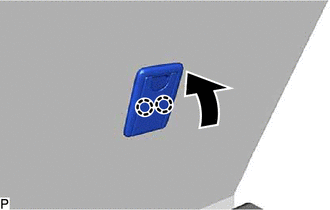
Engage the 2 clamps and install the rear seat wire RH.
-
Connect the 2 connectors.
-
-
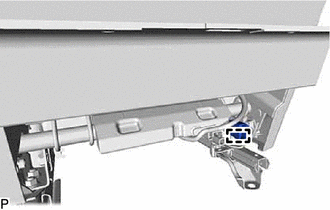
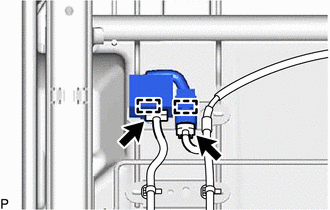
INSTALL FOLD SEAT CONTROL ECU (for Power Seat)
-
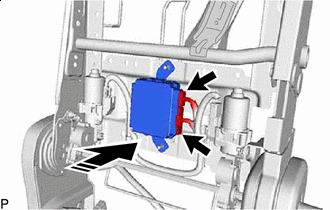
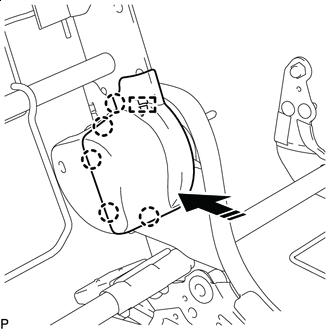
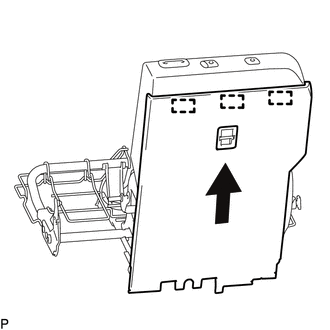
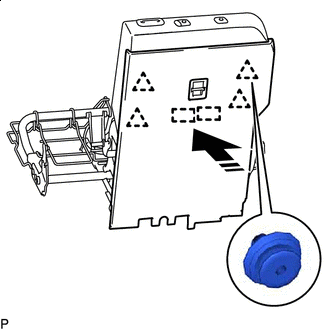
Install in this Direction Connect the 2 connectors and install the fold seat control ECU as shown in the illustration.
-
-
INSTALL REAR SEATBACK PROTECTOR (for Power Seat)
-
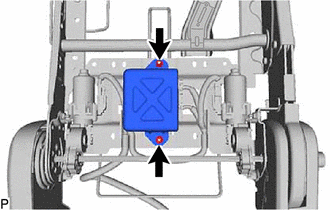
Install the rear seatback protector with the 2 nuts.
- Torque:
- 5.5 N*m { 56 kgf*cm, 49 in.*lbf }
-
-
INSTALL NO. 2 RECLINING LINK COVER RH (for Manual Seat)
-
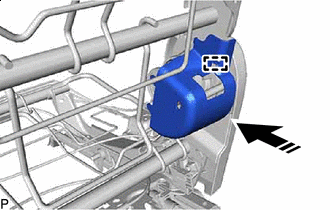
Install in this Direction Engage the guide to install the No. 2 reclining link cover RH as shown in the illustration.
-
-
INSTALL NO. 1 RECLINING LINK COVER RH (for Manual Seat)
-
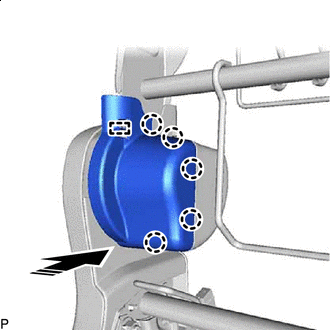
Install in this Direction Engage the guide and 5 claws to install the No. 1 reclining link cover RH as shown in the illustration.
-
-
INSTALL NO. 2 RECLINING LINK COVER LH (for Manual Seat)
-
Install in this Direction Engage the guide to install the No. 2 reclining link cover LH as shown in the illustration.
-
-
INSTALL NO. 1 RECLINING LINK COVER LH (for Manual Seat)
-
Install in this Direction Engage the guide and 5 claws to install the No. 1 reclining link cover LH as shown in the illustration.
-
-
INSTALL REAR SEAT AIRBAG ASSEMBLY RH
-
INSTALL REAR CENTER SEAT OUTER BELT ASSEMBLY
-
INSTALL SEATBACK FELT RH
-
Install a new seatback felt RH.
-
-
INSTALL SEAT COVER WIRE
-
Install the 5 seat cover wires.
Tech Tips
-
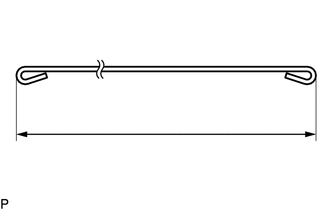
Wire 1000 mm (3.28 ft.) or longer and shaped wire are available as supplied parts.
-
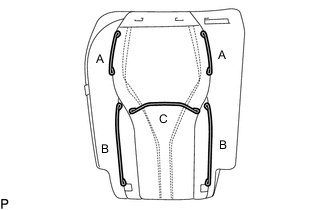
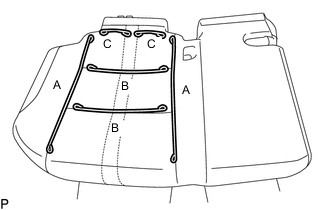
For wire 1000 mm (3.28 ft.) or less in length, cut or shape 1000 mm (3.28 ft.) wire into the dimensions shown in the illustration.
-
Make sure to read the precautions before preparing the wire.
Length A 130 mm (5.12 in.) B 330 mm (1.0824 ft.) C Available as supplied parts. Tech Tips
The dimension shown in the illustration is the length.
-
-
-
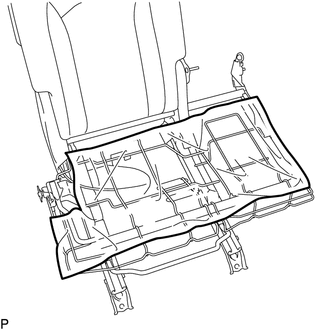
INSTALL SEPARATE TYPE REAR SEATBACK COVER
Tech Tips
When installing a separate type rear seatback cover, refer to Precaution in order to prevent wrinkles from forming.
-
for Manual Seat:
-
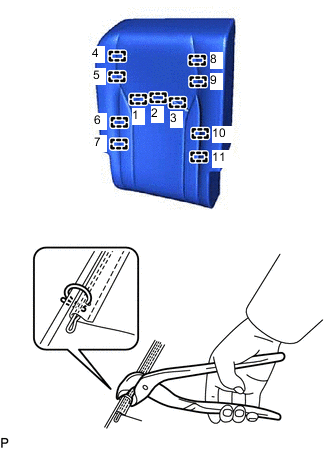
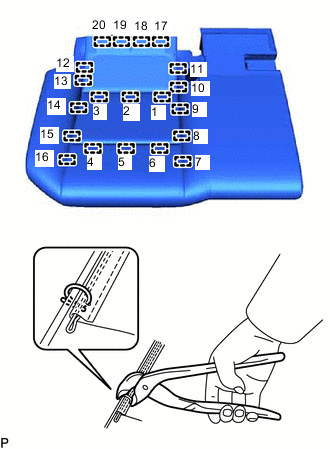
Using hog ring pliers, install the separate type rear seatback cover to the separate type rear seatback pad with 11 new hog rings in the order shown in the illustration.
Note
-
Be careful not to damage the separate type rear seatback cover.
-
Be sure to securely install the hog rings as shown in the illustration while preventing wrinkles from forming on the separate type rear seatback cover.
-
-
-
for Power Seat:
-
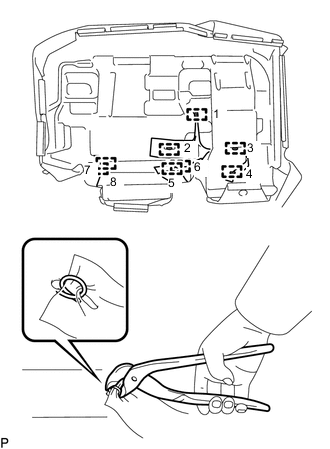
Using hog ring pliers, install the separate type rear seatback cover to the separate type rear seatback pad with 11 new hog rings in the order shown in the illustration.
Note
-
Be careful not to damage the separate type rear seatback cover.
-
Be sure to securely install the hog rings as shown in the illustration while preventing wrinkles from forming on the separate type rear seatback cover.
-
-
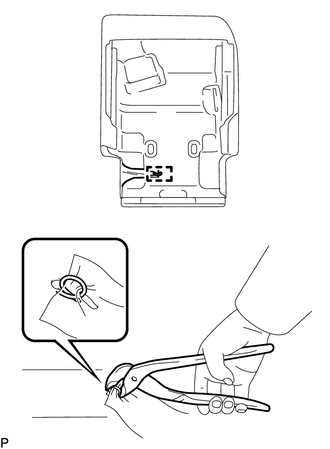
Using hog ring pliers, install a new hog ring.
Note
-
Be careful not to damage the separate type rear seatback cover.
-
Be sure to securely install the hog ring as shown in the illustration while preventing wrinkles from forming on the separate type rear seatback cover.
-
-
-
-
INSTALL SEPARATE TYPE REAR SEATBACK COVER WITH PAD
-
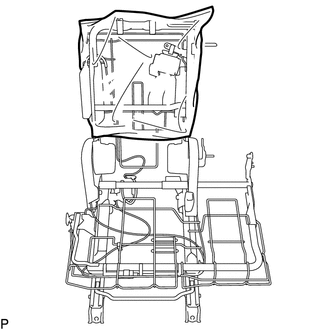
Temporarily install the separate type rear seatback cover with pad to the rear seatback frame sub-assembly.
-
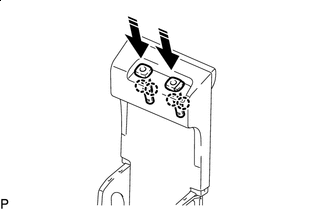
Install the 2 rear seatback cover brackets with the nut.
- Torque:
- 5.5 N*m { 56 kgf*cm, 49 in.*lbf }
Note
-
For vehicles with a rear seat airbag assembly, the separate type rear seatback cover with pad must be securely installed. Otherwise, the rear seat airbag assembly may not deploy properly.
-
Make sure that the strap is not twisted after installing the nut.
-
Make sure that the brackets are installed securely.
-
for Manual Seat:
-
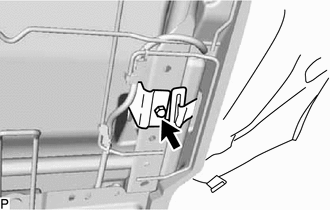
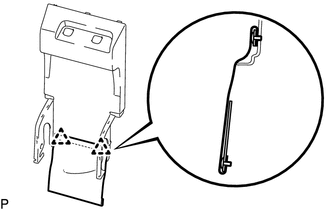
Engage the 2 hooks.
-

Fastener Engage the fastener.
-
-
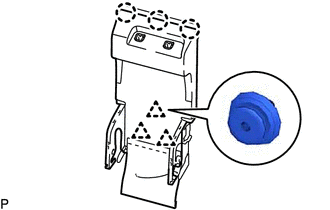
Install in this Direction Engage the 4 claws to install the 2 rear No. 1 seat headrest supports as shown in the illustration.
-
Engage each hook to install the separate type rear seatback cover with pad.
-
-
INSTALL REAR SEAT SHOULDER BELT COVER
-
Pass rear center seat outer belt assembly through the rear seat shoulder belt cover and engage the 2 guides and 2 claws to install it.
-
-
INSTALL SEAT BELT ANCHOR COVER CAP
-
Install in this Direction Engage the 2 guides to install the seat belt anchor cap as shown in the illustration.
-
-
CONNECT REAR CENTER SEAT OUTER BELT ASSEMBLY
-
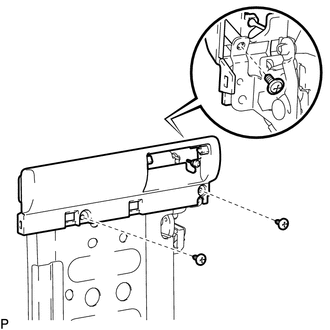
INSTALL REAR SEATBACK BOARD CARPET ASSEMBLY RH
-
Engage the 3 guides as shown in the illustration.
-
Install in this Direction Engage the 2 guides and 4 clips as shown in the illustration.
-
Engage the 2 hooks to install the rear seatback board carpet assembly RH.
-
-
INSTALL SEAT CUSHION FELT RH
-
Install a new seat cushion felt RH.
-
-
INSTALL REAR SEATBACK COVER RH
-
Install in this Direction Engage the 6 claws to install the rear seatback cover RH as shown in the illustration.
-
Engage the 2 claws as shown in the illustration.
-
-
INSTALL REAR SEATBACK LOCK ASSEMBLY RH
-
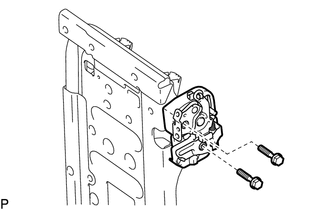
Install the rear seatback lock assembly RH with the 2 bolts.
- Torque:
- 13.5 N*m { 138 kgf*cm, 10 ft.*lbf }
-
-
INSTALL NO. 2 CENTER SEATBACK COVER
-
Install the No. 2 center seatback cover with the 3 screws.
-
-
INSTALL REAR SEATBACK LOCK LEVER
-
Engage the guide and claw to install the rear seatback lock lever as shown in the illustration.
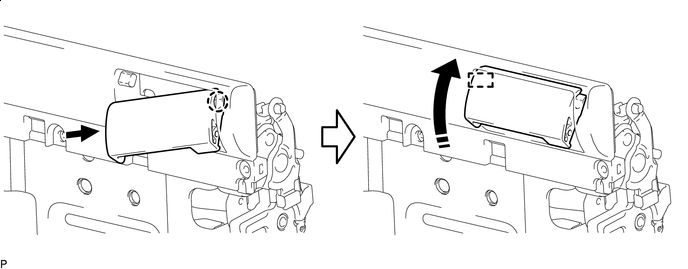
Install in this Direction - - -
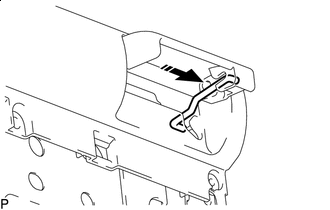
Install in this Direction Install the fold seatback wire as shown in the illustration.
-
Install the fold seatback wire and engage the retainer as shown in the illustration to secure it.
-
-
INSTALL REAR SEAT CENTER ARMREST COVER SUB-ASSEMBLY
-
Engage the 2 clips to install the rear seat center armrest cover sub-assembly as shown in the illustration.
-
-
INSTALL NO. 1 SEATBACK COVER
-
Engage the 3 claws and 3 clips to install the No. 1 seatback cover.
-
Install in this Direction Engage the 4 claws to install the 2 rear seat headrest support assemblies as shown in the illustration.
-
-
INSTALL NO. 2 REAR SEAT CENTER ARMREST BOX (w/ Console Box Lid)
-
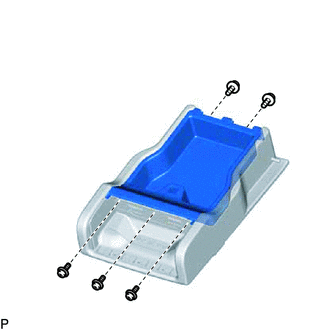
Install the No. 2 rear seat center armrest box with the 5 screws.
-
-
INSTALL REAR SEAT CENTER ARMREST DOOR SUB-ASSEMBLY (w/ Console Box Lid)
-
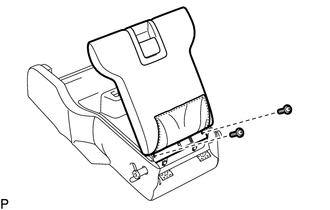
Install the rear seat center armrest door sub-assembly with the 2 screws.
-

Fastener Engage the 2 fasteners.
-
-
INSTALL CUP HOLDER ASSEMBLY
-
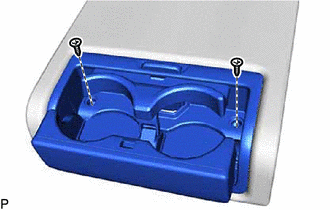
Install the cup holder assembly with the 2 screws.
-
-
INSTALL REAR SEAT CENTER ARMREST COVER
-
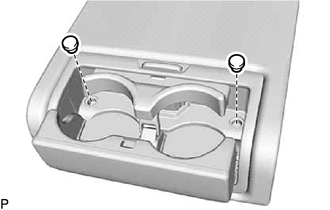
Install the 2 rear seat center armrest covers.
-
-
INSTALL REAR SEAT CENTER ARMREST ASSEMBLY
-
Engage the guide as shown in the illustration.
-

Using a T45 "TORX" socket wrench, install the rear seat center armrest assembly with the No. 2 rear seat reclining spacer and 2 bolts.
- Torque:
- 21 N*m { 214 kgf*cm, 15 ft.*lbf }
-
Fold the rear seat center armrest assembly RH as shown in the illustration.
-

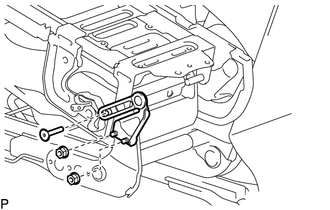
Using a T45 "TORX" socket wrench, install the bolt and rear seatback hinge.
- Torque:
- 21 N*m { 214 kgf*cm, 15 ft.*lbf }
-
-
INSTALL CENTER ARMREST HINGE COVER RH
-
Install in this Direction Engage the 5 guides and 7 claws to install the center armrest hinge cover RH as shown in the illustration.
-
-
INSTALL ARMREST ASSEMBLY
-
Install in this Direction Install the rear seat center armrest plate as shown in the illustration.
-
Engage the pin and temporarily install the armrest assembly as indicated by the arrows, in the order shown in the illustration.
-
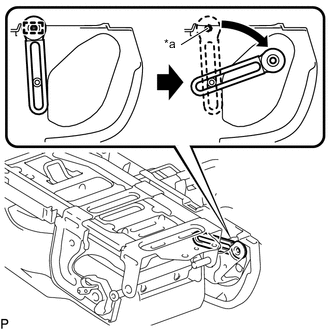
*a Pin Engage the rear seatback hinge to the pin of the center armrest hinge cover RH as shown in the illustration.
Note
If the rear seatback hinge is not engaged to the pin of the center armrest hinge cover RH, the armrest assembly cannot be installed as it will interfere with the rear seatback frame sub-assembly RH.
-
Using a T45 "TORX" socket wrench, install the armrest assembly with the 2 rear seat reclining spacers and 2 bolts.
- Torque:
- 21 N*m { 214 kgf*cm, 15 ft.*lbf }
-
Using a T45 "TORX" socket wrench, install the bolt.
- Torque:
- 21 N*m { 214 kgf*cm, 15 ft.*lbf }
-
Install the rear seatback center hinge sub-assembly with the 2 nuts.
- Torque:
- 21 N*m { 214 kgf*cm, 15 ft.*lbf }
-
-
INSTALL NO. 1 SEAT ARMREST ASSEMBLY
-
Engage the 2 clips.
-
Install the No. 1 seat armrest assembly with the 2 bolts.
- Torque:
- 21 N*m { 214 kgf*cm, 15 ft.*lbf }
-
-
INSTALL CENTER ARMREST HINGE COVER LH
-

Install in this Direction Engage the 5 guides and 7 claws to install the center armrest hinge cover LH as shown in the illustration .
-
-
INSTALL REAR SEATBACK BOARD SUB-ASSEMBLY
-
Install in this Direction Engage the 5 clips and 10 claws to install the rear seatback board sub-assembly as shown in the illustration.
-
-
INSTALL REAR SEATBACK COVER (w/o Telematics Transceiver)
-

Install in this Direction Engage the 6 claws to install the rear seatback cover as shown in the illustration.
-
Engage the 2 claws as shown in the illustration.
-
-
INSTALL REAR SEAT 3 POINT TYPE BELT ASSEMBLY RH
-
INSTALL SEAT COVER WIRE
-
Install the 6 seat cover wires.
Tech Tips
-
Wire 1000 mm (3.28 ft.) or longer and shaped wire are available as supplied parts.
-
For wire 1000 mm (3.28 ft.) or less in length, cut or shape 1000 mm (3.28 ft.) wire into the dimensions shown in the illustration.
-
Make sure to read the precautions before preparing the wire.
Length A 420 mm (1.3776 ft.) B 240 mm (9.45 in.) C 90 mm (3.54 in.) Tech Tips
The dimension shown in the illustration is the length.
-
-
-
INSTALL SEPARATE TYPE REAR SEAT CUSHION COVER
Tech Tips
When installing a separate type rear seat cushion cover, refer to Precaution in order to prevent wrinkles from forming.
-
Using hog ring pliers, install the separate type rear seat cushion cover to the separate type rear seat cushion pad with 20 new hog rings in the order shown in the illustration.
Note
-
Be careful not to damage the separate type rear seat cushion cover.
-
Be sure to securely install the hog rings as shown in the illustration while preventing wrinkles from forming on the separate type rear seat cushion cover.
-
-
Using hog ring pliers, install 8 new hog rings in the order shown in the illustration.
Note
-
Be careful not to damage the separate type rear seat cushion cover.
-
Be sure to securely install the hog rings as shown in the illustration while preventing wrinkles from forming on the separate type rear seat cushion cover.
-
-
-
INSTALL SEPARATE TYPE REAR SEAT CUSHION COVER WITH PAD
-
Temporarily install the separate type rear cushion cover with pad to the rear seat cushion frame sub-assembly RH.
-

Engage each hook to install the separate type rear seat cushion cover with pad.
-
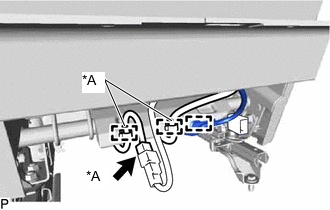
*A w/ Seat Heater System for Manual Seat:
-
Engage the clamp.
-
w/ Seat Heater System:
-
Engage the 2 clamps to install the rear seat wire RH.
-
Connect the connector.
-
-
-
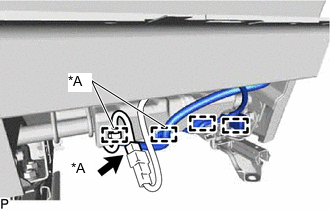
*A w/ Seat Heater System for Power Seat:
-
w/ Seat Heater System:
-
Engage the 2 clamps to install the rear seat wire RH.
-
Connect the connector.
-
-
Engage the 2 clamps.
-
-
Engage the 3 hooks.
-
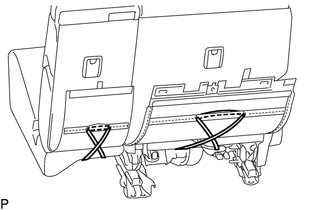
Connect the 2 rubber bands.
-
-
INSTALL CONNECTOR MALE HOUSING (for Manual Seat)
-
w/o Seat Heater System:
-
Engage the clamp to install the connector male housing.
-
-
-
INSTALL CONNECTOR BRACKET (w/o Seat Belt Warning System)
-

Install in this Direction Engage the claw as shown in the illustration to install the connector bracket.
-
-
INSTALL SEAT HEATER CONTROL SUB-ASSEMBLY (w/ Seat Heater System)
-
Engage the 2 clamps to install the seat heater control sub-assembly.
-
Connect the 2 connectors.
-
-
CONNECT SEPARATE TYPE REAR SEAT CUSHION COVER WITH PAD
-

Engage the 2 hooks to connect the separate type rear seat cushion cover with pad.
-
-
INSTALL NO. 1 RECLINING ADJUSTER RELEASE HANDLE RH (for Manual Seat)
-
Install the No. 1 reclining adjuster release handle RH with the 3 screws.
-
-
INSTALL REAR SEAT COVER CAP RH (for Manual Seat)
-
Engage the 2 claws to install the rear seat cover cap RH.
-
-
INSTALL REAR POWER SEAT SWITCH RH (for Power Seat)
-
Install in this Direction Engage the 2 claws to install the rear power seat switch RH as shown in the illustration.
-
-
INSTALL POWER SEAT SWITCH ASSEMBLY (for Power Seat)
-

Connect the connector.
-
Install in this Direction Engage the 2 claws to install the power seat switch assembly as shown in the illustration.
-