SECURITY HORN ASSEMBLY INSTALLATION
PROCEDURE
-
INSTALL SECURITY HORN ASSEMBLY
-
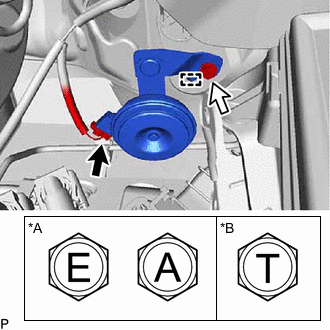
*A for Type A *B for Type B Connect the connector.
-
Engage the guide and install the security horn assembly with the bolt.
- Torque:
- for Type A
- 8.3 N*m { 85 kgf*cm, 73 in.*lbf }
- for Type B
- 10 N*m { 102 kgf*cm, 7 ft.*lbf }
Note
There are three types of bolts and the tightening torque depends on the type of bolt used as shown in the illustration. Therefore, confirm the tightening torque before installing the bolt.
-
-
INSTALL AIR CLEANER CAP SUB-ASSEMBLY (for 8AR-FTS)
-
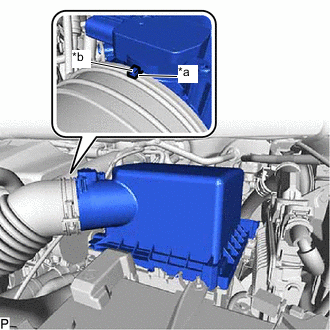
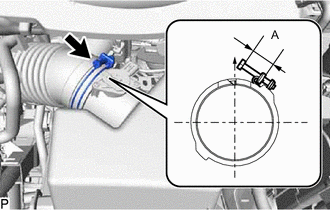
*a Notch *b Rib Align the rib with the hose notch as shown in the illustration and connect the air cleaner cap sub-assembly.
-
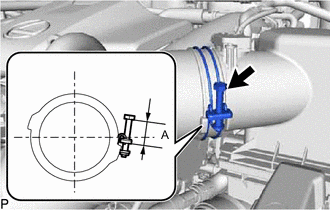
Tighten the hose clamp as shown in the illustration.
Reference Measurement Area Measurement A 13.0 to 19.0 mm (0.512 to 0.748 in.) -
Engage the 2 guides and 2 clamps to install the air cleaner cap sub-assembly.
-
Engage the 2 clamps.
-
Connect the connector.
-
-
INSTALL AIR CLEANER CAP SUB-ASSEMBLY (for 2GR-FKS)
-
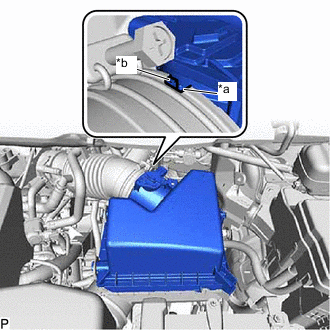
*a Notch *b Rib Align the rib with the hose notch as shown in the illustration and connect the air cleaner cap sub-assembly.
-
Tighten the hose clamp as shown in the illustration.
Reference Measurement Area Measurement A 13.0 to 19.0 mm (0.512 to 0.748 in.) -
Engage the 2 guides and 2 clamps to install the air cleaner cap sub-assembly.
-
Engage the clamp.
-
Connect the connector.
-