SLIDING ROOF HOUSING(for Panoramic Moon Roof) REASSEMBLY
PROCEDURE
-
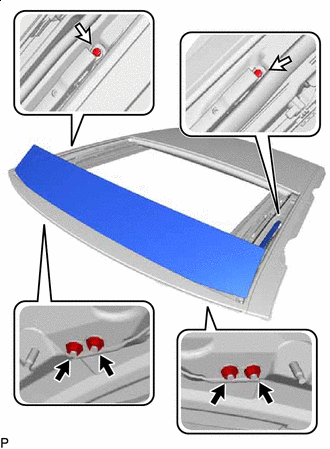
INSTALL REAR SLIDING ROOF GARNISH
-
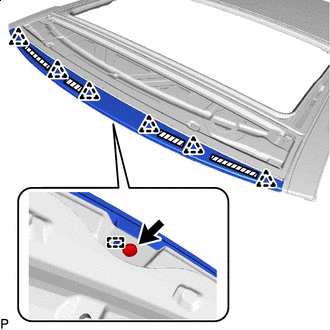
Engage the 3 guides and 4 claws to install the rear sliding roof garnish to the sliding roof housing panel.
-
-
INSTALL NO. 1 SLIDING ROOF SIDE GARNISH LH
-
Clean the sliding roof housing panel.
-
Using a heat light, heat the sliding roof housing panel.
Heating Temperature Item Temperature Sliding Roof Housing Panel 20 to 30°C (68 to 86°F) CAUTION:
-
Do not touch the heat light and heated parts, touching the heat light may result in burns.
-
Touching heated parts for a long time may result in burns.
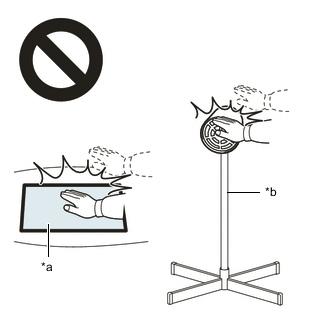
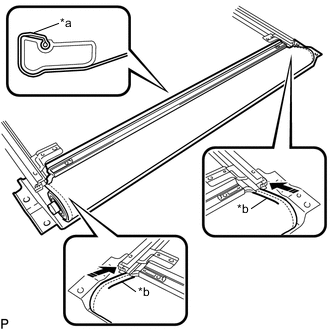
*a Heated Part *b Heat Light Note
Do not heat the sliding roof housing panel excessively.
-
-
Remove the double-sided tape from the sliding roof housing panel.
-
Clean off any tape adhesive residue with cleaner.
-
-
Coat the installation area of the sliding roof housing panel with primer.
-
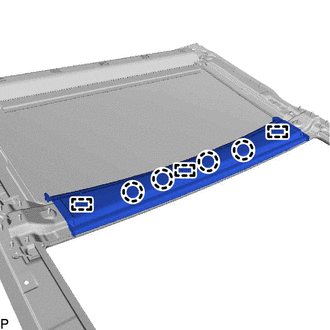
Remove the release paper from a new No. 1 sliding roof side garnish LH.
Tech Tips
After removing the release paper, keep the exposed adhesive free from foreign matter.
-
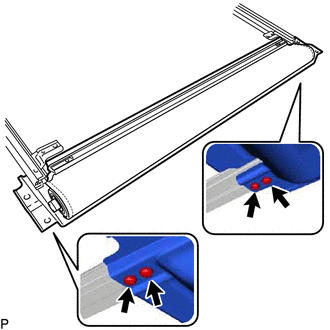
Engage the clip and install the No. 1 sliding roof side garnish LH.
*A Back Side - - 
Double-sided Tape - - -
Install the 6 nuts.
- Torque:
- 6.3 N*m { 64 kgf*cm, 56 in.*lbf }
-
-
INSTALL NO. 1 SLIDING ROOF SIDE GARNISH RH
Tech Tips
Use the same procedure as for the LH side.
-
INSTALL NO. 1 SLIDE ROOF PANEL SUB-ASSEMBLY
-
Clean the sliding roof housing panel.
-
Using a heat light, heat the sliding roof housing panel.
Heating Temperature Item Temperature Sliding Roof Housing Panel 20 to 30°C (68 to 86°F) CAUTION:
-
Do not touch the heat light and heated parts, touching the heat light may result in burns.
-
Touching heated parts for a long time may result in burns.
*a Heated Part *b Heat Light Note
Do not heat the sliding roof housing panel excessively.
-
-
Remove the double-sided tape from the sliding roof housing panel.
-
Clean off any tape adhesive residue with cleaner.
-
-
Coat the installation area of the sliding roof housing panel with primer.
-
Remove the release paper from a new No. 1 sliding roof panel sub-assembly.
Tech Tips
After removing the release paper, keep the exposed adhesive free from foreign matter.
-
Double-sided Tape Engage the guide and 6 clips, and install the No. 1 sliding roof panel sub-assembly.
-
Using a T25 "TORX" socket wrench, install the screw.
- Torque:
- 6.3 N*m { 64 kgf*cm, 56 in.*lbf }
-
-
INSTALL NO. 2 SLIDE ROOF PANEL SUB-ASSEMBLY
-

Nut 
"TORX" Screw Using a T25 "TORX" socket wrench, temporarily install the No. 2 slide roof panel sub-assembly with the 2 screws and 4 nuts.
-
Using a T25 "TORX" socket wrench, tighten the 2 screws.
- Torque:
- 5.0 N*m { 51 kgf*cm, 44 in.*lbf }
-
Tighten the 4 nuts to install the No. 2 slide roof panel sub-assembly.
- Torque:
- 5.0 N*m { 51 kgf*cm, 44 in.*lbf }
-
-
INSTALL SUNSHADE TRIM SUB-ASSEMBLY
-
Using a T25 "TORX" socket wrench, install the sunshade trim sub-assembly with the 4 screws.
- Torque:
- 5.0 N*m { 51 kgf*cm, 44 in.*lbf }
-
*a Sunshade Cover *b End of Sunshade Cover 
Install in this Direction Wrap the sunshade cover as shown in the illustration.
-
Insert the ends of the sunshade cover into the slide roof rail sub-assembly as shown in the illustration.
-

Engage the 2 guides and 2 claws.
-
Using a T25 "TORX" socket wrench, install the 2 screws.
- Torque:
- 5.0 N*m { 51 kgf*cm, 44 in.*lbf }
-
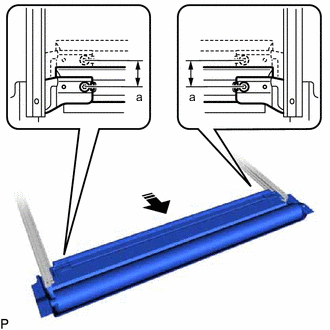
Slide Slide the sunshade trim sub-assembly as shown in the illustration.
Standard Area Dimension a 30 mm (1.18 in.)
-
-
INSTALL SLIDE ROOF RAIL SUB-ASSEMBLY
-
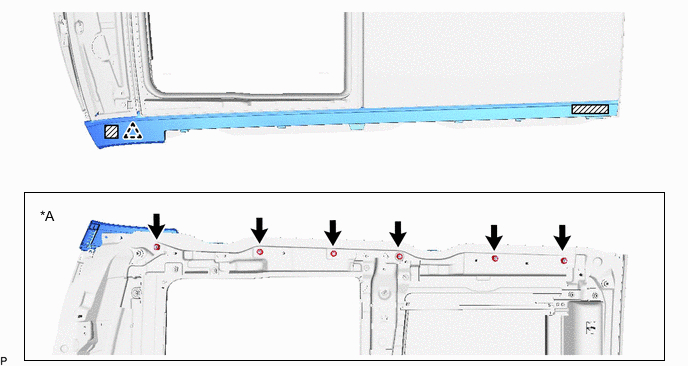
Install the slide roof rail sub-assembly with the 18 nuts.
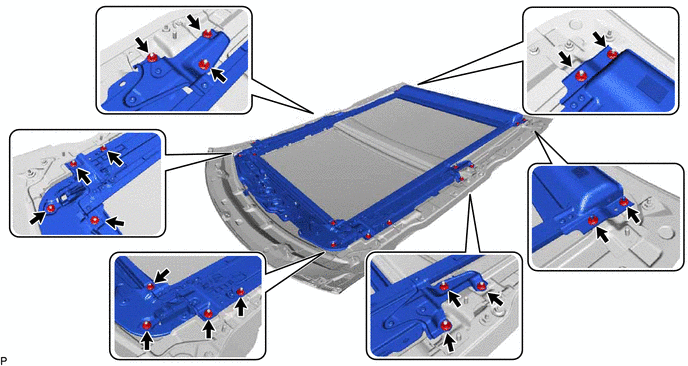
- Torque:
- 6.3 N*m { 64 kgf*cm, 56 in.*lbf }
-
-
INSTALL SLIDING ROOF DRIVE GEAR ASSEMBLY (for Roof Sunshade)
-
Apply MP grease to the gear of the sliding roof drive gear assembly.
-
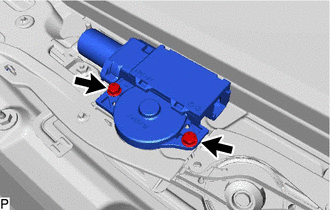
Install the sliding roof drive gear assembly with the 2 bolts.
- Torque:
- 5.4 N*m { 55 kgf*cm, 48 in.*lbf }
-
-
INSTALL SLIDING ROOF DRIVE GEAR ASSEMBLY (for Sliding Roof)
-
Apply MP grease to the gear of the sliding roof drive gear assembly.
-

Install the sliding roof drive gear assembly with the 2 bolts.
- Torque:
- 5.4 N*m { 55 kgf*cm, 48 in.*lbf }
-
-
INSTALL NO. 2 ROOF WIRE
-
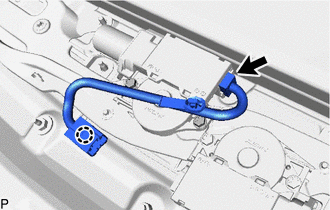
Engage the claw to install the No. 2 roof wire.
-
Connect the connector.
-
-
INSTALL ROOM LIGHT BRACKET
-
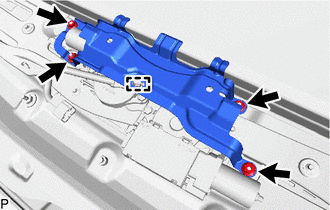
Engage the clamp.
-
Install the room light bracket with the 4 nuts.
- Torque:
- 6.3 N*m { 64 kgf*cm, 56 in.*lbf }
-