SLIDING ROOF HOUSING(for Panoramic Moon Roof) INSTALLATION
PROCEDURE
-
INSTALL SLIDING ROOF HOUSING ASSEMBLY
-
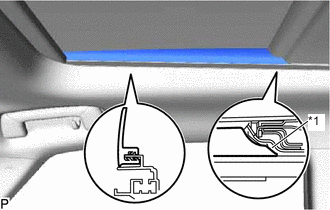
Pass a string under the windshield outside moulding as shown in the illustration.
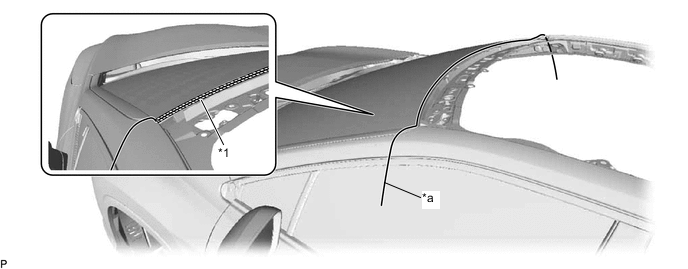
*1 Windshield Outside Moulding - - *a String - - -
Engage the 2 guides.
-
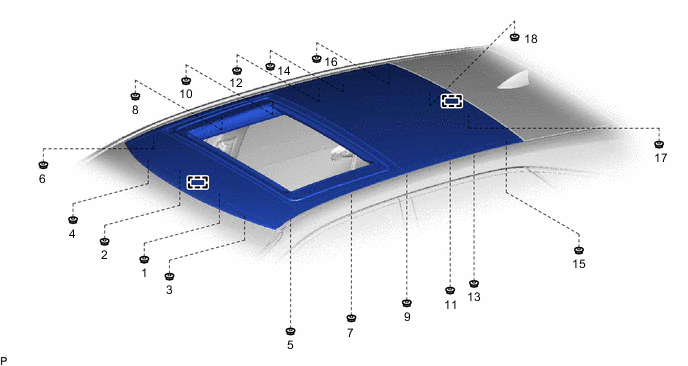
Temporarily install the sliding roof housing assembly with the 18 nuts.
-
Tighten the 18 nuts to install the sliding roof housing assembly.
Tech Tips
Tighten the nuts in the order shown in the illustration.
- Torque:
- 5.5 N*m { 56 kgf*cm, 49 in.*lbf }
-
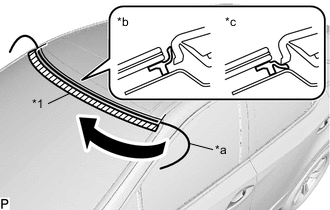
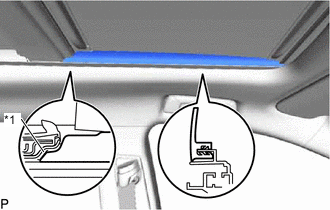
*1 Windshield Outside Moulding *a String *b Correct *c Incorrect Apply soapy water to the windshield outside moulding.
-
Slowly pull out the string to install the windshield outside moulding to the correct position.
-
-
INSTALL ROOF RACK ASSEMBLY LH
-
INSTALL ROOF RACK ASSEMBLY RH
Tech Tips
Use the same procedure as for the LH side.
-
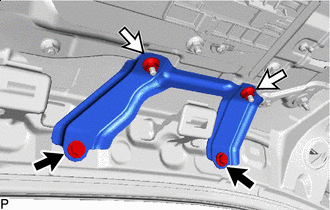
INSTALL REAR SLIDING ROOF HOUSING MOUNTING BRACKET LH
-
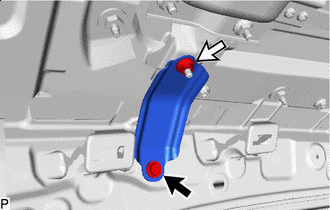

Bolt 
Nut Install the rear sliding roof housing mounting bracket LH with the bolt and nut.
- Torque:
- Bolt
- 8.0 N*m { 82 kgf*cm, 71 in.*lbf }
- Nut
- 5.5 N*m { 56 kgf*cm, 49 in.*lbf }
-
-
INSTALL REAR SLIDING ROOF HOUSING MOUNTING BRACKET RH
Tech Tips
Use the same procedure as for the LH side.
-
INSTALL CENTER SLIDING ROOF HOUSING MOUNTING BRACKET LH
-
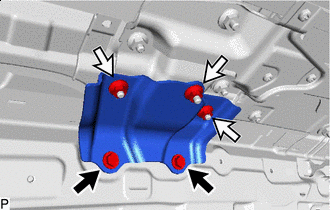
Bolt Nut Install the center sliding roof housing mounting bracket LH with the 2 bolts and 3 nuts.
- Torque:
- Bolt
- 8.0 N*m { 82 kgf*cm, 71 in.*lbf }
- Nut
- 5.5 N*m { 56 kgf*cm, 49 in.*lbf }
-
-
INSTALL CENTER SLIDING ROOF HOUSING MOUNTING BRACKET RH
Tech Tips
Use the same procedure as for the LH side.
-
INSTALL FRONT SLIDING ROOF HOUSING MOUNTING BRACKET LH
-
Bolt Nut Install the front sliding roof housing mounting bracket LH with the 2 bolts and 2 nuts.
- Torque:
- Bolt
- 8.0 N*m { 82 kgf*cm, 71 in.*lbf }
- Nut
- 5.5 N*m { 56 kgf*cm, 49 in.*lbf }
-
-
INSTALL FRONT SLIDING ROOF HOUSING MOUNTING BRACKET RH
Tech Tips
Use the same procedure as for the LH side.
-
INSTALL SLIDING ROOF GLASS SUB-ASSEMBLY
-
Using a T25 "TORX" socket wrench, temporarily install the sliding roof glass sub-assembly with the 6 screws.
-
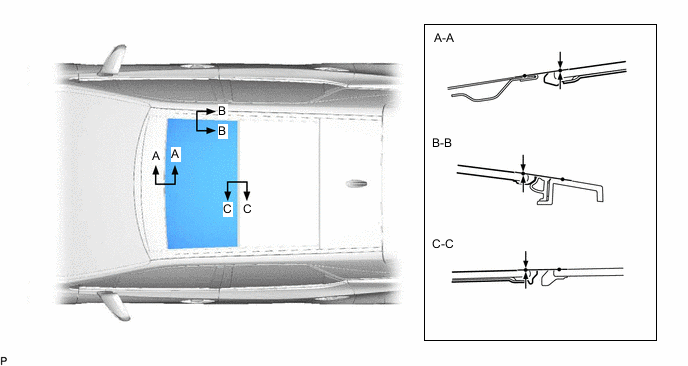
Perform a level check.
-
Check the difference in level of the sliding roof glass sub-assembly when the sliding roof glass sub-assembly is fully closed.
Tech Tips
"+" represents the condition that the glass is above the panel level. "-" represents the condition that the glass is below the panel level.
Area Measurement Area Measurement A-A 0 + 2.0 mm (0 + 0.0787 in.)
0 - 1.0 mm (0 - 0.0394 in.)
B-B 0 + 2.2 mm (0 + 0.0866 in.)
0 - 2.2 mm (0 - 0.0866 in.)
C-C 0 + 2.4 mm (0 + 0.0945 in.)
0 - 1.0 mm (0 - 0.0394 in.)
- -
-
-
Perform a gap check.

-
Check the gap between the sliding roof glass sub-assembly and sliding roof housing assembly.
Area Measurement Area Measurement A-A 4.6 to 7.0 mm (0.181 to 0.276 in.) B-B 5.4 to 7.4 mm (0.213 to 0.291 in.)
-
-
After adjusting the sliding roof glass sub-assembly, using a T25 "TORX" socket wrench, tighten the 6 screws.
- Torque:
- 5.0 N*m { 51 kgf*cm, 44 in.*lbf }
-
-
CHECK FOR WATER LEAK
-
After adjusting the sliding roof glass sub-assembly, check for water leakage into the vehicle interior.
-
If there are any leaks, readjust the sliding roof glass sub-assembly.
-
-
INSTALL CURTAIN SHIELD AIRBAG ASSEMBLY LH
-
INSTALL CURTAIN SHIELD AIRBAG ASSEMBLY RH
Tech Tips
Use the same procedure as for the LH side.
-
INSTALL NO. 4 SLIDING ROOF SIDE GARNISH LH
-
Move the sliding roof glass sub-assembly to the fully tilted up position.
-
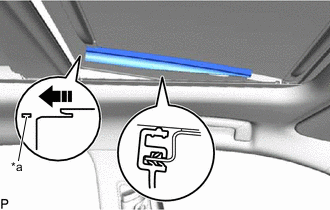
*a Plate 
Install in this Direction Align the rear edge of the No. 4 sliding roof side garnish LH with the plate and temporarily install the No. 4 sliding roof side garnish LH.
-
Slide the No. 4 sliding roof side garnish LH as shown in the illustration to fit the plate into the groove of the No. 4 sliding roof side garnish LH and install it.
-
-
INSTALL NO. 4 SLIDING ROOF SIDE GARNISH RH
Tech Tips
Use the same procedure as for the LH side.
-
INSTALL NO. 3 SLIDING ROOF SIDE GARNISH LH
-
*1 Rear Sliding Roof Garnish Install the No. 3 sliding roof side garnish LH.
Tech Tips
Make sure the front edge of the No. 3 sliding roof side garnish LH is contacting the rear sliding roof garnish.
-
-
INSTALL NO. 3 SLIDING ROOF SIDE GARNISH RH
Tech Tips
Use the same procedure as for the LH side.
-
INSTALL NO. 2 SLIDING ROOF SIDE GARNISH LH
-
*1 Rear Sliding Roof Garnish Install the No. 2 sliding roof side garnish LH.
Tech Tips
Make sure the front edge of the No. 2 sliding roof side garnish LH is contacting the rear sliding roof garnish.
-
-
INSTALL NO. 2 SLIDING ROOF SIDE GARNISH RH
Tech Tips
Use the same procedure as for the LH side.
-
INITIALIZE PANORAMIC MOON ROOF SYSTEM
-
CHECK PANORAMIC MOON ROOF SYSTEM