ROOF HEADLINING(w/o Rear No. 2 Seat) INSTALLATION
PROCEDURE
-
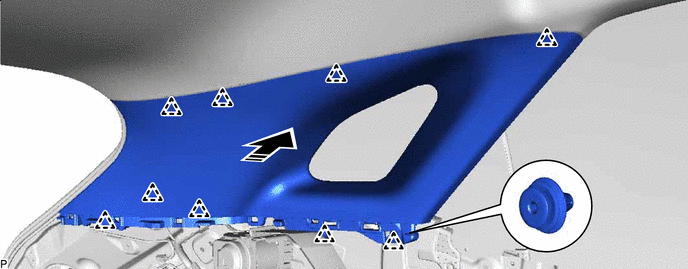
INSTALL ROOF HEADLINING ASSEMBLY
-
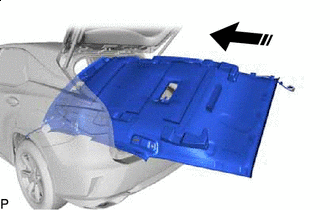

Install in this Direction Put the roof headlining assembly back into the vehicle through the back door as shown in the illustration.
Note
Do not damage the roof headlining assembly or vehicle interior.
-
for Standard Roof:
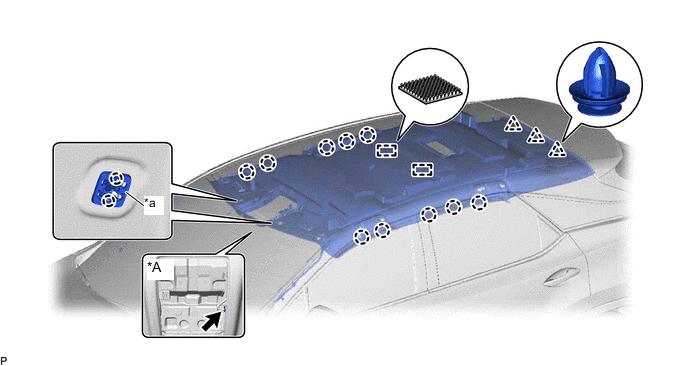
*A w/ Television Antenna - - *a Base of the Visor Holder - -
-
Engage the 2 claws to install each base of the visor holder.
-
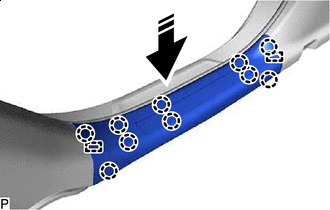
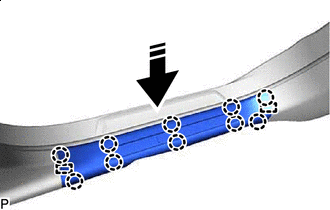
Engage the 3 clips, 10 claws and 2 fasteners to install the roof headlining assembly.
-
w/ Television Antenna:
-
Connect the connector.
-
-
-
for Sliding Roof:
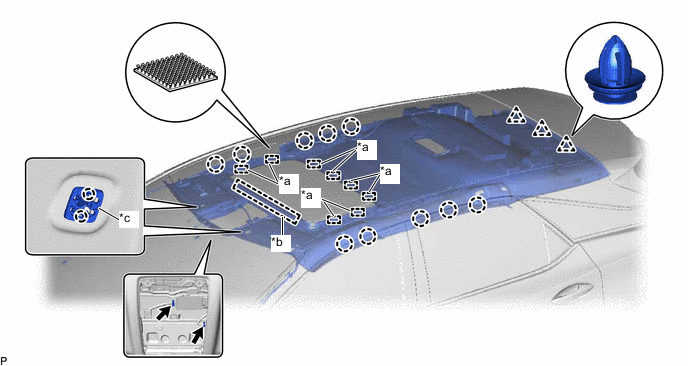
*a Fastener *b Guide *c Base of the Visor Holder - -
-
Engage the 2 claws to install each base of the visor holder.
-
Engage the guide, 3 clips, 10 claws and 8 fasteners to install the roof headlining assembly.
-
Connect each connector.
-
-
for Panoramic Moon Roof:
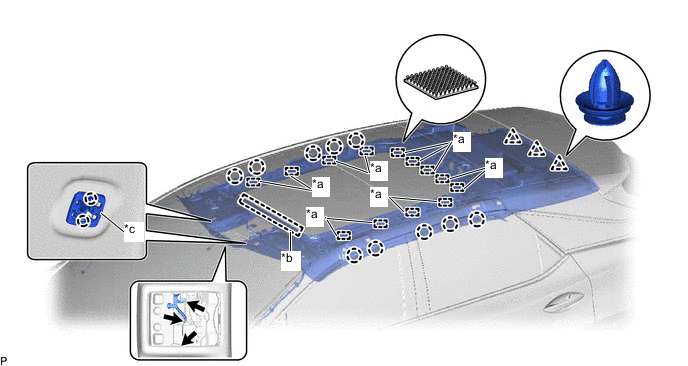
*a Fastener *b Guide *c Base of the Visor Holder - -
-
Engage the 2 claws to install each base of the visor holder.
-
Engage the guide, 3 clips, 10 claws and 13 fasteners to install the roof headlining assembly.
-
Connect each connector.
-
-
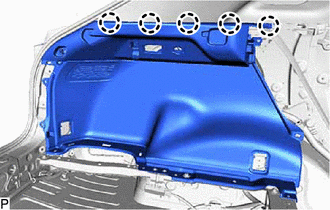
for Rear Pillar RH Side:
-
Connect each connector and the washer hose assembly.
-
Engage each clamp.
-
-
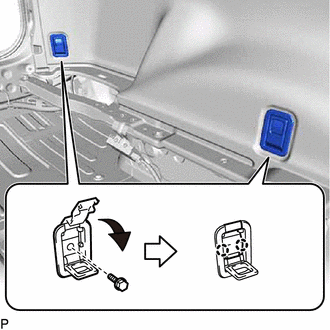
for Front Pillar LH Side:
-
Remove the protective cover.
-
Connect the 3 connectors.
-
Engage the 4 clamps.
-
Install the protective cover.
-
-
for Front Pillar RH Side:
-
Remove the protective cover.
-
Connect each connector and the washer hose assembly.
-
Engage the 3 clamps.
-
Install the protective cover.
-
-
for Windshield Glass Side:
-
Connect each connector.
-
-
-
INSTALL VISOR HOLDER (for LH Side)
-
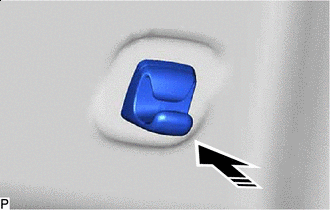
Install in this Direction Push in the visor holder as shown in the illustration.
-
-
INSTALL VISOR ASSEMBLY LH
-
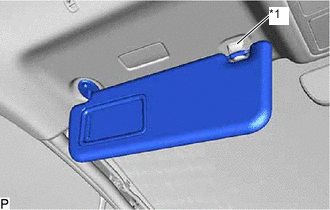
*1 Visor Holder Connect the visor assembly LH to the visor holder.
-
Install the visor assembly LH with the 2 screws.
-
-
INSTALL VISOR BRACKET COVER (for LH Side)
-
Install in this Direction Engage the 4 claws to install the visor bracket cover as shown in the illustration.
-
-
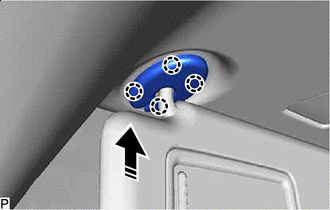
INSTALL ASSIST GRIP ASSEMBLY
Tech Tips
Use the same procedure for the RH side and LH side.
-
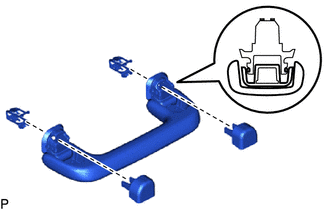
Install the 2 clips to the assist grip assembly.
-
Temporarily install 2 new assist grip covers to the assist grip assembly as shown in the illustration.
-
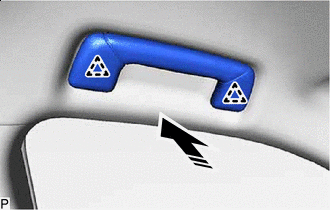
Install in this Direction Engage the 2 clips to install the assist grip assembly as shown in the illustration.
-

Engage the 2 claws to install the assist grip cover LH.
Note
Make sure that 2 clips are engaged securely.
Tech Tips
Use the same procedure for the RH side and LH side.
-
-
INSTALL REAR ASSIST GRIP ASSEMBLY LH
Tech Tips
Use the same procedure as for the assist grip assembly.
-
INSTALL REAR ASSIST GRIP ASSEMBLY RH
Tech Tips
Use the same procedure as for the assist grip assembly.
-
INSTALL VISOR HOLDER (for RH Side)
Tech Tips
Use the same procedure as for the LH side.
-
INSTALL VISOR ASSEMBLY RH
Tech Tips
Use the same procedure as for the LH side.
-
INSTALL VISOR BRACKET COVER (for RH Side)
Tech Tips
Use the same procedure as for the LH side.
-
INSTALL RAIN SENSOR (w/ Rain Sensor)
-
INSTALL RAIN SENSOR COVER (w/ Rain Sensor)
-
INSTALL INNER REAR VIEW MIRROR STAY HOLDER COVER (w/ Inner Rear View Mirror Stay Holder Cover)
-
INSTALL NO. 1 FORWARD RECOGNITION COVER (w/ Lexus Safety System+)
-
INSTALL NO. 2 FORWARD RECOGNITION COVER (w/ Lexus Safety System+)
-
INSTALL SPOT LIGHT ASSEMBLY
-
INSTALL ROOF CONSOLE BOX ASSEMBLY
-
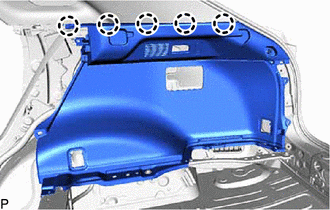
INSTALL ROOF SIDE INNER GARNISH ASSEMBLY LH
-
Install 9 new clips to the roof side inner garnish assembly LH.
-
Engage the 9 clips to install the roof side inner garnish assembly LH.
Install in this Direction - -
-
-
INSTALL DECK TRIM SIDE PANEL ASSEMBLY LH
-
Connect the connector.
-
Engage the 5 claws.
-
Install the deck trim side panel assembly LH with the 3 bolts and 4 clips.
-
-
INSTALL NO. 1 LUGGAGE COMPARTMENT LIGHT ASSEMBLY (for LH Side)
-
INSTALL ROPE HOOK ASSEMBLY (for LH Side)
-
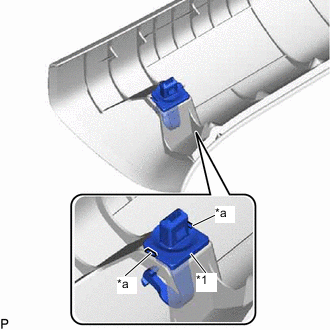
Install the 2 rope hook assemblies with the 2 bolts.
-
Engage the 4 claws to close each cover as shown in the illustration.
-
-
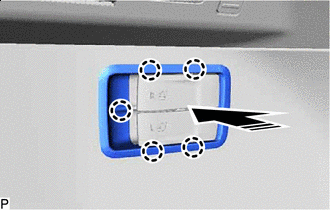
INSTALL NO. 1 LUGGAGE COMPARTMENT TRIM HOOK (for LH Side)
-

Install in this Direction Install the No. 1 luggage compartment trim hook as shown in the illustration.
-
-
INSTALL REAR FLOOR FINISH SIDE PLATE LH
-
Install in this Direction Engage the guide, 2 clips and 2 claws to install the rear floor finish side plate LH as shown in the illustration.
-
-
INSTALL REAR SEAT SIDE GARNISH LH
-
Install in this Direction Engage the 4 claws and 4 clips to install the rear seat side garnish LH as shown in the illustration.
-
Install the 2 clips.
-
-
INSTALL UPPER QUARTER TRIM PAD LH
-
Install in this Direction Engage the 12 clips to install the upper quarter trim pad LH as shown in the illustration.
-
-
INSTALL ROOF SIDE INNER GARNISH ASSEMBLY RH
Tech Tips
Use the same procedure as for the LH side.
-
INSTALL DECK TRIM SIDE PANEL ASSEMBLY RH
-
Engage the 5 claws.
-
Install the deck trim side panel assembly RH with the 3 bolts and 4 clips.
-
-
INSTALL RECLINING REMOTE CONTROL BEZEL RH (w/o Rear Power Seat System)
-
Install in this Direction Engage the 5 claws to install the reclining remote control bezel RH as shown in the illustration.
-
-
INSTALL FOLD SEAT SWITCH ASSEMBLY (w/ Rear Power Seat System)
-
INSTALL NO. 1 LUGGAGE COMPARTMENT LIGHT ASSEMBLY (for RH Side)
-
INSTALL ROPE HOOK ASSEMBLY (for RH Side)
Tech Tips
Use the same procedure as for the LH side.
-
INSTALL NO. 1 LUGGAGE COMPARTMENT TRIM HOOK (for RH Side)
-
Install in this Direction Install the No. 1 luggage compartment trim hook as shown in the illustration.
-
-
INSTALL REAR FLOOR FINISH SIDE PLATE RH
Tech Tips
Use the same procedure as for the LH side.
-
INSTALL REAR SEAT SIDE GARNISH RH
Tech Tips
Use the same procedure as for the LH side.
-
INSTALL UPPER QUARTER TRIM PAD RH
Tech Tips
Use the same procedure as for the LH side.
-
INSTALL REAR SEAT ASSEMBLY LH
-
INSTALL REAR SEAT ASSEMBLY RH
-
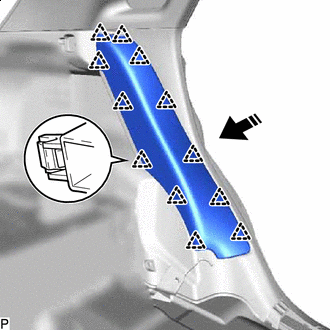
INSTALL CENTER PILLAR GARNISH LH
-
Install a new clip to the center pillar garnish LH.
-
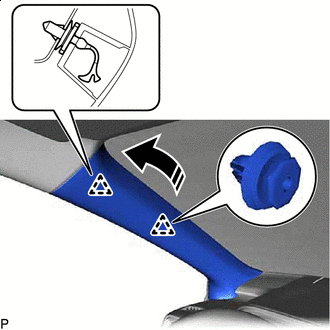
Install in this Direction Engage the guide and clip as shown in the illustration.
-
Install the center pillar garnish LH with the 2 clips.
-
-
CONNECT FRONT SEAT OUTER BELT ASSEMBLY LH
-
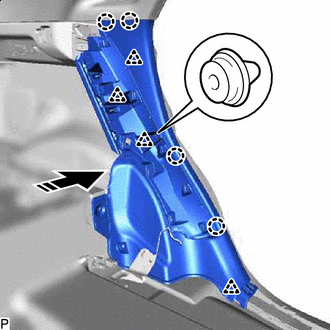
INSTALL LOWER CENTER PILLAR GARNISH LH
-
Install in this Direction Engage the guide, 5 claws and 5 clips to install the lower center pillar garnish LH.
-
-
INSTALL REAR DOOR SCUFF PLATE LH
-
Install in this Direction Engage the 2 guides and 10 claws to install the rear door scuff plate LH.
-
-
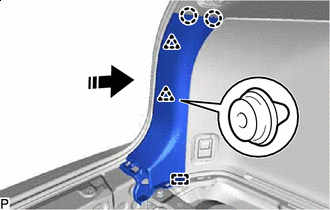
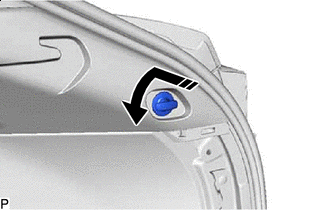
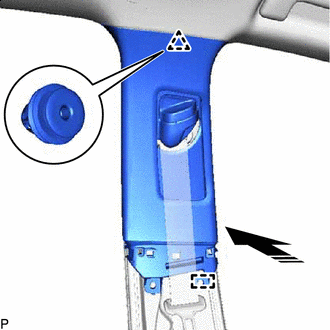
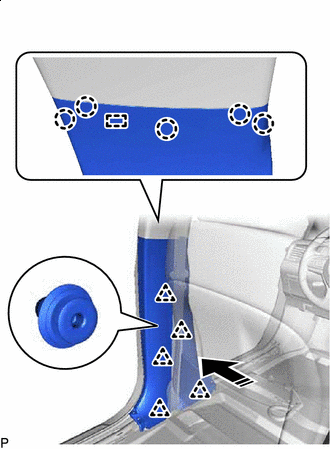
INSTALL FRONT PILLAR GARNISH LH
-
Remove the protective cover.
-
Install a new clip to the front pillar garnish LH.
-
*1 Front Pillar Garnish Clip *a Protruding Part Engage new front pillar garnish clip to the front pillar garnish LH.
Note
Do not allow the front pillar garnish clip to overlap the protruding parts of the front pillar garnish LH.
-
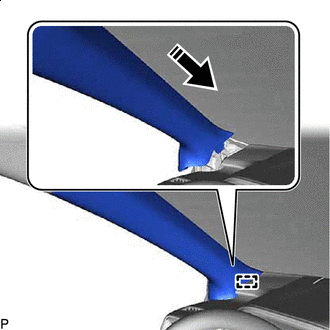
Install in this Direction Push the front pillar garnish LH as shown in the illustration to engage the guide.
-
Install in this Direction Engage the 2 clips to install the front pillar garnish LH.
Tech Tips
Make sure that the curtain shield airbag assembly LH is not pinched.
-
-
INSTALL FRONT DOOR SCUFF PLATE LH
-
w/ Illumination:
-
Connect the connector.
-
-
Install in this Direction Engage the 2 guides and 10 claws to install the front door scuff plate LH as shown in the illustration.
-
-
INSTALL CENTER PILLAR GARNISH RH
Tech Tips
Use the same procedure as for the LH side.
-
CONNECT FRONT SEAT OUTER BELT ASSEMBLY RH
Tech Tips
Use the same procedure as for the LH side.
-
INSTALL LOWER CENTER PILLAR GARNISH RH
Tech Tips
Use the same procedure as for the LH side.
-
INSTALL REAR DOOR SCUFF PLATE RH
Tech Tips
Use the same procedure as for the LH side.
-
INSTALL FRONT PILLAR GARNISH RH
Tech Tips
Use the same procedure as for the LH side.
-
INSTALL FRONT DOOR SCUFF PLATE RH
Tech Tips
Use the same procedure as for the LH side.
-
INSTALL REAR FLOOR FINISH PLATE
-
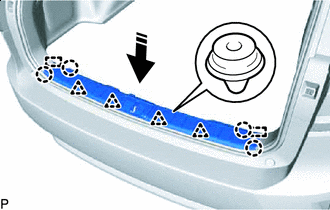
Install in this Direction Engage the 2 guides, 4 clips and 4 claws to install the rear floor finish plate as shown in the illustration.
-
-
INSTALL DECK SIDE TRIM BOX RH (except Full Size Spare Tire)
-
Engage the 5 guides to install the deck side trim box RH.
-
Install the 2 clips.
-
-
INSTALL DECK SIDE TRIM BOX RH (for Full Size Spare Tire)
-
Engage the 5 guides to install the deck side trim box RH.
-
Install the 3 clips.
-
-
INSTALL FRONT DECK FLOOR BOX (w/ Spare Tire)
-
Engage the 2 guides to install the front deck floor box.
-
Install the clip.
-
-
INSTALL DECK FLOOR BOX LH (w/o Spare Tire)
-
Engage the 2 guides to install the deck floor box LH.
-
Install the clip.
-
-
INSTALL DECK FLOOR BOX RH (w/o Spare Tire)
-
Engage the 3 guides to install the deck floor box RH.
-
Install the 2 clips.
-
-
INSTALL REAR NO. 4 FLOOR BOARD (except Full Size Spare Tire)
-
Engage the 5 guides and clip to install the No. 4 rear floor board.
-
-
INSTALL REAR NO. 4 FLOOR BOARD (for Full Size Spare Tire)
-
Engage the 5 guides and clip to install the rear No. 4 floor board.
-
Install the clip.
-
-
INSTALL REAR DECK FLOOR BOX (w/ Spare Tire)
-
Engage the 3 guides to install the rear deck floor box.
-
Install the 3 clips.
-
-
INSTALL SPARE WHEEL COVER (for Compact Spare Tire)
-
Install the spare wheel cover.
-
-
INSTALL REAR FLOOR CARPET (w/o Spare Tire)
-
Install the rear floor carpet with the 9 clips.
-
-
INSTALL REAR NO. 3 FLOOR BOARD
-
Install the rear No. 3 floor board.
-
-
INSTALL DECK BOARD ASSEMBLY
-
Install the deck board assembly.
-
-
INSTALL TONNEAU COVER ASSEMBLY
-
Install the tonneau cover assembly.
-