RADIO RECEIVER INSTALLATION
PROCEDURE
-
INSTALL RADIO RECEIVER ASSEMBLY
-
INSTALL NO. 3 INSTRUMENT PANEL REGISTER ASSEMBLY
-


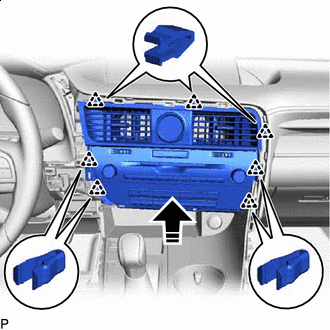
Install in this Direction Engage the 4 claws to install the No. 3 instrument panel register assembly as shown in the illustration.
-
-
INSTALL NO. 4 INSTRUMENT PANEL REGISTER ASSEMBLY
Tech Tips
Use the same procedure as for the No. 3 instrument panel register assembly.
-
INSTALL CLOCK ASSEMBLY
-
INSTALL RADIO RECEIVER ASSEMBLY WITH REGISTER
-
Connect each connector.
-
Install in this Direction Engage the 7 clips to temporarily install the radio receiver assembly with register as shown in the illustration.
-
Install the radio receiver assembly with register with the 2 bolts.
-
-
INSTALL LOWER INSTRUMENT FINISH PANEL SUB
-
INSTALL INSTRUMENT CLUSTER FINISH PANEL ORNAMENT
-
INSTALL LOWER NO. 1 INSTRUMENT PANEL FINISH PANEL
-
INSTALL LOWER NO. 2 INSTRUMENT PANEL FINISH PANEL
-
CONNECT CABLE TO NEGATIVE BATTERY TERMINAL
Note
When disconnecting the cable, some systems need to be initialized after the cable is reconnected.
-
PERFORM INITIALIZATION
w/ Parallel Parking Assist Function:
Tech Tips
When replacing the radio receiver assembly, perform Parking assist monitor system initialization.
for Initialization: Click here
for Calibration: Click here