AUTOMATIC TRANSAXLE SYSTEM HYDRAULIC TEST
-
PERFORM HYDRAULIC TEST
-
Measure the line pressure.
CAUTION:
A line pressure test should always be carried out with at least 2 people. One person should observe the condition of wheels and wheel chocks while the other is performing the test.
Note
-
Perform this test with the ATF (Automatic Transaxle Fluid) at the normal operating temperature: 50 to 80°C (122 to 176°F)
-
Be careful to prevent the SST hose from contacting the exhaust pipe.
-
This check must be conducted after checking and confirming that the engine is normal.
-
Perform this test with the air conditioning off.
-
Do not perform the stall test for longer than 5 seconds.
-
When performing the stall speed test repeatedly, wait for 15 seconds or more between tests.
-
The installation position of SST is different for the D position and R position line pressure tests.
-
Perform this test with the AUTO function (shift-linked function) of the electronic parking brake system off.
-
Warm up the ATF.
-
Lift the vehicle.
-
Remove the engine under cover.
-
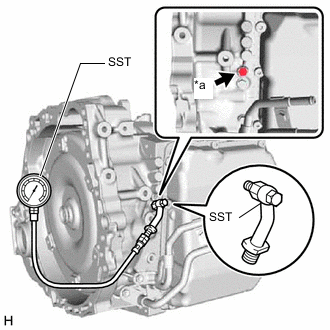
*a Test Plug A Remove the test plug A on the front side of the transaxle case and install SST.
- SST
- 09993-19015 ( 09993-00010, 09993-00040 )
-
Lower the vehicle.
-
Fully apply the parking brake and chock all 4 wheels.
Tech Tips
When the electric parking brake switch assembly is pulled 2 times (2 lock operations), the maximum amount of braking force is applied.
-
Start the engine and check the idle speed.
-
Keep your left foot firmly on the brake pedal and move the shift lever to D.
-
Measure the line pressure with the engine idling.
-
Depress the accelerator pedal as much as possible with your right foot. Quickly read the highest line pressure reading when the engine speed reaches stall speed.
Specified Line Pressure Condition D Position Idling 420 to 510 kPa
(4.2 to 5.3 kgf/cm2, 60 to 74 psi)
Stall test 1560 to 1750 kPa
(15.9 to 17.9 kgf/cm2, 226 to 254 psi)
-
Turn the engine switch off.
-
Remove SST and install the test plug A.
-
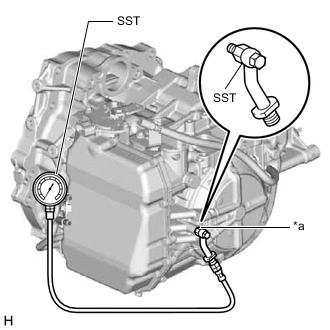
*a Test Plug B Remove the test plug B on the left side of the transaxle case and install SST.
- SST
- 09993-19015 ( 09993-00010, 09993-00040 )
-
Start the engine and check the idle speed.
-
Keep your left foot firmly on the brake pedal and move the shift lever to R.
-
Measure the line pressure with the engine idling.
-
Depress the accelerator pedal as much as possible with your right foot. Quickly read the highest line pressure reading when the engine speed reaches stall speed.
Specified Line Pressure Condition R Position Idling 560 to 670 kPa
(5.7 to 6.9 kgf/cm2, 81 to 98 psi)
Stall test 1750 to 2050 kPa
(17.8 to 21.0 kgf/cm2, 253 to 298 psi)
-
Turn the engine switch off.
-
Remove SST and install the test plug B.
-
Clear the DTCs.
Evaluation Problem Possible Cause Measured values at all positions are higher than specified
-
Shift solenoid valve SLT defective
-
Regulator valve defective
Measured values at all positions are lower than specified
-
Shift solenoid valve SLT defective
-
Regulator valve defective
-
Oil pump defective
Pressure is low when shift lever is in D only
-
D position circuit fluid leak
-
No. 1 clutch (C1) defective
Pressure is low when shift lever is in R only
-
R position circuit fluid leak
-
No. 3 clutch (C3) defective
-
No. 2 brake (B2) defective
-
-
-