MILLIMETER WAVE RADAR SENSOR INSTALLATION

CAUTION / NOTICE / HINT
Note
If the millimeter wave radar sensor assembly has been struck or dropped, replace the millimeter wave radar sensor assembly with a new one.
PROCEDURE
-
INSTALL MILLIMETER WAVE RADAR SENSOR ASSEMBLY
Note
If the front bumper assembly or radiator grill has been replaced, check that the beam axis change mechanism is at the standard position (centered).
-
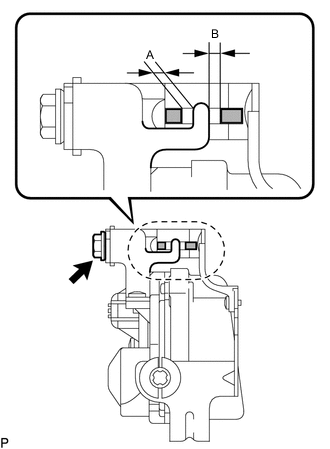
Set beam axis to the standard position.
-
Turn the bolt so that the beam axis change mechanism is positioned as shown in the illustration.
Specified Condition Difference between (A) and (B) 1 mm (0.0394 in.) or less
-
-

Bolt 
Screw Engage the 2 guides.
-
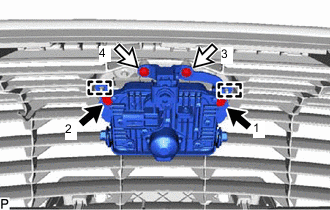
temporarily install the millimeter wave radar sensor assembly with the 2 bolts and 2 screws.
-
Tighten the 2 bolts and 2 screws to install the millimeter wave radar sensor assembly.
- Torque:
- Bolt
- 3.0 N*m { 31 kgf*cm, 27 in.*lbf }
Tech Tips
Tighten the bolts in the order shown in the illustration.
-
Connect the connector.
-
-
INSTALL COOL AIR INTAKE DUCT SEAL
-
ADJUST MILLIMETER WAVE RADAR SENSOR
-
When the millimeter wave radar sensor assembly or No. 1 millimeter wave radar sensor bracket is replaced with a new one, adjustment of the radar sensor beam axis must be performed.
-