CANISTER(w/o Canister Pump Module) INSPECTION
PROCEDURE
-
INSPECT CANISTER (CHARCOAL CANISTER ASSEMBLY)
-
Visually check the canister (charcoal canister assembly).
-
Visually check the canister (charcoal canister assembly) for cracks or damage.
If cracks or damage is found, replace the canister (charcoal canister assembly).
-
-
Check canister (charcoal canister assembly) air flow.
-

*a Port (A) *b Port (B) *c Port (C) Using a vacuum pump, check that air flows through the canister (charcoal canister assembly) according to the table below.
Standard Condition Specified Condition Port (B) and (C) closed, 2 kPa (15 mmHg, 0.591 in. Hg) of vacuum applied to port (A) Air does not flow Port (B) closed, 2 kPa (15 mmHg, 0.591 in. Hg) of vacuum applied to port (A) Air is sucked into port (C) Port (C) closed, 8 kPa (0.1 kgf/cm2, 1.2 psi) of compressed air applied to port (A)
Air comes out of port (B) 8 kPa (0.1 kgf/cm2, 1.2 psi) of compressed air applied to port (A)
Air comes out of port (B) and (C) If the result is not as specified, replace the canister (charcoal canister assembly).
-
-
-
CLEAN CANISTER FILTER
-
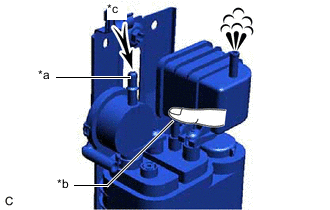
*a Port (A) *b Port (B) *c Air With the port (B) closed, blow 10 kPa (0.1 kgf/cm2, 1.5 psi) of compressed air into the port (A) to clean the canister filter.
Note
-
Make sure to clean the filter using only air. Do not use gasoline or any other means.
-
Do not disassemble the canister (charcoal canister assembly).
-
-