WINDSHIELD OUTSIDE MOULDING REMOVAL
CAUTION / NOTICE / HINT
Tech Tips
-
Use the same procedure for the RH side and LH side.
-
The following procedure is for the LH side.
PROCEDURE
-
REMOVE WINDSHIELD OUTSIDE MOULDING
-
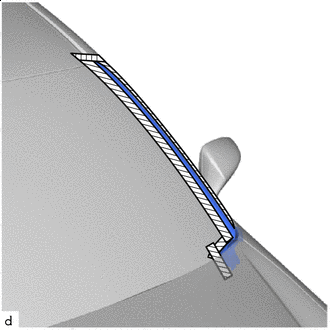

Protective Tape Apply protective tape around the windshield outside moulding as shown in the illustration.
-
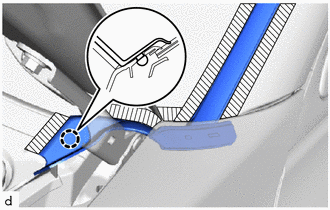
Disengage the claw.
-
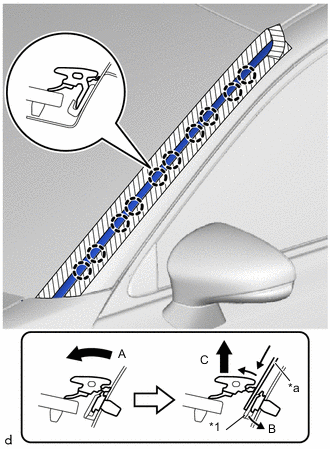
*1 No. 1 Windshield Outside Moulding Clip *a Moulding Remover D Move the windshield outside moulding in the direction indicated by the arrow labeled A in the illustration to widen the space between the moulding and body.
-
Insert moulding remover D between the windshield outside moulding and No. 1 windshield outside moulding clip.
-
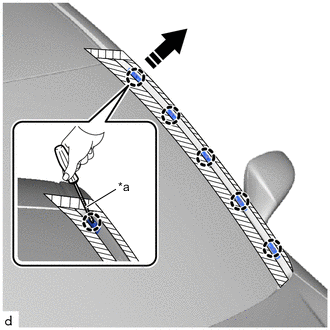
While pushing the claw of the No. 1 windshield outside moulding clip in the direction indicated by the arrow labeled B in the illustration, pull the windshield outside moulding upward in the direction indicated by the arrow labeled C in the illustration to disengage the claws to remove the windshield outside moulding.
Note
-
When removing the windshield outside moulding, be careful not to damage the No. 1 windshield outside moulding clip.
-
If a No. 1 windshield outside moulding clip is damaged or becomes disengage from the vehicle, replace it with a new one.
-
-
-
REMOVE NO. 1 WINDSHIELD OUTSIDE MOULDING CLIP
-
*a Protective Tape 
Remove in this Direction Using a screwdriver with its tip wrapped in protective tape, disengage the claw to remove the No. 1 windshield outside moulding clip.
Tech Tips
Use the same procedure for each No. 1 windshield outside moulding clips.
-
Remove the protective tape.
-
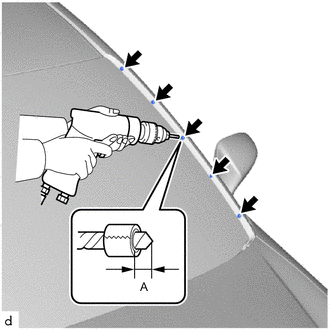
Insert a 4.0 mm (0.157 in.) drill bit into a drill.
-
Tape the 4.0 mm (0.157 in.) drill bit 5.0 mm (0.197 in.) from the tip as shown in the illustration.
Standard Measurement Area Measurement A 5.0 mm (0.197 in.) Note
Tape the 4.0 mm (0.157 in.) drill bit to prevent the drill bit from going too deep.
-
Lightly press the drill bit against the 5 rivets to drill off the 5 rivet flanges to remove the 5 rivets.
Note
-
Make sure to protect both the inside and outside of the vehicle as the rivet shavings will fly about.
-
Pressing the drill too firmly will cause the rivet to turn and result in the rivet not being drilled through.
-
Prying the rivets with the drill may damage the rivet installation holes or drill bit.
-
Be careful of the drilled rivets, as they may be hot.
-
-
Using a vacuum cleaner, remove the rivet fragments and shavings from the drilled areas.
-