REAR SPOILER REASSEMBLY
PROCEDURE
-
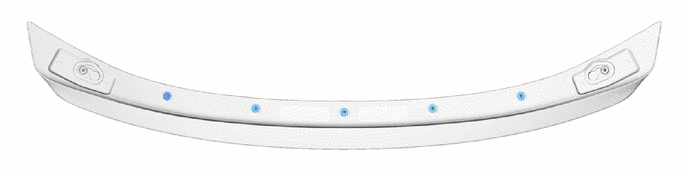
INSTALL NO. 3 REAR SPOILER SEAL
-
Install 5 new No. 3 rear spoiler seals.
-
-
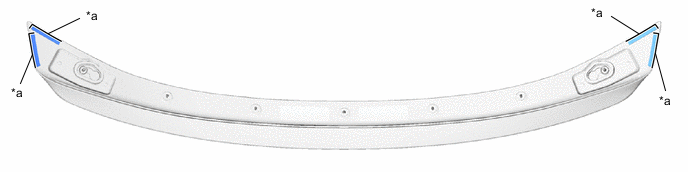
INSTALL NO. 1 REAR SPOILER SIDE PROTECTOR LH
Tech Tips
When installing the No. 1 rear spoiler side protector LH, heat the rear spoiler sub-assembly using an infrared light.
Heating Temperature Item Temperature Rear Spoiler Sub-assembly 20 to 30°C (68 to 86°F)
3 to 5 minutes
No. 1 Rear Spoiler Side Protector LH 20 to 30°C (68 to 86°F)
3 to 5 minutes
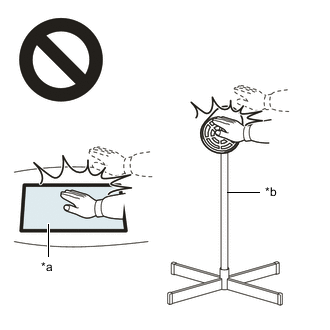
CAUTION:
-
Do not touch the infrared light or the heated portions of the components.
-
Touching the infrared light could result in burns.
-
Touching the heated portions of the components and remaining in contact for a long time could result in burns.
*a Heated Portions *b Infrared Light Note
Do not heat the No. 1 rear spoiler side protector LH and rear spoiler sub-assembly excessively.
-
Clean the No. 1 rear spoiler side protector LH installation surface.
-
Using a piece of cloth, rub the double-sided tape off the rear spoiler sub-assembly.
Note
-
Installing the No. 1 rear spoiler side protector LH with some double-sided tape remaining may cause poor adhesion.
-
Removing with a screwdriver, etc. may cause damage or poor adhesion.
-
-
Using a non-residue solvent, clean the attachment surface.
-
-
Using an infrared light, heat the rear spoiler sub-assembly and No. 1 rear spoiler side protector LH.
-
Remove the peeling paper from a new No. 1 rear spoiler side protector LH.
-
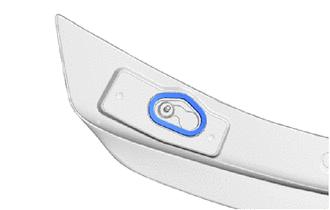
Install the No. 1 rear spoiler side protector LH as shown in the illustration.
Note
Press the No. 1 rear spoiler side protector LH firmly to install it.
-
-
INSTALL NO. 1 REAR SPOILER SIDE PROTECTOR RH
Tech Tips
Use the same procedure as for the LH side.
-
INSTALL NO. 4 REAR SPOILER PROTECTOR
Tech Tips
When installing the No. 4 rear spoiler protector, heat the rear spoiler sub-assembly using an infrared light.
Heating Temperature Item Temperature Rear Spoiler Sub-assembly 20 to 30°C (68 to 86°F)
3 to 5 minutes
No. 4 Rear Spoiler Protector 20 to 30°C (68 to 86°F)
3 to 5 minutes
CAUTION:
-
Do not touch the infrared light or the heated portions of the components.
-
Touching the infrared light could result in burns.
-
Touching the heated portions of the components and remaining in contact for a long time could result in burns.
*a Heated Portions *b Infrared Light Note
Do not heat the No. 4 rear spoiler protector and rear spoiler sub-assembly excessively.
-
Clean the No. 4 rear spoiler protector installation surface.
-
Using a piece of cloth, rub the double-sided tape off the rear spoiler sub-assembly.
Note
-
Installing the No. 4 rear spoiler protector with some double-sided tape remaining may cause poor adhesion.
-
Removing with a screwdriver, etc. may cause damage or poor adhesion.
-
-
Using a non-residue solvent, clean the attachment surface.
-
-
Using an infrared light, heat the rear spoiler sub-assembly and No. 4 rear spoiler protector.
-
Remove the peeling paper from a new No. 4 rear spoiler protector.
-
Align the No. 4 rear spoiler protector with the mark-off line of the rear spoiler sub-assembly.
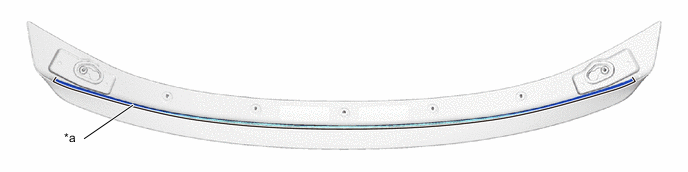
*a Mark-off Line - - Note
Press the No. 4 rear spoiler protector firmly to install it.
-
-
INSTALL NO. 3 REAR SPOILER PROTECTOR
Tech Tips
When installing the 4 No. 3 rear spoiler protectors, heat the rear spoiler sub-assembly using an infrared light.
Heating Temperature Item Temperature Rear Spoiler Sub-assembly 20 to 30°C (68 to 86°F)
3 to 5 minutes
No. 3 Rear Spoiler Protector 20 to 30°C (68 to 86°F)
3 to 5 minutes
CAUTION:
-
Do not touch the infrared light or the heated portions of the components.
-
Touching the infrared light could result in burns.
-
Touching the heated portions of the components and remaining in contact for a long time could result in burns.
*a Heated Portions *b Infrared Light Note
Do not heat the No. 3 rear spoiler protector and rear spoiler sub-assembly excessively.
-
Clean the No. 3 rear spoiler protector installation surface.
-
Using a piece of cloth, rub the double-sided tape off the rear spoiler sub-assembly.
Note
-
Installing the No. 3 rear spoiler protector with some double-sided tape remaining may cause poor adhesion.
-
Removing with a screwdriver, etc. may cause damage or poor adhesion.
-
-
Using a non-residue solvent, clean the attachment surface.
-
-
Using an infrared light, heat the rear spoiler sub-assembly and 4 No. 3 rear spoiler protectors.
-
Remove the peeling paper from 4 new No. 3 rear spoiler protectors.
-
Align the 4 No. 3 rear spoiler protectors with the mark-off line of the rear spoiler sub-assembly.
*a Mark-off Line - - Note
Press the 4 No. 3 rear spoiler protectors firmly to install it.
-
-
INSTALL CENTER REAR SPOILER PROTECTOR
Tech Tips
When installing the 2 center rear spoiler protectors, heat the rear spoiler sub-assembly using an infrared light.
Heating Temperature Item Temperature Rear Spoiler Sub-assembly 20 to 30°C (68 to 86°F)
3 to 5 minutes
Center Rear Spoiler Protector 20 to 30°C (68 to 86°F)
3 to 5 minutes
CAUTION:
-
Do not touch the infrared light or the heated portions of the components.
-
Touching the infrared light could result in burns.
-
Touching the heated portions of the components and remaining in contact for a long time could result in burns.
*a Heated Portions *b Infrared Light Note
Do not heat the center rear spoiler protector and rear spoiler sub-assembly excessively.
-
Clean the center rear spoiler protector installation surface.
-
Using a piece of cloth, rub the double-sided tape off the rear spoiler sub-assembly.
Note
-
Installing the center rear spoiler protector with some double-sided tape remaining may cause poor adhesion.
-
Removing with a screwdriver, etc. may cause damage or poor adhesion.
-
-
Using a non-residue solvent, clean the attachment surface.
-
-
Using an infrared light, heat the rear spoiler sub-assembly and 2 center rear spoiler protectors.
-
Remove the peeling paper from 2 new center rear spoiler protectors.
-
Align the 2 center rear spoiler protectors with the mark-off line of the rear spoiler sub-assembly.
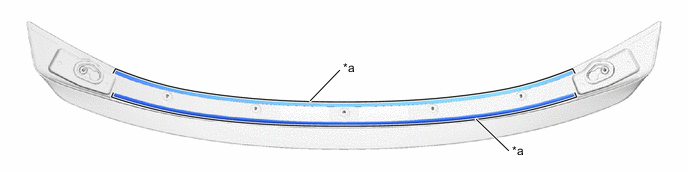
*a Mark-off Line - - Note
Press the 2 center rear spoiler protectors firmly to install it.
-