FRONT DOOR WINDOW FRAME MOULDING REMOVAL
CAUTION / NOTICE / HINT
The necessary procedures (adjustment, calibration, initialization, or registration) that must be performed after parts are removed, installed, or replaced during the front door outside moulding sub-assembly removal/installation are shown below.
| Replacement Part or Procedure | Necessary Procedure | Effect/Inoperative when not Performed | Link |
|---|---|---|---|
| Removal/installation of front door outside moulding sub-assembly | Initialize power window control system |
|
|
| Disconnect cable from negative battery terminal | Memorize steering angle neutral point | Parking assist monitor system | |
| LKA/LDA system | |||
| Pre-crash safety system | |||
| Adaptive high beam system | |||
| Reset power trunk lid | Power trunk lid system |
Tech Tips
-
Use the same procedure for the RH and LH sides.
-
The procedure listed below is for the LH side.
PROCEDURE
-
REMOVE FRONT DOOR BELT MOULDING
-
REMOVE FRONT DOOR REAR BELT MOULDING END COVER
-
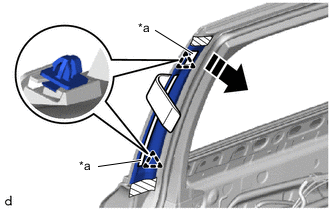
*a Double-sided Tape 
Protective Tape 
Remove in this Direction Apply protective tape around the front door rear belt moulding end cover.
-
Using an infrared light, heat the front door rear belt moulding end cover.
Heating Temperature Item Temperature Front Door Rear Belt Moulding End Cover 20 to 30°C (68 to 86°F) Note
Do not heat the front door rear belt moulding end cover.
-
Using a moulding remover D, peel off the double-sided tape and disengage the clips to remove the front door rear belt moulding end cover as shown in the illustration.
-
Remove the protective tape.
-
-
SEPARATE FRONT DOOR WEATHERSTRIP
-
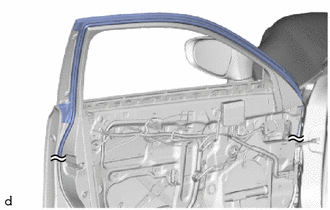
Remove the upper part of the front door weatherstrip so that the front door outside moulding sub-assembly can be removed.
-
-
REMOVE DOOR FRAME GARNISH
-
REMOVE FRONT DOOR FRONT LOWER FRAME UPPER COVER
-
REMOVE FRONT DOOR REAR WINDOW FRAME MOULDING
-
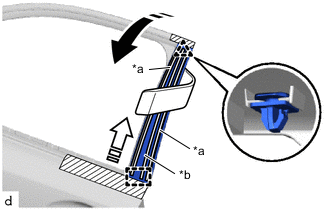
*a Double-sided Tape *b Butyl Tape Protective Tape Remove in this Direction (1) 
Remove in this Direction (2) Apply protective tape around the front door rear window frame moulding.
-
Using an infrared light, heat the front door rear window frame moulding.
Heating Temperature Item Temperature Front Door Rear Window Frame Moulding 20 to 30°C (68 to 86°F) Note
Do not heat the front door rear window frame moulding.
-
Using a moulding remover D, peel off the double sided tape and disengage the clip and guide to remove the front door rear window frame moulding as shown in the illustration.
-
Remove the protective tape.
-
-
REMOVE FRONT DOOR OUTSIDE MOULDING SUB-ASSEMBLY
-
Insert a 4.0 mm (0.157 in.) drill bit into a drill.
-
Tape the 4.0 mm (0.157 in.) drill bit 5.0 mm (0.197 in.) from the tip as shown in the illustration.
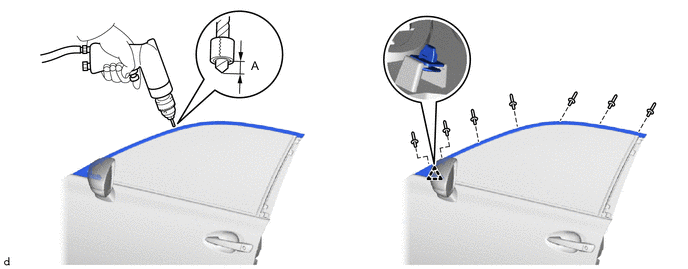
Standard Measurement Area Measurement A 5.0 mm (0.197 in.) Note
Tape the 4.0 mm (0.157 in.) drill bit to prevent the drill bit from going too deep.
-
Lightly press the drill against the rivets to drill off the rivet flanges, and remove the 7 rivets.
Note
-
Make sure to protect both the inside and outside of the vehicle as the rivet shavings will fly about.
-
Pressing the drill too firmly will cause the rivet to turn and result in the rivet not being drilled through.
-
Prying the rivets with the drill may damage the rivet installation holes or drill bit.
-
Be careful of the drilled rivets, as they may be hot.
-
-
Disengage the clip to remove the front door outside moulding sub-assembly.
-
Using a vacuum cleaner, remove the rivet fragments and shavings from the drilled areas.
-