REAR SEAT INNER BELT ASSEMBLY REMOVAL
CAUTION / NOTICE / HINT
The necessary procedures (adjustment, calibration, initialization, or registration) that must be performed after parts are removed, installed, or replaced during the rear seat inner with center belt assembly LH and rear seat inner with center belt assembly RH removal/installation are shown below.
| Replacement Part or Procedure | Necessary Procedure | Effect/Inoperative when not Performed | Link |
|---|---|---|---|
| Disconnect cable from negative battery terminal | Memorize steering angle neutral point | Parking assist monitor system | |
| LKA/LDA system | |||
| Pre-crash safety system | |||
| Adaptive high beam system | |||
| Reset power trunk lid | Power trunk lid system |
PROCEDURE
-
REMOVE REAR SEAT ASSEMBLY
-
REMOVE REAR DOOR SCUFF PLATE LH
-
REMOVE REAR DOOR SCUFF PLATE RH
Tech Tips
Use the same procedure as for the LH side.
-
REMOVE REAR SEAT SIDE GARNISH LH
-
REMOVE REAR SEAT SIDE GARNISH RH
Tech Tips
Use the same procedure as for the LH side.
-
REMOVE ROOF SIDE INNER GARNISH LH (w/ Rear Sunshade)
-
REMOVE ROOF SIDE INNER GARNISH RH (w/ Rear Sunshade)
Tech Tips
Use the same procedure as for the LH side.
-
REMOVE ROOF SIDE INNER GARNISH LH (w/o Rear Sunshade)
-
REMOVE ROOF SIDE INNER GARNISH RH (w/o Rear Sunshade)
Tech Tips
Use the same procedure as for the LH side.
-
REMOVE CHILD RESTRAINT SEAT TETHER ANCHOR COVER
-
REMOVE CENTER CHILD RESTRAINT SEAT TETHER ANCHOR COVER (w/ Center Bracket)
Tech Tips
Use the same procedure as for the child restraint seat tether anchor cover.
-
REMOVE CENTER STOP LIGHT COVER (w/o Rear Sunshade)
-
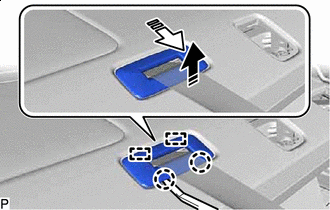
REMOVE REAR SEAT SHOULDER BELT HOLE COVER
-
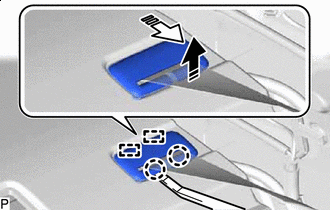

Remove in this direction (1) 
Remove in this direction (2) Using a moulding remover A, disengage the claws and guides to remove the rear seat shoulder belt hole cover as shown in the illustration.
Tech Tips
Use the same procedures as for the opposite side.
-
-
REMOVE PACKAGE TRAY TRIM PANEL ASSEMBLY (w/o Rear Sunshade)
-
Remove in this direction (1) Remove in this direction (2) Using a moulding remover A, disengage the claws and guides to remove the rear seat shoulder belt hole cover of the rear seat inner with center belt assembly LH as shown in the illustration.
-
Disengage the clips and guides to remove the package tray trim panel assembly as shown in the illustration.
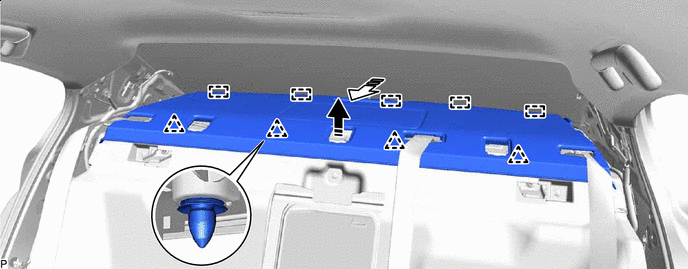
Remove in this direction (1) Remove in this direction (2)
-
-
REMOVE PACKAGE TRAY TRIM PANEL ASSEMBLY (w/ Rear Sunshade)
-
Remove in this direction (1) Remove in this direction (2) Using a moulding remover A, disengage the claws and guides to remove the rear seat shoulder belt hole cover of the rear seat inner with center belt assembly LH as shown in the illustration.
-
Disengage the clips to remove the package tray trim panel assembly as shown in the illustration.
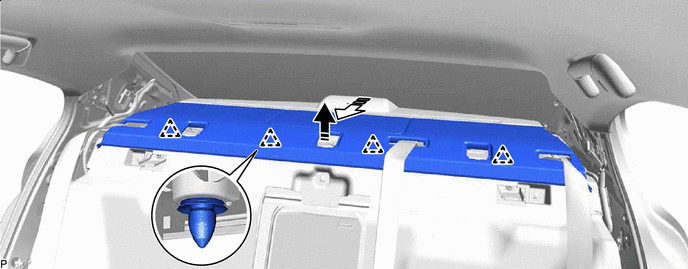
Remove in this direction (1) Remove in this direction (2)
-
-
REMOVE REAR SEAT INNER WITH CENTER BELT ASSEMBLY LH
-
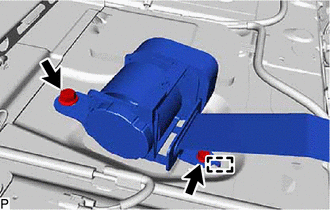
Remove the 2 bolts.
-
Disengage the guide to remove the rear seat inner with center belt assembly LH.
-
-
REMOVE REAR SEAT INNER WITH CENTER BELT ASSEMBLY RH
-
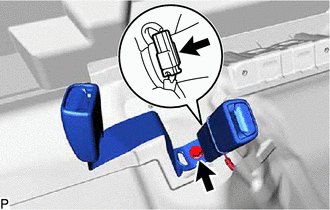
Disconnect the connector.
-
Remove the bolt and rear seat inner with center belt assembly RH
-